Contrary to generations of gardening advice, turning your soil with a fork is the single most destructive act for its health. This guide reveals how the ‘no-dig’ method works with nature, not against it, to build a self-sustaining, fertile ecosystem right under your feet, unleashing unparalleled fertility and saving your back in the process.
For generations, the image of a gardener has been synonymous with a spade in hand, diligently turning the earth. The familiar ache in the lower back after a day of digging was seen as a badge of honor, a necessary sacrifice for a bountiful harvest. We’ve been told that digging aerates the soil, relieves compaction, and helps mix in amendments. But what if this cornerstone of traditional gardening is fundamentally flawed? What if the very act we believe is helping is, in fact, shattering a delicate, living world beneath our feet?
This isn’t just about saving you from back-breaking labor, though that is a welcome side effect. This is about a paradigm shift in how we view soil. It’s not inert dirt; it’s a bustling metropolis, a complex ecosystem known as the soil food web. Every time you drive a fork into the ground, you are causing the equivalent of an earthquake, a hurricane, and a flood all at once for the trillions of microorganisms, fungi, and worms that are the true engines of fertility. The no-dig method is not a lazy shortcut; it’s a sophisticated, science-backed approach that honors this hidden world.
This article will dismantle the myths surrounding soil cultivation and reveal the powerful science behind leaving the soil undisturbed. We will explore the invisible fungal networks that act as the soil’s internet, provide a step-by-step guide to converting a patch of lawn into a thriving bed without a single turn of the spade, and show you how to measure the return of life to your garden. Prepare to become less of a laborer and more of an ecosystem custodian, guiding your garden towards a state of natural, self-sustaining abundance.
In the following sections, we will delve into the core principles of no-dig gardening, from understanding the subterranean life you’re protecting to creating a garden that feeds itself. This is your roadmap to a healthier garden and a healthier you.
Summary: The Gardener’s Guide to Working with Nature, Not Against It
- The Mycorrhizal Web: How Fungi Transport Nutrients When You Don’t Dig?
- Cardboard and Compost: How to Convert a Lawn to a Bed in One Day?
- The Compaction Myth: Does Not Digging Make Soil Hard?
- Hoeing or Pulling: Which Disturbs the Soil Web Less?
- Worm Counts: How to Measure Regeneration Success in 12 Months?
- Digging vs Top Dressing: How to Apply Amendments Without Wrecking Structure?
- Chop-and-Drop: Is It Messy or the Ultimate Fertilizer technique?
- Creating Self-Sustaining Ecosystems: How to Stop Buying Compost and Fertilizer?
The Mycorrhizal Web: How Fungi Transport Nutrients When You Don’t Dig?
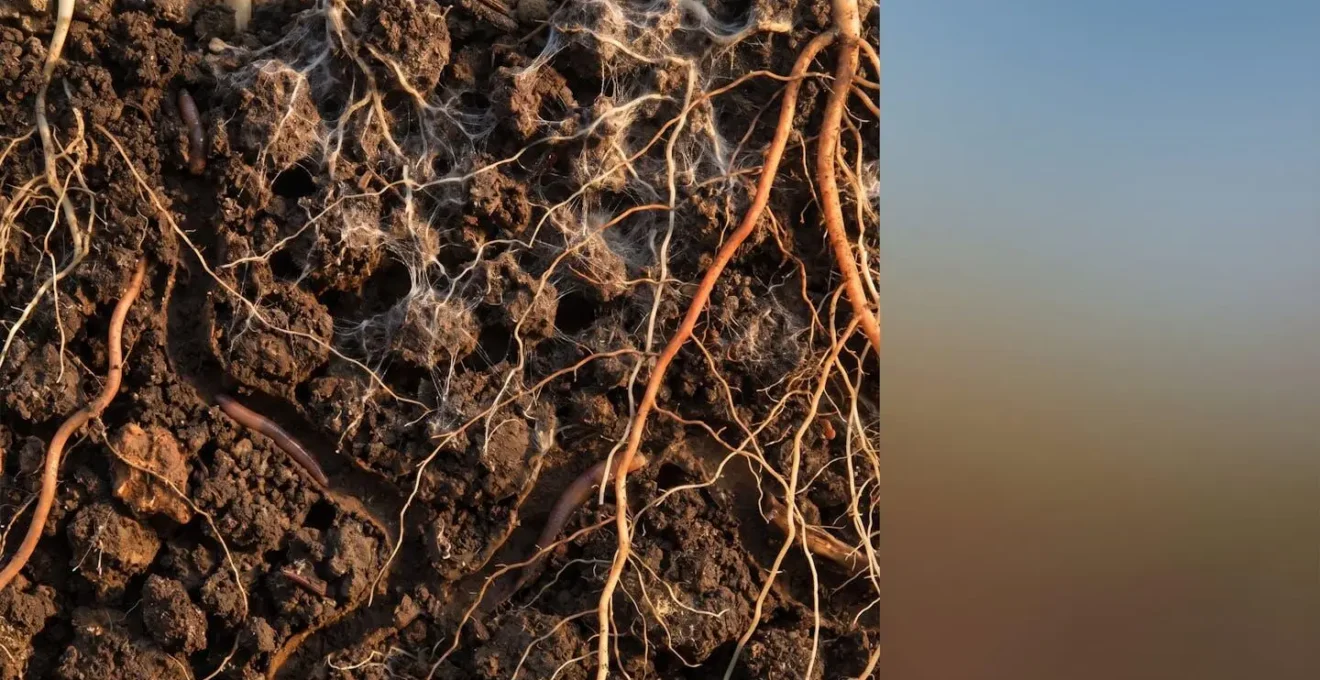
The greatest secret of a no-dig garden lies far beneath the surface, invisible to the naked eye. It’s a vast, intricate network of fungal threads known as the mycorrhizal web. This is the soil’s living internet, and digging is the equivalent of severing all its data cables. When you leave the soil undisturbed, you allow this incredible natural system to flourish. Scientists have discovered that a staggering 80-90% of all land plant species form a symbiotic relationship with these fungi, a partnership that has evolved over millions of years.
This partnership is a beautiful exchange. The plant, through photosynthesis, creates sugars (carbohydrates) and sends a portion down to its roots to feed the fungi. In return, the fungal hyphae, which are far finer than the tiniest plant roots, extend deep into the soil. They mine for essential nutrients like phosphorus and nitrogen and transport them, along with water, directly back to the plant. This network doesn’t just connect one plant to the soil; as shown in research on Common Mycorrhizal Networks (CMNs), it connects multiple plants, even of different species. This allows them to share resources and even send warning signals about pests or diseases. A dug garden constantly breaks this ancient communication system, forcing plants to fend for themselves.
By not digging, you become a protector of this web, fostering a cooperative ecosystem where plants help each other thrive, dramatically reducing the need for artificial fertilizers.
Cardboard and Compost: How to Convert a Lawn to a Bed in One Day?
The idea of starting a new garden bed often conjures images of back-breaking work: stripping sod, tilling the ground, and removing every last weed. The no-dig method flips this on its head, using a technique called « sheet mulching » or « lasagna gardening » to create a fertile bed right on top of an existing lawn or weedy patch. This process smothers the unwanted growth while simultaneously building rich, new topsoil. It’s an elegant solution that works with biological decomposition, not against it.
The core components are simple: cardboard and compost. The cardboard acts as a light-proof barrier, killing the grass and weeds below by blocking sunlight, while attracting earthworms who love the dark, moist conditions. As they work, they begin to break down the cardboard and aerate the soil beneath. The thick layer of compost on top serves two purposes: it provides an instant planting medium for shallow-rooted plants and acts as a slow-release source of nutrients that will feed the soil food web for months to come. Research shows that cardboard can fully decompose in as little as 2 to 6 months under moist conditions, transforming into valuable organic matter.
Your Action Plan: From Lawn to Garden Bed via Sheet Mulching
- Shape It: Use a hose or rope to outline your desired bed shape directly on the lawn. No need to remove the turf.
- Edge It (Optional): For a neat look, create a V-shaped edge, 4-6 inches deep, around the perimeter. This contains the mulch.
- Mulch It: Lay down corrugated cardboard, removing all plastic tape. Overlap pieces by 8-10 inches to ensure no light gets through. Wet the cardboard thoroughly as you go.
- Layer It: Add a generous layer of organic mulch—at least 4-6 inches of compost, well-rotted manure, or leaf mold—directly on top of the wet cardboard. Water this layer as well.
- Wait (or Plant): For deep-rooted plants, wait 4-6 months for decomposition. For shallow-rooted annuals like lettuce or squash, you can plant directly into the compost layer immediately.
This single-day project sets in motion a months-long process of soil creation, all while you relax and let nature’s decomposers do the heavy lifting.
The Compaction Myth: Does Not Digging Make Soil Hard?
One of the most persistent arguments against no-dig gardening is the fear of soil compaction. It seems logical: if you don’t regularly « fluff up » the soil with a fork, won’t it eventually become a hard, impenetrable brick? This is perhaps the biggest misconception, and the reality is the exact opposite. Digging is a temporary fix that ultimately destroys the very things that prevent compaction naturally: stable soil aggregates and a network of living tunnels.
In an undisturbed soil, an entire ecosystem of engineers is at work. Earthworms, beetles, and other organisms constantly burrow through the ground, creating permanent channels for air and water. Old plant roots die and decompose in place, leaving behind more pathways. The sticky exudates from bacteria and the fine web of fungal hyphae act as a natural glue, binding tiny soil particles together into spongy, stable crumbs called aggregates. This is what creates a true, resilient « biostructure ». Digging shatters these aggregates and collapses the worm tunnels, creating a temporary fluffiness that quickly settles into a denser, less-structured layer after rain. Scientific research using the Proctor Density Test has showed non-root-limiting bulk density at 1.40 g/cm³ for no-till soils, whereas tilled soils can reach root-limiting compaction at 1.65 g/cm³.
Case Study: Charles Dowding’s 7-Year Dig vs. No-Dig Trial
To provide definitive proof, no-dig pioneer Charles Dowding conducted a long-term experiment. He maintained two identical beds, applying the same amount of compost each year. One was dug annually, the other was left undisturbed (no-dig). Over seven years, the results were conclusive. The no-dig bed produced a total of 728.46 kg of vegetables, while the dug bed yielded only 656.37 kg—an 11% lower yield. More importantly, soil analysis showed the no-dig soil had far greater biodiversity and stronger, larger aggregates, proving its superior structure and resilience against compaction.
Walking on your beds should still be minimized, but the fear that soil will turn to concrete without your intervention is unfounded. Nature, when left alone, is a far superior architect of soil structure.
Hoeing or Pulling: Which Disturbs the Soil Web Less?
Even in the most well-mulched no-dig garden, a few weeds will inevitably appear. How you deal with them is critical. The goal is always to cause the least possible disturbance to the soil surface and the precious web of life just beneath it. This brings up a common debate: is it better to pull weeds out by the root or to slice them off with a hoe? While pulling a large weed can feel satisfying, it’s a miniature version of digging, creating significant disruption.
Pulling a weed, especially one with a deep taproot, rips a hole in the soil, damaging the mycorrhizal network and exposing dormant weed seeds to the light and air they need to germinate. Hoeing, when done correctly, is a far more surgical approach. The key is to use a sharp hoe (a stirrup or oscillating hoe is ideal) to slice the weed off just at or slightly below the soil surface. This kills the weed by separating it from its root, and the root is left in the ground to decompose, adding valuable organic matter and feeding the soil microbes without any disturbance.
This method also aligns with the core principle of weed prevention in no-dig systems. By not disturbing the soil, you avoid bringing a bank of old weed seeds to the surface. As the UK’s leading organic gardening charity, Garden Organic, explains:
Digging continually brings up buried weed seeds to the surface, encouraging them to germinate.
– Garden Organic, No-dig Gardening Guide
The best time to hoe is on a dry, sunny day, so the severed weeds quickly wither on the surface, returning their nutrients to the garden as a micro-mulch.
Worm Counts: How to Measure Regeneration Success in 12 Months?
One of the most rewarding aspects of switching to no-dig is witnessing the tangible return of life to your soil. While healthier plants and fewer weeds are great indicators, the most direct way to measure the regeneration of your soil’s ecosystem is to monitor its keystone species: the earthworm. Earthworms are the gut of the soil, pulling organic matter down, creating aeration tunnels, and excreting nutrient-rich casts. A thriving worm population is a clear sign that your soil food web is healthy and functional. Studies comparing tillage systems consistently find that no-dig and no-till plots have a two to five times higher earthworm density.
You don’t need a laboratory to see this effect in your own garden. Conducting a simple « worm census » is a fun and easy project, perfect for involving the whole family. By taking a sample at the start of your no-dig journey and then again after 12 months, you’ll have concrete, personal evidence of the incredible changes happening beneath your feet. The increase in both the number and size of the worms you find can be dramatic, providing powerful motivation to stick with the method.
Here is a simple process for conducting your own family worm census:
- Extract a Soil Sample: Dig out one shovel’s worth of soil (roughly a 20cm or 8-inch cube) from a garden bed. This is the only digging you’ll do!
- Sort on a Tarp: Spread the soil onto a light-colored tarp or plastic sheet. This makes the dark-bodied worms much easier to spot.
- Count and Record: Gently sift through the soil and count every earthworm you find. Note their numbers and general sizes (small, medium, large).
- Observe Other Life: Don’t just look for worms! Record the presence of other soil heroes like centipedes, beetles, and woodlice.
- Assess the Soil: Note the soil’s color (darker is better), its smell (a healthy, earthy scent is a good sign), and how easily it crumbles into aggregates.
- Repeat and Compare: Carefully return the soil and worms to the hole. Repeat the census in the same spot every 6-12 months to track your progress.
This isn’t just counting worms; it’s a direct conversation with your garden’s ecosystem, and the news after a year of no-dig is almost always good.
Digging vs Top Dressing: How to Apply Amendments Without Wrecking Structure?
So, if you’re not digging, how do you get compost, manure, and other soil amendments into the ground where plants can use them? This is a common and valid question, but it’s based on the old, destructive paradigm. The no-dig answer is elegantly simple: you don’t. You apply all organic matter to the surface as a mulch, a technique known as top dressing. This mimics how nutrients are delivered in nature—think of leaves falling in a forest—and lets the soil’s own workforce do the incorporation for you.
When you spread a layer of compost on the soil surface, you are providing food and habitat for the entire soil ecosystem. Earthworms are the primary movers. They come up to the surface (usually at night) to pull bits of organic matter down into their burrows, effectively tilling the compost into the soil for you. As they move, their tunnels create perfect channels for air and water, and their nutrient-rich casts build incredible soil structure. Meanwhile, a host of microorganisms, from bacteria to fungi, begin the process of decomposition right on the surface, slowly releasing nutrients that wash down to the plant roots with every rainfall.
This method of « feeding from the top » is the core of no-dig fertility. As Wikipedia’s entry on the topic summarizes, the process relies entirely on natural incorporation:
Organic matter such as well rotted manure, compost, leaf mold, spent mushroom compost, old straw, etc., is added directly to the soil surface as a mulch at least 5-15 centimeters deep, which is then incorporated by the actions of worms, insects and microbes.
– Wikipedia, No-dig gardening article
By top dressing, you’re not just adding nutrients; you’re feeding the very ecosystem that creates a self-sustaining, fertile, and well-structured soil for years to come.
Key Takeaways
- Digging shatters the soil’s natural structure and destroys the vital mycorrhizal fungal network.
- No-dig relies on top-dressing with organic matter, letting worms and microbes build superior soil structure (biostructure).
- The method effectively suppresses weeds, improves water retention, and creates a resilient, self-sustaining garden ecosystem.
Chop-and-Drop: Is It Messy or the Ultimate Fertilizer technique?
As you advance on your no-dig journey, you can begin to create fertility right where it’s needed using a technique called « chop-and-drop. » The concept is brilliantly simple: instead of removing plant debris, you chop it up and let it decompose directly on the soil surface. This can be the leaves of harvested vegetables, the trimmings from perennial plants, or even specific « dynamic accumulator » plants grown just for this purpose, like comfrey or borage. To some, this might look messy, a departure from the « clean » look of a conventional garden. But from an ecological perspective, it’s the ultimate in efficient, closed-loop fertilizing.
Every leaf and stem is a package of nutrients that the plant drew from your soil. When you remove them, you are exporting that fertility. When you chop-and-drop, you are returning it. The decomposing plant matter forms a natural mulch that protects the soil surface, conserves moisture, and provides a slow-release feast for the soil food web. Earthworms and other decomposers will quickly get to work, pulling the material into the soil and converting it back into plant-available nutrients. This process also contributes to a more balanced and resilient soil ecosystem, as noted by no-dig experts.
As Charles Dowding, a leading practitioner, suggests, this undisturbed environment fosters a healthier balance of soil life:
No-dig systems are said by practitioners such as Charles Dowding to be freer of pests and disease, possibly due to a more balanced soil population being allowed to build up in this undisturbed environment, and by encouraging the buildup of beneficial rather than harmful soil fungi.
– Charles Dowding, as cited in gardening literature
What may seem « messy » to the untrained eye is, in fact, a sign of a highly functional, self-fertilizing garden ecosystem hard at work.
Creating Self-Sustaining Ecosystems: How to Stop Buying Compost and Fertilizer?
The ultimate goal of the no-dig philosophy is to move beyond simply practicing a technique and to begin cultivating a truly self-sustaining garden ecosystem. This is a system that largely feeds and waters itself, where the fertility you harvest in your vegetables is continuously replenished by the garden’s own internal processes. It means gradually weaning your garden off external inputs like bagged compost and bottled fertilizers, closing the nutrient loop and creating a resilient, low-effort paradise.
Achieving this state of garden autarky involves combining all the principles we’ve discussed. It starts with a fanatical devotion to protecting the soil food web. It continues with on-site composting of all kitchen scraps and garden waste, turning « waste » into « black gold. » It evolves with the integration of chop-and-drop mulching, dynamic accumulator plants, and perhaps even cover crops. Each element works in synergy, building organic matter year after year, which in turn improves water retention, nutrient cycling, and overall soil health. This isn’t a fantasy; highly productive market gardens operate on this principle, generating significant income with minimal external inputs. Case studies of Charles Dowding’s garden demonstrate that it’s possible to generate over £35,000 of produce annually from a 1,600m² no-dig system.
Here’s how you can start building your own closed-loop family garden system:
- Master Home Composting: Collect all kitchen scraps (vegetable peels, coffee grounds) and garden clippings. Layer these « greens » (nitrogen) with « browns » (carbon) like dried leaves or cardboard.
- Maintain Your Pile: Keep the compost heap as moist as a wrung-out sponge and turn it occasionally to aerate and speed up decomposition.
- Harvest and Apply: After 6-12 months, your finished compost will be dark and earthy. Apply it as an annual top dressing to your beds.
- Practice Chop-and-Drop: Leave non-diseased plant debris directly on the beds to decompose in place.
- Save Your Own Seeds: Close the final loop by saving seeds from your healthiest, most productive plants, adapting your crops to your garden’s specific microclimate.
By shifting your role from a laborer who imposes their will on the soil to an ecosystem custodian who nurtures its inherent intelligence, you can create a garden that not only produces abundant food but also becomes a source of profound ecological satisfaction.