In summary:
- Root rot is a medical emergency for your plant, caused by root suffocation (asphyxiation), not just overwatering.
- Immediate diagnosis involves a multi-sensory check: if the soil smells sour or roots are brown and mushy, it’s time for surgery.
- Root surgery is non-negotiable: you must decisively trim all infected tissue with sterilized tools to stop the spread.
- A diluted hydrogen peroxide drench acts as emergency first aid, delivering a vital blast of oxygen to suffocating roots and killing anaerobic bacteria.
- Recovery requires an « ICU » phase: reduced watering, no fertilizer, and gentle light to allow the compromised root system to heal.
It’s a sight that causes panic in any plant parent: leaves are yellowing, drooping, and wilting, but when you touch the soil, it’s damp, even wet. Your instinct is to water a wilting plant, but in this case, that’s the most fatal mistake you can make. This contradiction is the classic, terrifying symptom of root rot, a silent killer that works below the surface. Many guides will tell you to « avoid overwatering » or « ensure good drainage, » but that advice is for prevention, not for a patient in critical condition.
When your plant is wilting while wet, you’re past prevention. You’re in an emergency situation. The problem isn’t just water; it’s a lack of oxygen. The roots are, quite literally, suffocating. But if the real issue is root asphyxiation, what if the key isn’t just to stop watering, but to perform an active, life-saving intervention? This isn’t a gardening task; it’s a paramedic’s rescue mission. Your plant is a patient, and you need to act with the urgency of a first responder.
This guide provides that emergency protocol. We will move beyond simple tips to give you a step-by-step triage and treatment plan. You will learn to diagnose the severity of the rot, perform the necessary root surgery, administer a hydrogen peroxide « oxygen blast » as critical first aid, and manage the delicate post-operative recovery phase. It’s time to scrub in.
To navigate this emergency procedure effectively, this guide is structured to take you from initial diagnosis to long-term recovery. The following sections break down each critical step of the plant rescue mission.
Contents: A Guide to Emergency Plant Rescue
- The Sniff Test: What Does Healthy Soil Smell Like vs Rot?
- Surgery for Plants: How to Trim Rotted Roots to Save the Specimen?
- The Decorative Pot Trap: Why Cover Pots Cause 50% of Houseplant Deaths?
- Chemical Drenches: Do They Work Once Rot Has Started?
- Recovery Mode: How to Water a Plant With Half a Root System?
- How to Check Roots Without Killing the Plant?
- Compaction or Grading: Why is Water Pooling in the Middle?
- Correcting Land Grading to Stop Lawn Waterlogging in Winter
The Sniff Test: What Does Healthy Soil Smell Like vs Rot?
Your first step as a plant paramedic is triage. You must accurately diagnose the problem before you can treat it. Forget what the leaves look like for a moment; the most crucial vital signs are in the soil. Healthy soil has a rich, pleasant, earthy smell, often described as what a forest smells like after it rains. This scent is from a compound called geosmin, produced by healthy microbes. In contrast, soil with root rot gives off a distinctly foul odor. It might smell musty like a damp basement, or in severe cases, like rotten eggs. This is the smell of hydrogen sulfide, a gas produced by anaerobic bacteria thriving in the oxygen-deprived, waterlogged environment.
This diagnostic process should engage multiple senses to confirm the diagnosis. A comprehensive check is your most reliable tool, as research from the National Gardening Association reveals that over 30% of container plant failures are linked to root-level issues like rot. Don’t be afraid to get your hands dirty; it’s a medical examination.
Here is a multi-sensory diagnostic checklist to perform your initial assessment:
- Smell Test: Healthy soil smells earthy (geosmin). Rotting soil smells musty, sour, or like rotten eggs (hydrogen sulfide). This is your primary indicator.
- Visual Check: Look at the roots if they are visible. Healthy roots are typically firm and white or light tan. Rotted roots appear soft, fragile, and are colored brown to black.
- Touch Test: Feel the soil. A healthy medium is crumbly and slightly moist. A waterlogged soil will feel heavy, muddy, and clump together, indicating poor oxygen exchange.
- Sound Test: Gently tap the outside of the pot. A hollow, resonant sound suggests well-aerated soil. A dull, heavy thud indicates a dense, waterlogged soil mass.
If the sniff test is positive and other signs point to rot, you have confirmed a life-threatening condition. It is time to prepare for immediate surgical intervention.
Surgery for Plants: How to Trim Rotted Roots to Save the Specimen?
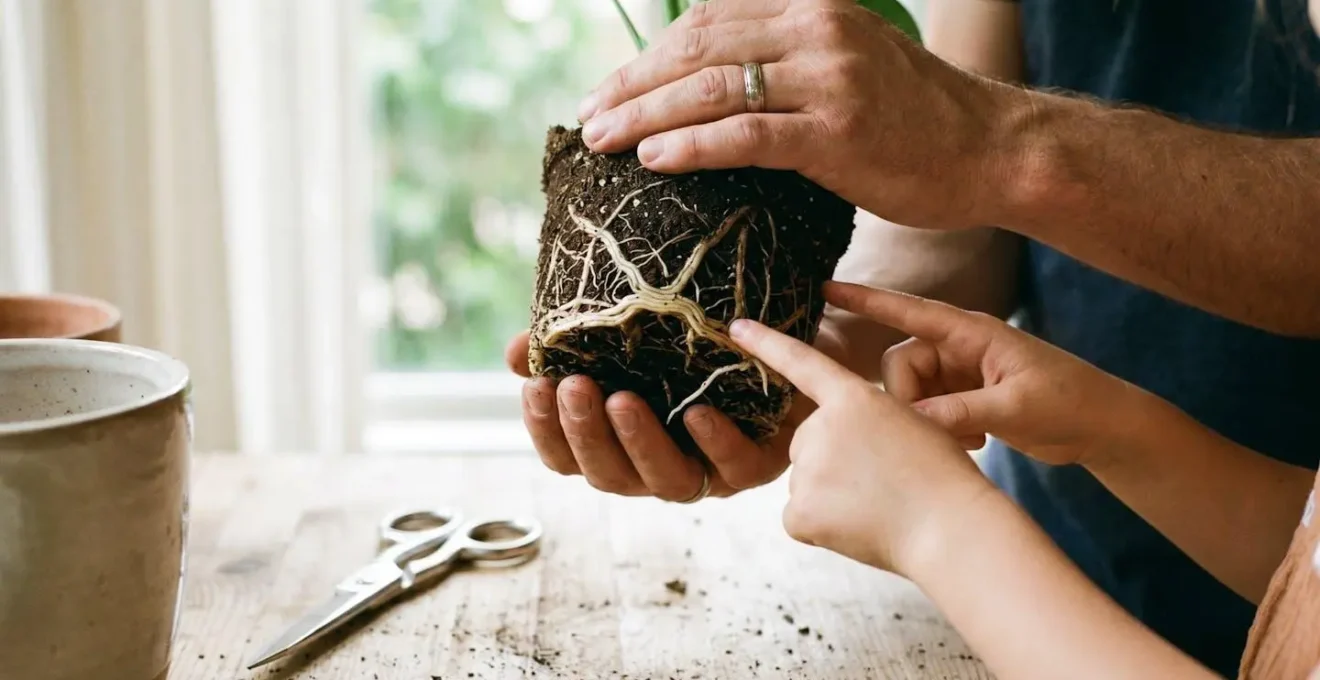
Once you’ve diagnosed advanced root rot, there is no time to waste. This is the surgical phase of the rescue. You must physically remove the dead and dying tissue to stop the « infection » from spreading to the healthy parts of the root system. Think of it less like pruning and more like a surgeon excising a gangrenous limb. Timidity is your enemy here; being decisive and thorough is the only way to give your patient a chance at survival. You will need a clean workspace, a sharp pair of scissors or shears, and a commitment to making the tough cuts.
Before you begin, sterilize your cutting tool. Wiping the blades with rubbing alcohol is a quick and effective method. This prevents you from introducing new pathogens to the already stressed plant. Gently remove the plant from its pot and wash away the soil to get a clear view of the entire root system. This is where you’ll see the stark contrast between life and death.
As you can see, healthy roots are firm and white, while the rotted sections are dark, mushy, and may even fall apart in your hands. Using your sterilized shears, you must trim away every single piece of dark, soft root. Cut slightly into the healthy tissue just above where the rot ends to ensure you’ve removed all the affected area. This may feel brutal, especially if a large portion of the root ball is affected, but it’s the only path to recovery.
Case Study: The « Bad Spot on the Apple » Analogy
In a documented recovery process for a severely rotted houseplant, the key to success was decisive action. The owner reported feeling hesitant to remove what seemed like a large portion of the roots. The turning point was using the analogy of cutting a bad spot off an apple—you have to cut a bit of the good part to make sure you get all the rot. This mindset shift led to the removal of nearly 50% of the root system. The plant was then repotted in fresh, dry soil. While it looked stressed for a week, it soon began to produce new, healthy leaves. This successful case shows that being aggressive in trimming dead tissue is better than being timid, as it gives the remaining healthy roots the oxygen they need to regenerate.
The Decorative Pot Trap: Why Cover Pots Cause 50% of Houseplant Deaths?
After performing surgery, it’s critical to identify the root cause of the trauma. In an astonishing number of cases, the culprit is hiding in plain sight: the beautiful, stylish decorative pot. These pots, often made of ceramic or metal without drainage holes, are a death trap. When you place a nursery pot inside a decorative « cover pot, » you create a reservoir. Excess water from watering drains out of the nursery pot and pools at the bottom of the cover pot, submerging the roots in a stagnant swamp. This is the perfect breeding ground for the anaerobic bacteria that cause root rot. The plant’s feet are constantly wet, and the roots cannot breathe.
This single, common decorating choice is one of the biggest silent killers of indoor plants. As garden expert Lee Burkhill of Garden Ninja states, it’s a fundamental error:
improper drainage kills more container plants than practically any other factor
– Lee Burkhill, Garden Ninja: Do pots need drainage holes?
To prevent this from ever happening again, you must modify your potting strategy. The goal is to get the aesthetic benefit of a decorative pot without creating a drowning hazard. Fortunately, there are several effective and family-friendly ways to achieve this, though some common « hacks » are dangerously ineffective.
This comparative table from a recent analysis on container drainage mistakes breaks down the most common solutions, highlighting what works and what to avoid.
| Solution Method | Family-Friendly Level | Effectiveness | Key Benefit |
|---|---|---|---|
| Drill drainage holes in ceramic pot | Adult DIY project | High | Permanent fix, allows direct planting |
| Nursery pot inside decorative cover | Child-safe, no tools | High | Easy to remove for watering, inspect roots |
| Layer of rocks in bottom | Simple setup | Low (not recommended) | Creates perched water table, worsens drainage |
| Safety gap with upside-down saucer | Creative, educational | Medium | Elevates plant above water pooling zone |
| Mesh or coffee filter over holes | Quick household fix | High | Prevents soil loss while allowing water flow |
The key takeaway is to never let the plant sit in standing water. Always empty the decorative pot’s saucer or reservoir about 30 minutes after watering.
Chemical Drenches: Do They Work Once Rot Has Started?
With the rotted tissue removed and the potting situation corrected, we can now administer first aid. This is where hydrogen peroxide (H2O2) enters our emergency protocol. It is crucial to understand that hydrogen peroxide is not a magical cure for root rot; the surgery you already performed is the cure. Instead, think of H2O2 as an emergency oxygen mask for a suffocating patient. When H2O2 comes into contact with organic material in the soil, it breaks down into water (H2O) and a free oxygen molecule (O). This reaction does two things: it provides an immediate blast of oxygen to the struggling roots and creates an environment hostile to the anaerobic bacteria that caused the rot in the first place.
For this emergency application, you must use a diluted solution. The standard is a 3% hydrogen peroxide solution, which is the common brown bottle found in any pharmacy. Do not use higher concentrations as they can damage the plant. The dilution ratio is critical; studies on soil remediation demonstrate that a 1:3 ratio of 3% H2O2 to water is effective without being overly harsh. For example, mix one cup of 3% hydrogen peroxide with three cups of water. Use this solution to thoroughly drench the soil of the repotted plant one time, allowing it to drain completely.
Many home remedies are touted online for root rot, but most are preventative at best and ineffective once rot has established itself. This table helps separate fact from fiction for these common household treatments.
| Remedy | What It Actually Does | Effectiveness | Family Safety |
|---|---|---|---|
| Hydrogen Peroxide (3%) | Releases oxygen, kills anaerobic bacteria, provides emergency oxygen blast | Moderate – First aid, not cure | Safe when diluted; breaks down into water + oxygen |
| Cinnamon powder | Mild surface-level fungicide with antimicrobial properties | Low – Prevention only | Very safe, food-grade spice |
| Chamomile tea | Gentle antifungal for seedlings, contains natural compounds | Very Low – Preventative | Completely safe, edible |
| Bleach solution | Strong sterilizer, kills all microbes including beneficial ones | Moderate – Harsh intervention | Toxic – Adult use only, avoid pets/kids |
The verdict is clear: while other remedies have minor preventative roles, only hydrogen peroxide provides the immediate, life-saving oxygen intervention required in a root rot emergency.
Recovery Mode: How to Water a Plant With Half a Root System?
Your patient has survived surgery and received emergency oxygen. Now comes the most delicate phase: recovery. The plant is in the Intensive Care Unit. Its root system has been drastically reduced, meaning its ability to absorb water and nutrients is severely compromised. Your care routine must adapt to this weakened state. The biggest mistake is to treat it like a healthy plant. Force-feeding a patient with a damaged digestive system will only cause more harm. The key is to provide gentle support and allow the plant to heal itself.
Watering is the most critical element. With half a root system, the plant needs far less water than before. The soil must be allowed to dry out significantly between waterings to prevent a relapse of rot. A great technique during this phase is bottom watering. This allows the plant to « drink » only what it needs, encouraging the remaining roots to grow downwards in search of moisture without saturating the entire soil column.
As shown, this minimalist setup allows for a controlled and gentle rehydration. In addition to careful watering, the plant’s environment needs to be stable and low-stress. This means no direct, harsh sunlight which increases water demand, and absolutely no fertilizer, which can burn the fragile, healing roots. Patience is your most important tool during this 2-4 week critical window.
Your Action Plan: Plant ICU Post-Surgery Care Protocol
- Water Less Frequently: Wait until the top 2 inches of soil are completely dry. The reduced root system absorbs far less water, so you must prevent re-rot.
- No Fertilizer for 1 Month: Do not force-feed a patient. Damaged roots cannot process nutrients, and fertilizer salts will burn the weakened tissue.
- Provide Gentle Indirect Light: Move the plant away from harsh, direct sun. Bright, indirect light reduces water demand while still allowing photosynthesis for energy production.
- Use Bottom Watering: Place the pot in a shallow saucer with 1 inch of water for 10-15 minutes. The plant will absorb what it needs, encouraging downward root growth.
- Monitor Daily, Touch Rarely: Observe leaf condition and soil moisture from a distance. Avoid unnecessarily disturbing the plant during its critical 2-4 week recovery.
How to Check Roots Without Killing the Plant?
A key part of recovery and future prevention is monitoring root health. But the act of unpotting a plant to check its roots is invasive and stressful, especially for a patient in recovery. So, how do you check on your plant’s vital signs without causing more trauma? The goal is a quick, non-invasive « wellness check. » The most effective method is the « Gentle Squeeze & Slide » technique, which should take no more than 30 seconds from start to finish. This is only for plants in flexible nursery pots, which is another strong argument for using them inside your decorative pots.
The process is straightforward and minimizes disturbance:
- Prepare Your Station: Lay down some newspaper. This is a quick check-up, not major surgery.
- Gentle Squeeze: With both hands, gently squeeze the sides of the nursery pot. This action loosens the root ball from the pot’s walls.
- Support and Slide: Place one hand over the top of the soil, supporting the plant’s stem between your fingers. Tip the pot sideways and allow the entire root ball to slide out smoothly into your hand.
- Quick Visual Inspection: You have about 10 seconds. Look at the outer roots. Are they white and firm? Or dark and soft? Is there a foul smell? Do not pull or poke the roots.
- Slide Back In: Immediately guide the root ball back into the pot, gently tapping it on the table to settle it back in place. Your examination is complete.
For a truly non-invasive and educational approach, especially in a family setting, a different strategy can eliminate the need for these checks altogether.
Case Study: The Clear Pot Observation Method
An educational approach advocated by some garden centers transforms root health from a mystery into a visible science project. By using transparent plastic nursery pots, families can observe root development in real-time without any disturbance. Case studies from centers like Bath Garden Center show that this method allows for early detection of problems like root circling or the very first signs of rot. Children can see how roots grow, how water is absorbed, and how moisture is distributed throughout the soil, turning plant care into an engaging, preventative learning experience.
Compaction or Grading: Why is Water Pooling in the Middle?
The life-threatening principle of root asphyxiation is universal. It’s not just confined to pots. The same crisis can unfold on a much larger scale in your own yard. If you notice persistent puddles on your lawn after rain, or areas where the grass is yellow and struggling despite being wet, you’re witnessing the outdoor equivalent of a pot with no drainage. The cause is often one of two culprits: poor land grading or, more commonly, soil compaction. Over time, from foot traffic, pets playing, or heavy mowers, the soil becomes dense and compressed. The tiny air pockets that roots need to breathe are squeezed shut. Water can’t drain through, so it pools on the surface and saturates the top layer of soil, drowning the grass roots below.
This creates the exact same oxygen-deprived, anaerobic conditions that kill houseplants. Before you can treat it, you need to diagnose it. Is the water just sitting in a low spot (a grading issue), or is the soil itself refusing to drink (a compaction issue)?
Family Science: The Backyard Percolation Test
To diagnose soil compaction, the percolation (or « perc ») test is a simple, tangible science experiment perfect for families. As explained by university extensions like UMD, it makes the abstract concept of drainage visible. In the problem area, dig a hole about 12 inches deep and 6 inches wide. Fill it completely with water and start a timer. If the water drains away within 4 hours, your drainage is acceptable. If water is still standing in the hole after 4 hours, you have confirmed a soil compaction problem. This simple diagnostic proves that the enemy is the same everywhere: compacted soil that suffocates roots.
Once compaction is confirmed, the treatment involves re-introducing air into the soil. This is known as aeration. Luckily, there are several family-friendly ways to de-compact a lawn and give the grassroots a breath of fresh air.
- Lawn Acupuncture: Systematically push a garden fork 4-6 inches deep across the affected area, gently rocking it back and forth to create air channels.
- Recruit Earthworms: Introduce composting earthworms at the edges of the lawn. Their natural burrowing is a form of continuous, organic aeration.
- Top-Dress with Compost: Spread a thin layer (1/4 inch) of compost over the lawn. Microorganisms will work it into the soil, improving its structure over time.
- Create Paths: Use stepping stones to create designated paths, preventing repeated foot traffic from re-compacting the same areas.
Key takeaways
- Root rot is root suffocation; the smell of sour or musty soil is your most reliable emergency signal.
- Surgical precision is mandatory: use sterilized tools to cut away all dark, mushy root tissue, even if it means removing a significant portion.
- Hydrogen peroxide (3% diluted 1:3 with water) is a one-time emergency first aid, not a cure. Its purpose is to deliver an immediate oxygen blast to surviving roots.
Correcting Land Grading to Stop Lawn Waterlogging in Winter
You’ve performed the emergency interventions. You’ve diagnosed and treated the immediate crisis, both in your pots and in compacted areas of your lawn. The final step in this paramedic’s protocol is establishing a long-term wellness plan to ensure the trauma never repeats. For outdoor spaces, especially in regions with wet winters, this means addressing the fundamental landscape flaw: poor grading. If water naturally flows to and collects in a low spot on your property, you will be fighting a constant battle against waterlogging. Correcting the land grading is the ultimate preventative cure.
While hiring a landscaper to professionally re-grade a yard is the most direct solution, it can be costly. However, there are highly effective and aesthetically pleasing strategies that work *with* the water instead of just fighting it. One of the best solutions is to create a dry creek bed or a rain garden. These are intentionally designed landscape features that turn a problem area into a beautiful, functional asset. A dry creek bed is a shallow trench filled with river rocks that channels excess water away from the low spot to a place where it can safely drain. A rain garden is a planted depression that uses water-loving native plants to absorb and process the excess runoff.
These natural drainage solutions are not just functional; they create habitat for pollinators and add visual interest to your yard. Instead of a muddy, yellow patch of lawn, you have a purposeful garden feature. The « thirsty plants » strategy is key to making this work.
- Select Water-Loving Natives: Choose plants like Blue Flag Iris or Cardinal Flower that are naturally adapted to wet feet and will thrive in the damp conditions.
- Create a Rain Garden: Transform the lowest spot into an intentional garden feature designed to capture and absorb water.
- Plant in Clusters: Group thirsty plants together in the wet zones. Their combined root systems act as a powerful living drainage system, pulling massive amounts of water from the soil.
By implementing these long-term solutions, you move from a reactive, emergency-based mindset to a proactive, holistic one. You’re not just saving one plant; you’re creating a resilient ecosystem.
Now that you are equipped with the full emergency protocol, from diagnosis to long-term rehabilitation, the next step is to put this knowledge into practice. Begin by confidently assessing your plants, both indoor and out, and take decisive action at the first sign of trouble.