In summary:
- A waterlogged lawn is a structural failure, not a gardening problem. Fixing it requires groundwork, not just lawn care.
- Diagnose the core issue first: is it surface compaction from foot traffic or an incorrect ground slope (grading)?
- Engineered solutions like French drains and correctly sized rain gardens are essential tools to actively manage and redirect heavy water flow.
- Never work on wet soil, and always plan drainage to flow away from your house and not cause problems for your neighbours.
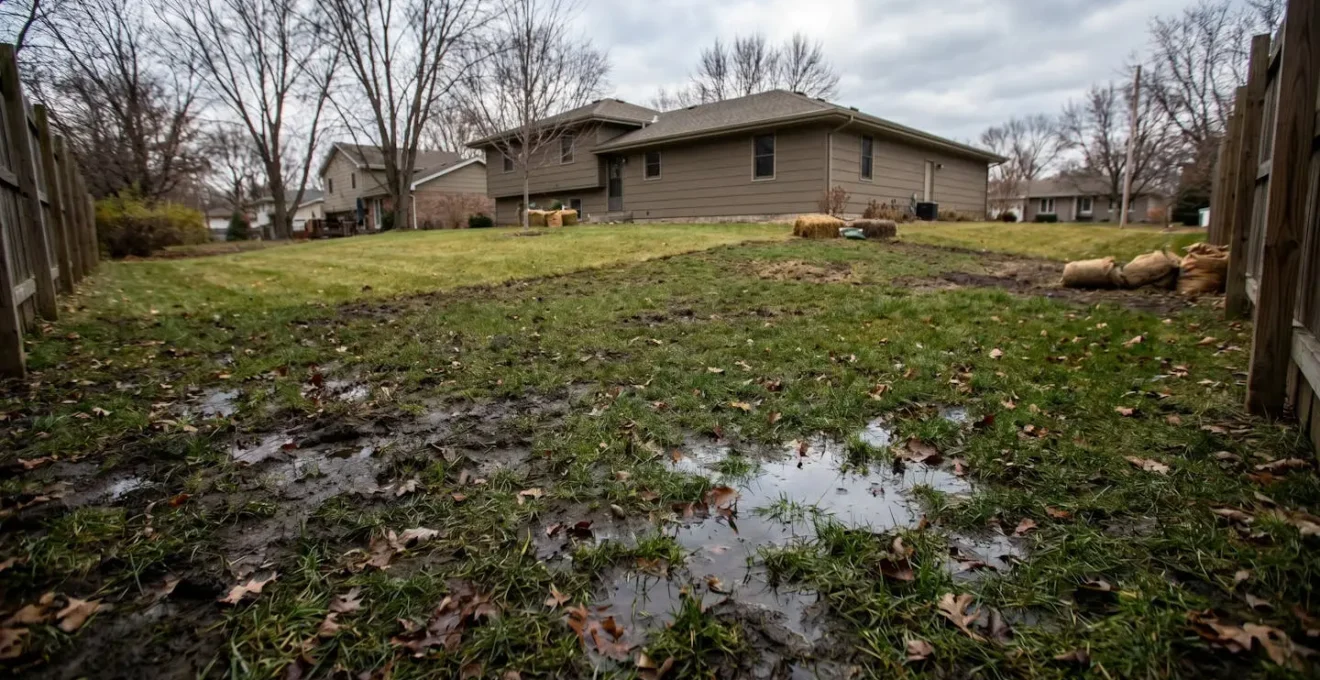
That sinking feeling you get when you look out at the lawn isn’t just in your gut; it’s right there in your garden, under several inches of standing water. Every winter, it’s the same story: a green lawn turns into a brown, squelching bog. The kids’ boots are permanently caked in mud, and you’ve abandoned all hope of stepping outside without sacrificing a good pair of shoes. You’ve probably heard the usual advice – spike it with a fork, throw some sand on it, hope for a dry spell. This is symptom management, and it never works long-term.
The truth is, a chronically waterlogged garden isn’t a turf problem; it’s a structural failure. The ground itself isn’t doing its job. Water isn’t moving, and the soil is either sealed shut or shaped all wrong. To fix it for good, you have to stop thinking like a gardener and start thinking like a groundworker. It’s about understanding the physics of water, the structure of your soil, and putting in the foundational work that solves the problem from the bottom up. We’re not just patching the surface; we’re re-engineering the way your garden handles water.
This guide will walk you through the essential groundwork principles. We’ll start with the fundamental rules of slopes, dig into the proper construction of drains, and diagnose the real reason water is pooling. Then, we’ll explore how to build systems that not only get rid of water but harness it, turning a winter liability into a year-round asset. Read on to discover the structural solutions for reclaiming your lawn.
Contents: A Structural Guide to Fixing Your Boggy Lawn
- What is the Minimum Gradient Needed to Shed Water off a Patio?
- French Drains: How to Install One to Dry Out a Boggy Lawn?
- The Grading Mistake That Floods Your Neighbour’s Property
- Compaction or Grading: Why is Water Pooling in the Middle?
- When to Grade Soil: Avoiding Structure Damage in Wet Weather
- How to Lay Paving on Sand to Prevent Sinking and Cracking?
- How Big Should Your Rain Garden Be to Handle Roof Runoff?
- How to Build Rain Gardens to Handle British Storm Surges?
What is the Minimum Gradient Needed to Shed Water off a Patio?
Before we dig into the soft ground of the lawn, let’s start with the hard surfaces. The principles of moving water are clearest here. A patio, driveway, or path that pools water is a clear sign of a grading failure. Water is lazy; it won’t move without a push. That push comes from gravity, and we create it with a slope, or ‘fall’. Trying to make a surface perfectly flat is a rookie mistake that guarantees you’ll have a puddle problem. You need to build in a deliberate, consistent gradient to tell the water exactly where to go.
The rule of thumb is straightforward and non-negotiable for any impermeable surface. For effective drainage, you need a minimum fall. The standard requirement is a 2% grade, which translates to a drop of 1/4 inch for every foot of run. So, for a patio that is 12 feet wide, you need it to be 3 inches lower on the drainage side than on the house side. This might not sound like much, but it’s the difference between a dry, usable space and a slick, mossy ice rink in winter.
This gradient must be directed away from your house’s foundation—no exceptions. The goal is to move water away from critical structures and towards a suitable drainage point, like a lawn area, a flower bed designed to take water, or a purpose-built drain. Getting this simple measurement wrong is the root cause of countless damp issues in homes. It’s foundational physics: give water a clear, downhill path, and it will follow it every time.
Mastering this basic principle of fall on hardscaping is the first step to understanding how to manage water across your entire property.
French Drains: How to Install One to Dry Out a Boggy Lawn?
When your lawn is so saturated that grading alone won’t solve it, you need to give the water an escape route. A French drain is exactly that: an underground highway for water. It doesn’t just skim water off the surface; it intercepts and removes excess water from deep within the soil profile, tackling the root cause of a boggy lawn. It’s not just a ditch filled with gravel; it’s an engineered system that, when built correctly, can transform a swamp into usable ground.
The key to a successful French drain lies in its construction—the specific layers and materials that work together to collect and transport water efficiently. A poorly built one will clog with silt and fail within a few seasons. A correctly built one is a permanent solution.
The structure shown above is critical. The geotextile fabric is the most important, yet most often forgotten, element. It acts as a filter, letting water in but keeping the fine soil particles out, which prevents the system from silting up. The large, coarse stone creates maximum void space for water to move quickly, and the perforated pipe at the very bottom acts as the main conduit to carry it all away. Note the pipe holes face downwards; this allows water to fill the bottom of the pipe first, carrying away silt and debris as it flows, effectively self-cleaning the system.
Here’s the groundworker’s method for installing a French drain that lasts:
- Mark the path for your drain with stakes and string, ensuring you create a consistent, gentle slope for the entire run—aim for a 1-inch drop for every 8 feet.
- Hire a trenching machine for a day. It minimizes the time the trench is open, which is a safety essential if you have children or pets.
- Dig your trench roughly 18 inches wide and 24 inches deep. Pile the excavated soil on a tarp away from the edge to keep the area clean and prevent it from falling back in.
- Line the entire trench with non-woven geotextile fabric, leaving at least 10 inches of excess fabric on each side to wrap over the top later.
- Place your perforated pipe directly on the fabric at the bottom of the trench—not on a bed of gravel. This ensures it’s at the lowest possible point to collect water.
- Fill the trench with large, angular, crushed stone (1.5-inch minimum size). Avoid rounded « pea gravel, » as it has less void space and can shift over time.
- Once filled, wrap the excess geotextile fabric over the top of the stone like a burrito. This completely encases the drainage system, protecting it from silt from above. You can then top it with a layer of soil and turf.
Finally, think about the outlet. Instead of an ugly pipe sticking out of the ground, consider terminating the drain into an attractive dry creek bed made with river rock or a purpose-built soakaway pit, turning a utility into a garden feature.
The Grading Mistake That Floods Your Neighbour’s Property
Your goal is to solve your water problem, not to make it your neighbour’s. The single biggest and most common grading mistake is to mindlessly slope your land so that all your excess water is directed straight onto the adjacent property. This isn’t just inconsiderate; in many areas, it’s illegal. You are responsible for managing the water on your land. Simply diverting a concentrated flow of water towards a neighbour’s foundation, patio, or low-lying garden bed is a recipe for disputes and potential legal action.
Before you move a single shovelful of dirt, you must understand where the water will go. The « talk first, dig later » philosophy is key. Proactive communication is a professional’s best tool. Approach your neighbour before the project starts, explain what you’re planning, and show them how you’re ensuring the water will be managed responsibly. Often, a collaborative approach like a shared swale (a shallow, wide, vegetated channel) along the property line or a joint soakaway can benefit both properties and prevent conflict.
To avoid causing issues, you need to physically test your plan. Don’t just guess where the water will flow; make it show you. A simple hosepipe test can save you a world of trouble.
Here is a water flow visualization test you must perform before any major grading work:
- On a dry day, use stakes and brightly coloured spray paint to mark out the high and low points of your proposed new grade.
- Run a garden hose to the highest point of your planned slope. To make the flow obvious, you can add a few drops of food colouring to the water in a watering can and pour that at the start point.
- Slowly release water and watch its exact path. Don’t flood the area; you want to simulate a steady, heavy rain.
- Take photos and make notes. Where does the water go? Does it head for a property line? Does it pool against your neighbour’s fence or, worse, head toward their foundation?
- Carefully check if the water is flowing towards vulnerable areas on your neighbour’s property, such as their garden beds, patio, or existing low spots.
- If you see a problem, adjust your grading plan now. This is the time to add a French drain, a swale, or a rain garden to intercept that water before it leaves your property.
This simple act of observation and testing is the difference between a successful project and a costly mistake. Read the water, respect your boundaries, and engineer a solution that works for everyone.
Compaction or Grading: Why is Water Pooling in the Middle?
You see a puddle in the middle of your lawn. The immediate assumption is often that the ground is sloped incorrectly—a grading problem. But often, the issue isn’t the overall slope of the land, but the condition of the soil itself. The problem is compaction. Over time, from foot traffic, kids playing, or even the weight of a summer paddling pool, the soil particles get squeezed together. This eliminates the tiny air pockets that normally allow water to percolate downwards. The ground becomes as hard and impermeable as a concrete slab. When it rains, the water hits this layer and simply stops, creating a persistent puddle.
Fixing a grading issue when the real problem is compaction is a waste of time and money. You need to diagnose the problem correctly before you can apply the right solution. Aerating a lawn with a grading problem won’t help, and re-grading a lawn with a compaction problem won’t solve the issue long-term. You need to get your hands dirty and figure out what’s happening under the surface. In fact, studies show that regular foot traffic, like the path from a patio door to a shed, can lead to an up to 50% increase in soil compaction in those areas.
Before you call in the diggers, put on your detective hat. You can perform a few simple tests to determine if you’re dealing with compaction or a true grading problem. This is your first and most important job.
Your Diagnostic Checklist: Compaction vs. Grading
- The Screwdriver Test: A day or two after rain, try to push a long screwdriver or a metal rod into the soil in the pooling area. If you can’t easily push it in at least 4-6 inches, you’ve hit a compacted layer. Compare it with an area that drains well.
- The Worm Count: Healthy, uncompacted soil is alive. Dig up a 6-inch square cube of soil in the problem area. If you find fewer than 5 worms, it’s a strong sign the soil structure is poor and likely compacted.
- The Pooling Test: This is about observation. After a heavy rain, does water sit on the surface for more than a day before soaking in? If so, percolation is being prevented, which points directly to compaction.
- Traffic Pattern Mapping: Stand back and look at your lawn. Can you see worn paths where people or pets walk frequently? Check under swing sets, around play equipment, or where you placed a temporary structure. Compaction almost always follows traffic.
- Visual Grass Health Check: Compacted soil starves grass roots of air and water. Look for thinning grass, bare patches, or a proliferation of tough weeds like dandelions and plantain that thrive in compacted ground.
If your tests scream « compaction, » the solution is aeration (core aeration, not just spiking) and improving soil structure. If the soil is soft but the puddle still forms, then it’s time to look at re-grading the area to create a proper fall.
When to Grade Soil: Avoiding Structure Damage in Wet Weather
So you’ve diagnosed a grading problem. The instinct is to get out there and fix it immediately. But timing is everything in groundwork. Moving soil at the wrong time of year can cause far more damage than it solves. Working on wet, saturated soil is the cardinal sin of earthmoving. It destroys the soil’s structure, turning it into a soupy, unworkable mess. Even worse, operating machinery or moving heavy loads of soil near your house in wet conditions can put dangerous pressure on your home’s foundation.
Professionals don’t fight the weather; they work with it. The wet winter months are not for digging; they are for observation. This is your planning phase. As a homeowner, you should use the periods of heaviest rain to your advantage. Go out during a downpour. Take photos, draw a map of your garden, and mark exactly where the water flows and where it pools. Document the worst-affected areas. This real-world data is invaluable. It provides a precise, undeniable action plan for when the ground is ready to be worked.
When you do start work, the most critical area to respect is the zone immediately around your house. As a rule, you should avoid any major excavation or piling of heavy materials within five feet of your foundation, especially in damp conditions. The weight of machinery or a large pile of soil can exert immense lateral pressure on your foundation walls, leading to cracks and structural damage. The ground’s stability is lowest when it’s wet. Therefore, the best time for grading is during a dry spell in late spring or summer when the soil is firm and stable.
Patience is a groundworker’s virtue. Use winter to plan with precision, and wait for the right conditions to execute with safety. This two-stage approach ensures you’re fixing the problem effectively without creating a new, more expensive one.
How to Lay Paving on Sand to Prevent Sinking and Cracking?
A patio or walkway that sinks, cracks, or has pavers that wobble is, at its heart, a small-scale grading and drainage failure. The problem is rarely the paving slab itself; it’s almost always the base underneath that has failed. Laying pavers on a simple bed of sand without a proper foundation is asking for trouble. Rainwater will wash the sand away, creating voids. Freeze-thaw cycles in winter will cause the ground to heave. The result is an unstable, uneven, and unsafe surface. The secret to durable paving is that 90% of the work is in the bit you don’t see.
A proper paving installation is a layered system designed for stability and drainage. Coarse, sharp sand is used for the thin bedding layer the paver sits on, but it is not the foundation. The real strength comes from a well-compacted sub-base of gravel and robust edging to hold everything in place. Getting this structure right ensures your paving stays level and drains correctly for decades.
To lay paving that won’t sink or crack, you must follow a structural process:
- Install Edging First: Before anything else, install strong, rigid edging (like concrete or heavy-duty plastic restraints) around the perimeter of the area. This creates a contained box that stops the sub-base and sand from washing out at the sides.
- Excavate to the Correct Depth: Dig out the area to a depth that accounts for all layers: typically 4-6 inches for the compacted gravel sub-base, 1 inch for the sand bed, plus the thickness of your chosen pavers.
- Use the Right Sand: For the bedding layer, you must use coarse, sharp sand (also known as grit sand or concrete sand). Do not use fine, soft builder’s sand; it holds too much water and doesn’t lock together, leading to movement.
- Compact the Sub-Base: Add your gravel sub-base layer and compact it thoroughly with a hired plate compactor. This is the load-bearing skeleton of your patio. It must be firm and stable before you proceed.
- Screed the Sand Bed: Add the 1-inch layer of sharp sand on top of the compacted gravel. Use a straight piece of timber to screed it to a perfectly smooth and consistent depth, maintaining that crucial 2% slope for drainage.
- Use Polymeric Sand for Joints: After laying the pavers, sweep polymeric sand into the joints. This special sand contains a binder that hardens when activated with water, locking the pavers together and preventing weeds and ant nests.
- Activate Polymeric Sand Correctly: Ensure the paver surface is completely dry before sweeping in the polymeric sand. Use a leaf blower to remove any dust. Then, gently mist the area with water to activate the binder without washing it out of the joints.
By treating paving as a structural engineering project rather than a decorative one, you ensure a stable, long-lasting surface that enhances your garden instead of becoming another problem to fix.
How Big Should Your Rain Garden Be to Handle Roof Runoff?
A rain garden is one of the most effective tools in your drainage arsenal. It’s more than just a boggy patch with a few plants; it’s an engineered depression in the landscape designed to capture, hold, and slowly absorb runoff from surfaces like your roof or driveway. Instead of letting all that water from a storm surge overwhelm your lawn or the public drains, you direct it to the rain garden, which acts like a giant sponge. But for it to work, it has to be the right size. Too small, and it will be overwhelmed in the first heavy shower. Too large, and you’re sacrificing more garden space than necessary.
Sizing is a calculation, not a guess. It depends on two main factors: the size of the surface area draining into it (your « catchment area, » e.g., a section of your roof) and the type of soil you have. While a typical residential rain garden ranges from 100 to 300 square feet, a more precise calculation is needed for it to be effective. For most homeowners with typical clay-loam soil, a simple rule of thumb works well for sizing a garden that is 6 inches deep.
The following table provides a practical starting point for sizing your rain garden based on the roof area that will drain into it. The key is to measure the footprint of the roof or other impervious surface, not the sloped surface area, that will be directed to the garden.
| Roof/Runoff Area | Garden Depth | Recommended Garden Size | Example Dimensions |
|---|---|---|---|
| 250 sq ft (small shed) | 6 inches | ~40 sq ft | 8′ x 5′ |
| 500 sq ft (garage roof) | 6 inches | ~85 sq ft | 10′ x 8.5′ |
| 1000 sq ft (quarter of house roof) | 6 inches | ~165 sq ft | 12′ x 14′ |
| 1500 sq ft (half of house roof) | 6 inches | ~250 sq ft | 15′ x 17′ |
| As this rain garden sizing guide explains, the calculation method is: Divide drainage area by 6 for a 6-inch deep garden holding 1 inch of rainfall. Sizes are approximate. | |||
Once you have the size, the shape can be whatever fits your garden’s design—a kidney bean shape often looks more natural than a simple rectangle. The goal is a functional piece of green infrastructure that is also a beautiful garden feature.
Key takeaways
- Your waterlogged lawn is a structural problem. You must diagnose whether it’s compaction or grading before attempting a fix.
- Water requires a clear, unobstructed path. Use gravity with a minimum 2% grade on hard surfaces and engineered channels like French drains for lawns.
- Plan your work in the right season. Observe water patterns in the wet winter, but only perform groundwork on dry, stable soil in spring or summer.
- Never divert your water problem onto a neighbour’s property. Test your grading plan and communicate before you dig.
How to Build Rain Gardens to Handle British Storm Surges?
A standard rain garden is great for average rainfall, but in a climate with increasingly frequent and intense storm surges, you need to build for the worst-case scenario. An « extreme weather » rain garden isn’t just about holding water; it’s about safely managing an overflow. The primary function of the garden is to capture and infiltrate the first inch or so of rainfall from a storm—this accounts for about 90% of all rain events and deals with the most polluted « first flush » of runoff. But what happens during that 1-in-10-year downpour that dumps three inches of rain in an hour? Without a plan, your rain garden will overflow unpredictably, potentially directing a torrent of water right towards your house.
The solution is to design a dedicated, engineered overflow system. This is a non-negotiable feature for any rain garden built to handle unpredictable, heavy storms. It acts as a safety valve, directing excess water from an extreme event along a predetermined, safe path away from vulnerable structures. This overflow should be designed to look like a natural part of the garden, such as a dry creek bed.
Building this safety feature into your design is a straightforward process. It’s about deciding where you want the water to go when the system is at capacity, and armouring that path against erosion.
To build a robust overflow system for your rain garden, follow these steps:
- Designate an Exit Point: When shaping your rain garden basin, deliberately create a low point on the side that is furthest from your house and points towards a safe discharge area (like the street, a larger lawn area, or a soakaway).
- Construct a Rock-Lined Channel: At this designated exit point, build an overflow channel. This should be a shallow weir or spillway, lined with heavy river rock or small boulders to prevent the rushing water from eroding the soil.
- Grade the Overflow Path: Ensure the channel and the path beyond it have a consistent, gentle downward slope, directing water safely away from your home’s foundation and your neighbour’s property.
- Size for the 90/10 Rule: Your main rain garden basin should be sized to handle the vast majority of storms (the 90%). The overflow is there to handle the extreme 10% safely. Don’t make the overflow too low, or the garden won’t hold enough water to be effective.
- Plant for Resilience: Plant tough, erosion-resistant ground cover plants along the overflow path. They will help to stabilize the soil and can tolerate both dry conditions and occasional fast-flowing water.
- Test the System: During construction, and before planting, test your overflow. Deliberately flood the rain garden with a hose until it overflows. Verify that the water exits at your chosen point and flows safely along the intended path.
Now you have the groundworker’s plan. You’ve learned to read the land, diagnose the problem, and engineer solutions that are built to last. The next step is to wait for that first dry spell, pick up your spade, and start taking back your garden from the bog.