A functional rain garden is not a decorative flowerbed; it’s a high-performance drainage system engineered to precise specifications.
- Success depends on calculating hydraulic load (sizing) and engineering the soil for a specific infiltration rate.
- Failure to plan for overflow during extreme rainfall is the most common and costly mistake, risking water damage to property.
Recommendation: Before buying a single plant, conduct a soil percolation test. This single piece of data will determine the entire design of your garden.
With the increasing frequency of intense downpours across Britain, the familiar sight of overwhelmed drains and waterlogged lawns is becoming a serious concern for homeowners. The conventional response often involves more hard landscaping and bigger pipes, but this only shifts the problem downstream. Many environmentally-aware households turn to the concept of a rain garden, picturing a lush, self-watering feature. However, this is where a critical misunderstanding often begins.
The common advice focuses on digging a shallow basin and choosing moisture-loving plants. While not entirely wrong, this approach completely misses the point. It treats the rain garden as a horticultural project when it is, in fact, an eco-engineering one. The key to building a rain garden that can genuinely handle storm surges isn’t just about what you plant; it’s about hydraulics, soil science, and meticulous planning for system failure. Without this engineering mindset, a well-intentioned project can quickly become a stagnant, mosquito-breeding swamp that does little to protect your property during a real deluge.
But what if the true purpose of a rain garden is not simply to be a garden that likes rain, but a high-performance, small-scale sustainable drainage system (SuDS)? This guide moves beyond the platitudes of « digging a dip » to provide an engineer’s perspective. We will deconstruct the rain garden into its functional components, focusing on the critical calculations, material specifications, and design choices that separate a successful, resilient system from a muddy disappointment. This is about transforming a patch of your garden into a powerful piece of climate-resilient infrastructure.
This article provides a structured, engineering-led approach to designing and building a rain garden. Follow along as we cover everything from plant selection based on function to the critical calculations for soil composition and overflow management.
Summary: How to Build Rain Gardens to Handle British Storm Surges?
- Plants That Survive Both Drowning and Drought in Rain Gardens
- How Big Should Your Rain Garden Be to Handle Roof Runoff?
- Sand or Compost: The Perfect Soil Mix for Rapid Drainage
- The Stagnation Mistake That Turns Rain Gardens into Mosquito Pits
- Where Does the Water Go When the Rain Garden is Full?
- How to Establish a ‘Dry Garden’ Backbone in Chalky Soil?
- French Drains: How to Install One to Dry Out a Boggy Lawn?
- Bioswales vs Traditional Drains: Which Handles Heavy Rainfall Better?
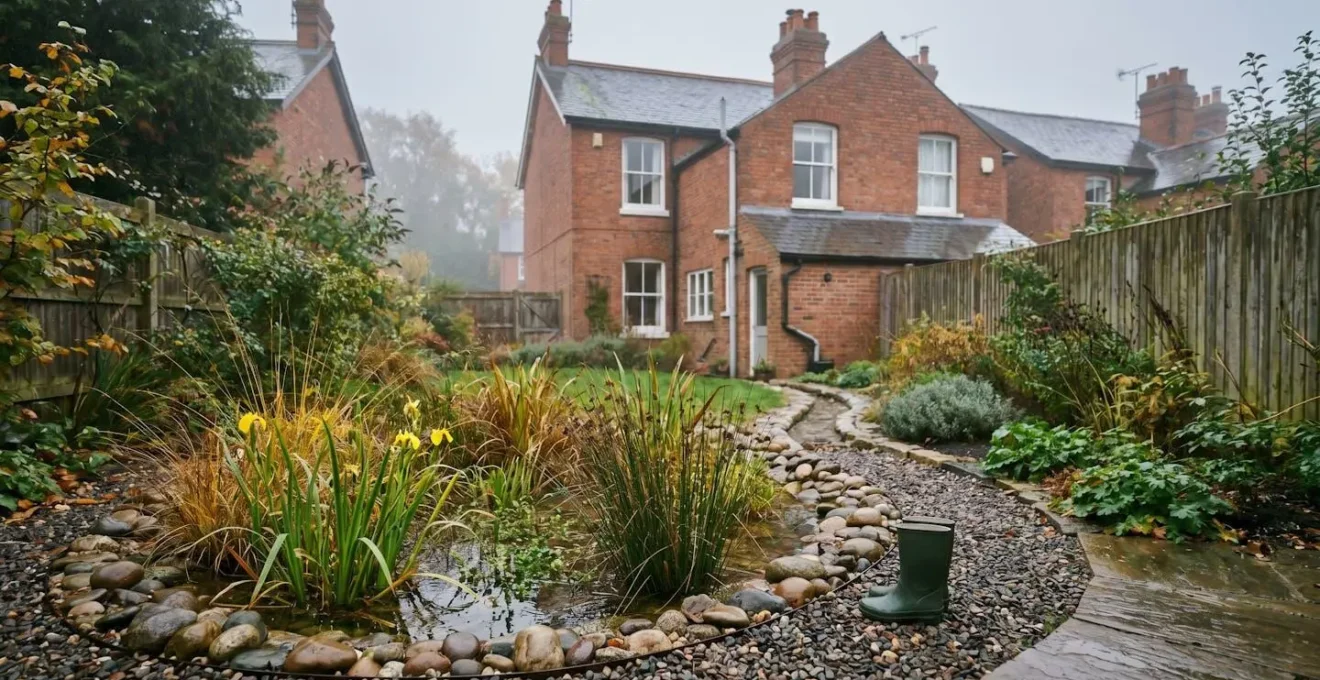
Plants That Survive Both Drowning and Drought in Rain Gardens
From an engineering standpoint, plants are not decoration; they are a living, functional component of the drainage system. A rain garden experiences extreme hydrological cycles: complete inundation during a storm, followed by potentially long, dry periods. Plant selection must therefore prioritize resilience over pure aesthetics. The most effective strategy is to zone the garden based on the anticipated duration of water exposure, creating a micro-ecosystem where each plant performs a specific role.
The base of the garden, Zone 1, is the wettest area and requires species that can tolerate having their roots submerged for up to 48 hours. Think of plants like Yellow Flag Iris or Cardinal Flower. The sloped sides, or Zone 2, drain faster and are suited for more versatile plants that can handle periodic soaking but not permanent wet feet. The perimeter, Zone 3, is the driest and helps transition the rain garden into the wider landscape, using plants that prefer normal soil conditions. This zonation creates a robust, self-regulating system.
Beyond tolerance, consider the structural role of the plants. The root systems are particularly vital. Deep, fibrous roots, such as those found in many native grasses and sedges, are critical for maintaining soil structure, preventing compaction, and creating channels that enhance water infiltration. These roots are the unsung heroes of the system, doing more for long-term hydraulic performance than the most beautiful flowers. In fact, studies show that rain gardens can absorb 30-40% more water than a conventional lawn, a feat largely attributable to this combination of soil depth and root-channel activity.
Ultimately, a well-engineered planting scheme ensures the rain garden not only manages water effectively but also becomes a thriving, biodiverse habitat that requires minimal intervention once established.
How Big Should Your Rain Garden Be to Handle Roof Runoff?
Guesswork is the enemy of good engineering. The single most critical factor determining your rain garden’s success is its size relative to the « hydraulic load » it must manage—that is, the volume of water flowing into it. An undersized garden will be overwhelmed by a typical British downpour, failing to provide any meaningful flood mitigation. An oversized garden, while effective, represents an inefficient use of space and resources. The goal is to calculate the ‘Goldilocks’ size: just right for your specific property.
A robust rule of thumb provided by UK experts is to size the garden to be at least 20% of the roof area that drains into it. To calculate this, you measure the footprint of the roof area that is serviced by the downpipe you’re diverting (length x width), and then multiply that area by 0.20. For example, a 50-square-metre roof section would require a 10-square-metre rain garden. This calculation provides the surface area; the depth (typically 30-60cm) is determined by soil drainage capacity.
However, this sizing formula assumes your soil can actually absorb the water. Before you dig, you must gather data on your site’s specific conditions by performing a percolation test. This simple test measures the infiltration rate of your soil—a key performance metric. A slow drainage rate (less than 2.5cm per hour) doesn’t mean you can’t build a rain garden; it means you must engineer a better soil mix or increase the garden’s size to compensate. Without this data, your sizing calculation is just a guess.
Your Action Plan: DIY Soil Percolation Test
- Dig a test hole: Excavate a hole approximately 30cm (12 inches) in diameter and 30cm deep in the proposed location of your rain garden.
- Saturate the soil: Fill the hole with water and allow it to drain completely. This pre-saturates the surrounding soil for an accurate reading.
- Measure the drainage rate: Refill the hole with water and use a ruler or measuring tape to record the water level. Track how much the water level drops in one hour.
- Analyse the results: An ideal rate is between 2.5cm and 7.5cm (1-3 inches) per hour. A rate below 2.5cm/hr indicates slow drainage that will require soil amendment.
- Repeat if necessary: For variable soil, conduct the test in a few different spots to find the optimal location or to understand the extent of amendments needed.
Treating this measurement and testing phase with diligence is the first step in moving from a simple gardener to a home eco-engineer, ensuring your project is built on a foundation of solid data.
Sand or Compost: The Perfect Soil Mix for Rapid Drainage
The « engine » of your rain garden is not its plants, but its soil. The success of the entire system hinges on the engineered soil media’s ability to perform one critical function: infiltrate a large volume of water quickly. If the soil is too dense (like heavy clay), water will pool on the surface, creating a stagnant swamp. If it’s too porous (like pure sand), water will pass through too quickly, offering little filtration or support for plant life. The goal is to create a bespoke mix that balances rapid drainage with adequate moisture retention.
The key performance metric for this component is the infiltration rate. For a rain garden to function correctly and avoid stagnation issues, the Royal Horticultural Society recommends a soil drainage rate of at least 5cm (2 inches) per hour. If your native soil, as measured by your percolation test, is slower than this, you will need to excavate and replace it with an engineered mix. A standard, effective recipe is a homogenous blend of approximately 60% sand (for drainage), 20% topsoil (for structure and nutrients), and 20% compost (for water retention and microbial life).
The installation of this soil is as important as its composition. When excavating the basin for your garden, it is crucial to avoid compacting the subsoil at the base. Never walk on or use heavy machinery in the bottom of the pit, as this can create a hardpan layer that negates all your soil engineering efforts. The soil mix should be added in layers and lightly settled, but not mechanically compacted. This ensures the entire soil profile maintains its designed permeability, allowing water to move freely downwards.
Furthermore, the design must incorporate channels to manage water flow. A gravel-lined ‘rill’ or channel leading from the downpipe into the garden prevents the incoming torrent from eroding your carefully prepared soil. Similarly, an overflow channel at the opposite end, also lined with stones, provides a controlled exit point for water during extreme events, a topic we’ll cover in detail later.
This deliberate approach to soil science ensures your rain garden can handle the hydraulic load of a storm surge, draining efficiently while providing a healthy growing medium for your chosen plants.
The Stagnation Mistake That Turns Rain Gardens into Mosquito Pits
A common fear that prevents homeowners from building rain gardens is the threat of creating a breeding ground for mosquitoes. This concern is valid, but it stems from a misunderstanding of how a properly engineered rain garden functions. A rain garden is not a pond or a bog; it is a temporary holding basin. The defining feature of a successful rain garden is that it is designed to be dry most of the time.
The key to preventing mosquito proliferation is rapid drainage. Mosquito larvae require standing water for at least 72 hours to complete their life cycle. A correctly designed system is engineered to ensure that any pooled water infiltrates completely within a much shorter timeframe. As a strict design specification, rain gardens should drain within 12 to 48 hours maximum after a rainfall event. If water remains for longer than two days, it is not a functioning rain garden; it is a sign of a design flaw, typically incorrect sizing or compacted, poorly draining soil.
When your garden drains within this 48-hour window, you don’t just prevent mosquitoes; you actively create a habitat that helps control them. The temporary water source attracts beneficial predators. Dragonflies and damselflies, whose nymphs are voracious predators of mosquito larvae, will be drawn to your garden. Birds will visit to drink and bathe, and amphibians like frogs and newts may take up residence. This creates a balanced, resilient micro-ecosystem where pests are managed naturally.
The « stagnation mistake » is therefore a direct result of poor engineering. It happens when the principles of sizing (H2.2) and soil composition (H2.3) are ignored. By ensuring your calculations are sound and your soil medium meets the required infiltration rate, you design out the problem from the very beginning. The absence of mosquitoes becomes a key performance indicator of your system’s success.
Ultimately, a well-drained rain garden is an asset to the local ecosystem, proving that effective water management and the creation of biodiversity can, and should, go hand in hand.
Where Does the Water Go When the Rain Garden is Full?
A rain garden is engineered to manage a typical, frequent storm event. But what happens during a once-in-a-decade deluge? A responsible design must always account for the « worst-case scenario. » This means planning, from day one, for the moment your rain garden will inevitably overflow. An uncontrolled overflow is a significant risk, potentially directing a concentrated stream of water towards your home’s foundation. A well-designed overflow, however, is a safety feature that protects your property.
The first rule of overflow design is location. The rain garden must be sited at least 3 metres (10 feet) away from your house’s foundation, especially if you have a basement. This creates a safe buffer zone. When excavating, the garden should be graded so that it is perfectly level, but the surrounding landscape should be subtly shaped to create a predetermined overflow path. This path must direct water away from any structures and towards a safe disposal point, such as a larger lawn area, a ditch, or a connection to the existing municipal storm drain system further down your property.
The overflow point itself should be a defined, stabilised channel, often a shallow depression or ‘spillway’ lined with stones or dense turf. This prevents erosion as the water begins to exit the garden. This spillway must be set at a lower elevation than the surrounding land but higher than the maximum designed water level in the garden. This ensures the garden fills to its design capacity before any water begins to escape through the designated route. This concept of planning for safe failure is a core tenet of resilient engineering.
The need for such robust planning is underscored by national statistics. Given that the Environment Agency’s 2024 national flood risk assessment indicates 4.6 million properties in England are at risk from surface water flooding, managing overflow is not a minor detail; it is a critical component of home-scale flood resilience. Your rain garden is the first line of defence, and the overflow is its essential safety valve.
By designing a deliberate and safe route for excess water, you transform a potential liability into a predictable and manageable part of your home’s sustainable drainage system.
How to Establish a ‘Dry Garden’ Backbone in Chalky Soil?
A rain garden project, particularly the excavation phase, generates a valuable resource: excavated soil, or ‘spoil’. The default, un-engineered approach is to pay for its removal. The eco-engineering approach, however, is to view this spoil as an asset. This is particularly true if your rain garden is built on a slope. You can apply a ‘cut and fill’ technique, using soil excavated from the higher end of the basin to build up the lower end, creating a level base for the rain garden with zero waste.
This process often leaves you with a surplus of subsoil. Instead of discarding it, this material provides the perfect opportunity to create a complementary landscape feature: a ‘dry garden’ or berm. This raised mound, built from the excavated subsoil, creates a sharply-draining, low-nutrient environment that is the complete opposite of the rain garden. It’s the ideal habitat for drought-tolerant plants that thrive in conditions mimicking a Mediterranean or gravel garden, such as Lavender, Rosemary, or Sedums.
This is systems thinking in practice. You are creating two distinct, climate-resilient habitats from a single project. The rain garden manages excess water, while the dry garden thrives on its absence. This pairing increases the biodiversity of your garden and creates year-round visual interest. The berm can also be strategically placed to act as a visual screen, to direct water flow, or to add topographical interest to a flat landscape.
Case Study: The RHS Waste Reduction Strategy
The Royal Horticultural Society champions a practical waste-reduction strategy for rain garden projects. When excavating on sloping sites, the top end requires more digging than the lower end. Rather than disposing of this excavated soil, gardeners can use the spoil from the top end to fill in at the lower end, creating a level rain garden base. This approach simultaneously solves two problems: it eliminates waste removal costs and provides the ideal free substrate for establishing raised beds or berms for drought-tolerant dry garden plants, creating a complementary climate-resilient garden system.
By reusing the excavated soil, you not only save money and reduce waste but also build a more complex, resilient, and interesting garden ecosystem that is better adapted to the UK’s increasingly variable climate.
French Drains: How to Install One to Dry Out a Boggy Lawn?
A rain garden is a powerful tool, but it is not a universal solution for every water problem. It is crucial to correctly diagnose the source of your water issue before prescribing a solution. A rain garden is designed to manage surface runoff—water flowing over the ground from a roof or patio during a storm. It is not designed to solve problems caused by a high water table or persistent groundwater, which manifest as a permanently boggy, saturated lawn.
For these groundwater issues, a French drain is often the more appropriate engineering solution. A French drain is essentially a subterranean channel—a perforated pipe laid in a trench filled with gravel—that collects groundwater and redirects it away to a suitable disposal point. Its primary function is to lower the water table in a specific area, not to manage a sudden influx of storm water. Trying to use a rain garden to fix a boggy lawn is like using a bucket to empty a rising river; it’s the wrong tool for the job.
Understanding the distinction is key to making the right decision for your property. The following table provides a clear decision matrix for when to choose one system over the other, or in some cases, both.
| Decision Factor | Rain Garden | French Drain |
|---|---|---|
| Soil Condition | Only wet during/after rain events | Area always boggy or saturated |
| Primary Function | Capture and infiltrate storm runoff | Redirect and remove persistent groundwater |
| Water Source | Surface runoff from roof, driveway, patio | High water table, dispersed groundwater |
| Drainage Time | Drains within 12-48 hours | Continuous drainage needed |
| Installation Complexity | Moderate (excavation, planting, grading) | Higher (trenching, pipe, gravel layers) |
| Ecosystem Benefits | High (pollinator habitat, biodiversity) | Low (primarily functional) |
| Best Application | Managing heavy rainfall events | Permanently lowering water table in specific area |
In advanced drainage strategies, these two systems can be combined. A French drain can be installed to de-water a soggy part of a lawn, with its outflow pipe directed to be the primary water source for a rain garden elsewhere on the property. This integrated approach solves two distinct problems, turning the unwanted groundwater into a resource for a biodiverse feature. This demonstrates a sophisticated understanding of water management on a residential scale.
By correctly identifying your issue as either a surface runoff or groundwater problem, you can invest your time and money in the solution that will actually deliver the desired results.
Key Takeaways
- A rain garden is an engineered system; its size must be calculated (approx. 20% of the contributing roof area) to handle the specific hydraulic load.
- The soil is not just dirt, it is an engineered medium that must meet a performance specification, typically a drainage rate of at least 5cm per hour.
- A functional system drains within 48 hours to prevent stagnation and must include a planned, safe overflow path to manage extreme rainfall events.
Bioswales vs Traditional Drains: Which Handles Heavy Rainfall Better?
A residential rain garden is a microcosm of a larger and increasingly vital urban planning concept: the bioswale. While a rain garden is typically a basin, a bioswale is a linear, vegetated channel designed to slow, convey, and filter stormwater runoff from larger areas like roads or car parks. Both are forms of Sustainable Drainage Systems (SuDS) that represent a fundamental philosophical shift away from traditional drainage engineering.
Traditional drains—the familiar network of pipes and gullies—operate on a principle of « fast conveyance. » Their sole purpose is to get water off a surface and into a river or treatment plant as quickly as possible. This approach, however, simply concentrates the hydraulic load and pollutants, contributing to flash flooding and river pollution downstream. It is a brute-force method that is increasingly failing in the face of more intense, climate-change-driven storms. Bioswales and rain gardens, in contrast, operate on a principle of « slow, spread, and sink. » They mimic natural water cycles, using vegetation and soil to treat water as a resource, not a waste product.
The performance difference is stark. While a traditional drain offers zero pollutant removal, a bioswale or rain garden acts as a natural filter. As water percolates through the soil and plant roots, it is cleaned. Studies have shown that these systems are remarkably effective, with data suggesting they are capable of removing up to 90% of nutrients and chemicals, and up to 80% of sediments from runoff. This has a profound positive impact on the health of local waterways. They also provide crucial biodiversity corridors in urban landscapes, a benefit that concrete pipes can never offer.
By building a rain garden, you are not just protecting your own home; you are implementing on a small scale the same advanced, nature-based solution that progressive civil engineers are now using to build more resilient and healthier towns and cities.