You can create a highly productive, eco-friendly permaculture garden that is beautiful, orderly, and perfectly suited to a suburban neighborhood.
- Permaculture is a design philosophy focused on efficiency, not a specific « messy » aesthetic; it can be adapted to look neat and intentional.
- Simple shifts in thinking, like making a shed multifunctional or using curved borders, dramatically increase a garden’s output without expanding its footprint.
Recommendation: Start by observing your yard’s unique patterns for a season—this single step will inform all future design choices and ensure you work with nature, not against it.
For many homeowners, the word « permaculture » conjures images of sprawling, untamed food forests—a vibrant but chaotic jungle that seems at odds with the clean lines of a suburban neighborhood. You want a garden that’s more sustainable, that gives back more than it takes, and reduces your trips to the grocery store. But the fear of creating a « messy » yard that raises eyebrows from the neighbors or violates a homeowner’s association rule is a powerful deterrent. The common advice to just « let nature take over » feels impractical and aesthetically risky.
This approach misunderstands the core of permaculture. It’s not about letting go of design; it’s about a deeper, more intelligent form of design. What if the key wasn’t to fight for a conventional look, but to use permaculture principles to create a garden that is so efficient, productive, and elegantly designed that it becomes a new standard of beauty? This is not about sacrificing aesthetics for ethics, but achieving both through smart, nature-inspired systems thinking.
This article will guide you through a transformative process. We won’t just list abstract principles. We will translate them into eight concrete, practical strategies you can apply to your own suburban garden. We will explore how to work with shade, turn simple structures into powerhouses of efficiency, and create abundance in a way that is both beautiful and manageable. Get ready to reimagine your backyard not as a plot to be tamed, but as a dynamic ecosystem you can intelligently design.
Summary: A Guide to Practical and Aesthetic Suburban Permaculture
- Zone 1:How to Boost Photosynthesis in Shady North-Facing Gardens?
- One Element, Three Uses: How a Shed Can Collect Water and Reflect Heat?
- The Guild Trap: Why Planting 7 Species Together Can Fail in Small Spaces?
- Observation First: Why You Should Wait a Year Before Designing?
- The Edge Effect: Increasing Yields by Maximizing Borders?
- Sun and Shade: How a Spiral Creates Different Zones for Basil and Parsley?
- How to Establish a ‘Dry Garden’ Backbone in Chalky Soil?
- Creating Self-Sustaining Ecosystems: How to Stop Buying Compost and Fertilizer?
Zone 1:How to Boost Photosynthesis in Shady North-Facing Gardens?
The north-facing side of a house is often seen as a gardening dead zone—a place where only the most resilient mosses survive. But from a permaculture perspective, this is simply a challenge requiring a clever design solution, not abandonment. Instead of fighting the shade, we can amplify the available light. The key is to transform the surrounding environment into a light-bouncing machine. Simple, strategic changes can turn a dim corner into a viable growing area for a surprising range of plants.
The most immediate and effective technique is using reflective surfaces. Painting an adjacent wall or fence a bright, matte white can dramatically increase the amount of ambient light bouncing onto your plants. This isn’t just a hopeful theory; recent research from Utrecht University reveals that plants in shade receive significantly more usable light than previously measured, and we can enhance this effect. Even the color of your mulch matters—light-colored wood chips or gravel will reflect light upwards, while dark bark will absorb it.
Beyond paint, you can get creative with decorative elements that serve a dual purpose. Strategically placed mirrors or shiny garden art can redirect beams of sunlight into specific spots. It’s also vital to select the right plants. Look for shade-adapted species, often found in woodland environments, which have evolved to thrive in lower-light conditions. Plants with large, thin leaves like hostas, ferns, and many leafy greens are built to capture diffuse light efficiently. By combining these light-harvesting strategies, your shadiest garden spot can become a lush, productive, and beautiful part of your yard’s ecosystem.
This approach transforms a problem area into an opportunity, demonstrating the power of working with, rather than against, the natural conditions of your site.
One Element, Three Uses: How a Shed Can Collect Water and Reflect Heat?
In a conventional garden, a shed is just a shed: a place to store tools. In a permaculture garden, a shed is a powerhouse. The principle of « stacking functions » challenges us to ensure every element in our design performs multiple jobs. Your humble garden shed is the perfect place to start. By thinking of it not as a static object but as an active component in your garden’s ecosystem, you can unlock at least three additional functions without sacrificing any storage space.
First and most obviously, the shed is a water-collecting surface. Every square foot of roof can harvest a significant amount of rainwater. Installing a simple gutter and a rain barrel is the first step. This collected water is a perfect, chlorine-free resource for your plants, reducing your reliance on municipal water. Second, the shed’s walls are potential thermal regulators. A south-facing wall painted a dark color becomes a thermal mass, absorbing solar energy during the day and slowly releasing it at night. This creates a warm microclimate that can extend your growing season or allow you to grow plants that wouldn’t normally survive in your zone.
Third, the shed is a vertical structure perfect for supporting life. It can act as a trellis for climbing beans or a productive espaliered fruit tree. The shady side can host a pollinator hotel or a vertical herb garden for shade-tolerant plants like mint and parsley. It becomes a hub of activity, providing shelter, water, warmth, and support. This transformation from a simple storage box to a multi-functional ecosystem hub is the essence of efficient permaculture design.
As this illustration shows, a single, well-placed element can become the heart of a system. Its roof provides water, its wall provides heat and structure, and its surfaces provide habitat. This is the quiet efficiency that defines a well-designed permaculture garden—it does more with less effort.
By asking « What else can this do? », you begin to weave a web of connections that makes your garden more resilient, productive, and fascinating.
The Guild Trap: Why Planting 7 Species Together Can Fail in Small Spaces?
The concept of plant guilds is one of the most exciting ideas in permaculture—the notion that by planting a community of mutually beneficial plants, you can create a small, self-sustaining ecosystem. However, it’s also where many aspiring suburban permaculturists fall into a trap. The classic « seven-layer » guild, often promoted in books, can quickly become an overgrown, chaotic jumble in a small suburban bed, reinforcing the very « messy » stereotype you want to avoid.
The problem is one of scale and context. A seven- or nine-species guild is designed to mimic a natural forest edge, which requires space to develop. In a 4×8 foot raised bed, it’s often a recipe for disaster, as faster-growing plants overwhelm their neighbors, creating a maintenance nightmare and a visually cluttered look. The solution isn’t to abandon guilds, but to simplify them. The goal is function, not a specific number of plants. A successful small-space guild can be built with just three to five species, providing all the essential functions without the chaos.
Case Study: The Simplified Suburban Guild
A perfect example for a tidy suburban garden is a guild built around a central element, like a tomato plant. Instead of seven layers, we choose three key partners. At the base, we plant basil, which is said to repel tomato hornworms and improve flavor. We also intersperse a few marigolds to deter nematodes and attract pollinators. Finally, a living mulch of creeping thyme can be planted around the edge to suppress weeds and retain soil moisture. This 3-plant guild (plus the main crop) is easy to manage, visually appealing, and provides multiple benefits: pest deterrence, pollinator attraction, and ground cover.
This simplified approach doesn’t mean you can’t have diversity. It’s about being intentional. As a leading guide on the topic notes, aesthetics can be maintained even with higher diversity. According to the experts at Permaculture Gardens, in their « Permaculture Guilds Design Guide »:
While this permaculture principle can sometimes clash with the aesthetics of a garden, it is still possible to design a diverse planting of 7-9 crops in a garden bed and place them in a repetitive pattern so that they make a beautiful planting.
– Permaculture Gardens, Permaculture Guilds Design Guide
The key is pattern and repetition. A simplified guild repeated throughout a bed creates a sense of order and rhythm that is pleasing to the eye, achieving the holy grail of suburban permaculture: functional beauty.
This shift from dogma to design empowers you to create plant communities that are effective, manageable, and beautiful.
Observation First: Why You Should Wait a Year Before Designing?
In our fast-paced world, the most radical permaculture principle is also the simplest: wait. The impulse when you get a new garden space is to start digging immediately. We want to impose our will on the land. Permaculture asks for the opposite. It asks for « prolonged and thoughtful observation rather than prolonged and thoughtless labor. » The classic advice is to observe a site for a full year before implementing any major, permanent designs.
This isn’t a call for inaction; it’s a call for intelligent action. As noted by the community project Edible Evanston, » The classic exhortation in permaculture is to observe your land for ONE YEAR before placing any permanent features (such as fruit trees or hardscaping). » A year allows you to see the garden in all four seasons. Where does the sun fall in the low winter versus the high summer? Where do puddles form after a heavy rain? What are the prevailing winds? Where do the kids naturally run, creating desire paths? Where does the snow pile up?
This process of observation is about data collection. You are creating a living map of your yard’s energy flows—water, sun, wind, and human traffic. You can make this a fun, ongoing project. Get a simple map of your property and use colored pencils to trace the sun’s path each season, mark wet spots, and note where you’d like a shady spot to sit in August. This map, built over a year, is the most valuable garden design tool you will ever own. It ensures that when you do decide to plant that fruit tree or build that patio, you are putting it in the perfect spot where it will thrive with the least amount of effort.
This year of observation saves you years of frustration. It prevents you from planting a sun-loving tree in a spot that ends up being shaded by the house in summer, or building a path that no one uses. It is the ultimate expression of working smarter, not harder.
It transforms you from a mere gardener into the architect of your own personal ecosystem, making choices based on deep knowledge rather than guesswork.
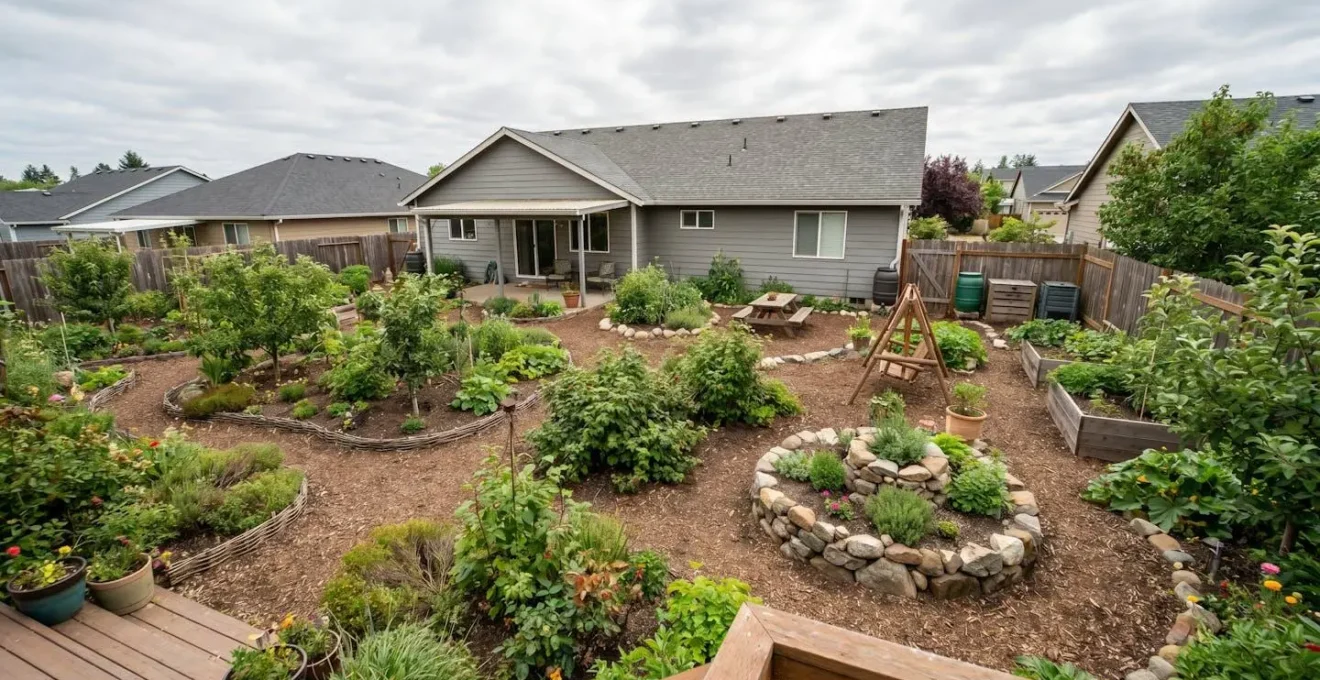
The Edge Effect: Increasing Yields by Maximizing Borders?
In nature, the most vibrant and diverse areas are often the edges—where the forest meets the meadow, where the river meets the land. These transitional zones, or « ecotones, » have characteristics of both ecosystems, creating unique niches that support a greater variety of life than either system alone. Permaculture recognizes this phenomenon as the « Edge Effect » and teaches us to use it to our advantage. In a suburban garden, this translates to a simple but powerful design strategy: maximize your borders.
The straight, rectangular garden bed is a human invention, prized for its tidiness but remarkably inefficient from an ecological standpoint. By simply changing the shape of your garden beds from straight lines to gentle, flowing curves, you can dramatically increase the amount of productive edge. It’s a simple geometric principle: a wavy line between two points is longer than a straight one. In fact, permaculture practitioners have documented that by creating wavy borders, you can easily triple the length of the edge within the same footprint. A 10-foot straight border can become a 30-foot growing edge.
More edge means more space for different plants to interact. It creates more microclimates—the sunny side of a curve versus the shady side, the wind-protected pocket versus the exposed point. It also makes the garden more accessible for you. A « keyhole » garden bed design is the ultimate expression of this. It uses a U-shape or other indented pattern to maximize the amount of bed you can reach from a single path. This is especially valuable in smaller suburban lots, where every square foot of growing space counts. You get more growing area and more accessible workspace, all while creating a beautiful, naturalistic look that is far more visually interesting than a simple box.
By moving beyond straight lines and embracing curves, you not only increase your garden’s productivity but also its aesthetic appeal, creating a space that feels both abundant and intentionally designed.
Sun and Shade: How a Spiral Creates Different Zones for Basil and Parsley?
If you want to see multiple permaculture principles converge into a single, beautiful, and productive feature, look no further than the herb spiral. This simple structure is a masterclass in efficient design and a perfect project for a suburban backyard. It’s a vertically layered, spiral-shaped garden bed that uses its form to create a variety of microclimates, allowing you to grow a wide range of herbs with different needs in a very small footprint.
The design is ingenious. By spiraling upwards, the structure creates different zones of sun, shade, and moisture. The very top of the spiral is the highest, driest, and sunniest spot—perfect for Mediterranean herbs like rosemary, oregano, and thyme that love sharp drainage and full sun. As the spiral winds down, the soil becomes progressively cooler and moister. The middle slopes are ideal for sun-lovers that appreciate a bit more moisture, like basil. The very bottom, often facing north, is the coolest and dampest spot, creating the perfect habitat for plants like parsley and chives.
The spiral shape itself is a form of edge effect, maximizing the growing area in a compact space. An herb spiral with a 5-foot diameter can provide the same growing length as a 15-foot straight row. It is the epitome of « stacking, » both vertically and in terms of function. You’re not just growing herbs; you are creating a diverse habitat that can be a beautiful focal point in your garden. For a family-friendly twist, you can design it as a « Pizza Garden, » planting all the herbs needed for pizza night in their ideal spots.
Your Action Plan: Building a Family-Friendly Herb Spiral
- Design and Layout: Mark out a spiral shape on the ground, 3-5 feet in diameter. Plan for the structure to rise from ground level to about 3 feet high at the center.
- Zone by Microclimate: Mentally map your zones. Designate the hot, dry top for oregano/thyme, the sunny middle for basil, and the cooler, moister bottom for parsley/chives.
- Build the Walls: Use reclaimed materials like broken concrete (urbanite) or stones. Make it a family art project by having kids paint and decorate the rocks for the spiral walls.
- Plant for a Purpose: Arrange herbs needed for family pizza night in their accessible zones—oregano at the top, basil in the middle, and maybe some cherry tomatoes on the sunniest side.
- Integrate Habitat: Leave small gaps and crevices in the wall structure as you build. These create micro-habitats for beneficial insects like ground beetles and spiders that help control pests.
It’s a living sculpture that provides fresh herbs, teaches ecological principles, and looks fantastic in any garden setting.
How to Establish a ‘Dry Garden’ Backbone in Chalky Soil?
Chalky, alkaline soil can be a gardener’s nightmare. It’s often thin, drains too quickly, and locks up essential nutrients, leaving many plants struggling. The conventional approach is a battle of endless soil amendment—lugging in bags of acidic compost and constantly watering. A permaculture approach, however, seeks a more elegant solution: change the plants, not the soil. By establishing a « dry garden » backbone of plants that are naturally adapted to these conditions, you create a resilient, low-maintenance, and stunningly beautiful garden that thrives in its environment.
The key is to select a palette of drought-tolerant perennials that don’t mind alkaline soil. Think of the aromatic, silver-leafed plants of the Mediterranean: lavender, Russian sage, rosemary, and thyme are perfect candidates. These plants have evolved to handle dry conditions and poor soil. Their silvery foliage reflects harsh sunlight, and their fine or waxy leaves reduce water loss. They form the permanent, structural « backbone » of the garden bed.
Instead of trying to amend the entire bed, use the « pocket planting » method. Dig planting holes two to three times wider than the plant’s root ball and fill them with a rich mixture of compost and your native soil. This gives each plant a « launch pad » of enriched soil to establish a strong root system before it ventures into the surrounding chalk. To further conserve moisture, design in layers. Use a low-growing, drought-tolerant groundcover like creeping thyme to act as a living mulch, shading the soil around the base of your taller perennials, reducing evaporation, and suppressing weeds. This creates a self-sustaining system where the plants themselves protect the soil, building a garden that requires minimal watering once established.
The result is a garden that not only survives but thrives, offering a tapestry of texture and fragrance that is beautiful in its own right, proving that challenging conditions can inspire the most creative and resilient designs.
Key takeaways
- Permaculture in suburbs is about smart, aesthetic design, not creating a mess.
- Simple structures like sheds and spirals can be transformed into multi-functional powerhouses for water, heat, and diverse planting.
- Success in small spaces comes from simplifying complex ideas like guilds and maximizing productive « edge » with curved, intentional designs.
Creating Self-Sustaining Ecosystems: How to Stop Buying Compost and Fertilizer?
The ultimate goal of a permaculture garden is to become a self-sustaining ecosystem—a closed loop where the garden itself produces everything it needs to thrive. This means breaking the cycle of dependency on external inputs like bags of compost, bottles of fertilizer, and municipal water. It’s a transformative shift from a garden that consumes resources to one that generates its own fertility and resilience. This is achieved by intentionally designing nutrient cycles within your yard.
One of the most powerful techniques for this is « chop and drop. » This involves growing specific plants known as dynamic accumulators—plants with deep taproots like comfrey, borage, or even dandelions—which mine nutrients from deep in the subsoil. When you « chop » these plants and « drop » their leaves on the soil surface as mulch, those nutrients are released right where your other plants can use them. This process mimics how a forest builds soil. You are essentially creating your own on-site fertilizer factory, transforming garden « waste » into a valuable resource.
Composting is another cornerstone of a self-feeding garden. A simple, contained composting system can transform your kitchen scraps and yard trimmings into « black gold. » To make it a family-friendly activity, choose a tumbler-style composter that children can safely turn. Create a fun visual chart for the fridge showing what can and can’t be composted. This simple routine connects the household to the garden, closing the loop between what you eat and what you grow. You can even brew « compost tea » or liquid feeds from plants like comfrey and nettles, creating your own potent, all-natural liquid fertilizers.
Implementing these strategies means you are no longer just a gardener; you are the facilitator of a living system. This is the ultimate expression of permaculture: a beautiful, productive garden that largely takes care of itself, providing you with healthy food and a deep sense of connection to the natural cycles of your own backyard.