Damp in your period home is rarely a failed Damp Proof Course (DPC); it’s almost always an external water management issue that you can diagnose and fix.
- Raised flower beds, high patios, and hard surfaces against walls create “bridges” for moisture to bypass an otherwise effective DPC.
- Blocked downpipes and incorrectly placed soakaways can saturate foundations by dumping thousands of litres of water directly at the base of your walls.
Recommendation: Before commissioning any expensive internal damp-proofing work, conduct a full perimeter audit of your property’s exterior. This guide shows you how.
The appearance of a persistent damp patch, low on an internal wall of a cherished period property, triggers a familiar sense of dread. The immediate diagnosis, often made in haste, is “rising damp,” a term that conjures images of costly, disruptive works like chemical Damp Proof Course (DPC) injections. Homeowners are frequently led to believe their property’s primary defence against ground moisture has fundamentally failed and requires urgent, invasive intervention. This is a common and expensive misconception.
As a heritage damp surveyor, I can state that the DPC is often the last thing to fail. In the vast majority of cases I investigate, the DPC is functioning exactly as it should. The real problem is not moisture rising inexplicably from the deep foundations, but water being actively guided across a man-made “bridge” just outside the wall. These bridges are the unintended consequences of common garden features: raised flower beds, new patios laid too high, and hard, impermeable surfaces that trap water against the brickwork.
This article will not focus on internal remedies. Instead, it provides a systematic, external inspection guide—the exact process a professional surveyor follows. We will move around the perimeter of your home, examining each element from flower beds and air bricks to downpipes and driveways. The objective is to empower you to identify and rectify the true, external source of water stagnation that is presenting as “rising damp” inside your home, saving you from unnecessary expense and protecting your property’s structural integrity.
Contents: A Surveyor’s Guide to External Water Management
- Why Flower Beds Built Against Walls Cause Damp Courses to Fail?
- How to Keep Air Bricks Clear Using Gravel Trenches?
- Splashback: How Hard Surfaces Near Walls Soak Brickwork
- The Downpipe Error Dumping Tonnes of Water on Foundations
- How Far Must a Soakaway Be From Foundations to Be Safe?
- Why Your New Driveway Needs to Be Permeable by Law?
- What is the Minimum Gradient Needed to Shed Water off a Patio?
- Hardscape Features That Comply With UK Permeable Paving Regulations
Why Flower Beds Built Against Walls Cause Damp Courses to Fail?
The most common culprit in misdiagnosed rising damp cases is the seemingly innocent flower bed banked up against an external wall. While aesthetically pleasing, this feature is a primary cause of DPC bridging. A Damp Proof Course is a horizontal barrier, typically slate, bitumen, or plastic, installed in a wall (usually 150mm above external ground level) to prevent moisture from the ground rising up through the bricks via capillary action. It does not fail; it gets bypassed. When soil, mulch, and planting are piled up against the wall above this 150mm line, they create a bridge for moisture.
The soil acts like a sponge, absorbing rainwater and irrigation, and holding it in direct contact with the porous brickwork above the DPC. This allows moisture to penetrate the wall and appear internally as a classic rising damp tide mark. It’s not rising from the foundations; it’s moving sideways from your garden. In fact, many chartered surveyors agree that up to 90% of damp problems are unrelated to genuine DPC failure and are instead caused by such external factors.
The solution is simple in principle: maintain a clear 150mm gap between any soil or mulch and the top of your DPC line. This often means excavating the raised bed away from the wall and creating a gap, perhaps filled with a gravel trench, which allows the base of the wall to breathe and dry out.
Case Study: DPC Bridging from Raised Flowerbeds in Sussex
An investigation by Sussex Damp Experts into bridging damp highlights how typical triggers in UK gardens, such as newly laid patios and flower beds banked against house walls, are a primary cause of damp. They observe that soil effectively acts as a wick, connecting wet ground directly to the wall above the DPC line. This creates localised damp patches that align perfectly with the external landscaping features, a clear giveaway that it is not true rising damp, which would typically present as a more uniform tide mark along a wall.
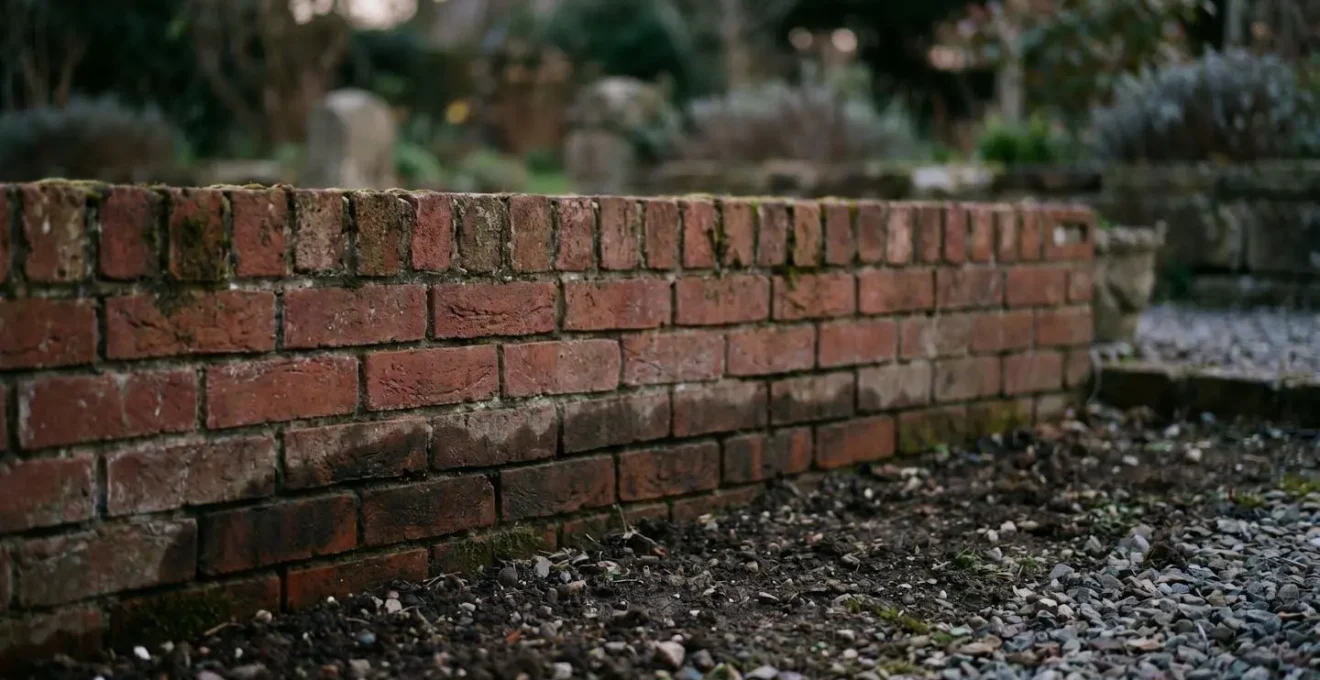
How to Keep Air Bricks Clear Using Gravel Trenches?
Just as crucial as the DPC is the provision for sub-floor ventilation, provided by air bricks. These small, vented bricks, usually terracotta or plastic, are set into the lower courses of brickwork to allow a flow of air beneath the suspended timber floors common in period properties. This airflow removes moisture from the sub-floor void, preventing the build-up of damp conditions that can lead to timber rot and fungal decay in floor joists. When these air bricks are blocked by soil, paving, or even dense foliage, this vital ventilation ceases. The sub-floor becomes stagnant and damp, a condition that will eventually manifest inside the property.
A highly effective and professional solution to protect air bricks and the base of a wall is the creation of a perimeter gravel trench, sometimes called a French drain. This involves excavating a channel alongside the foundation to a depth below the DPC, creating an air gap that prevents soil contact and allows moisture to drain away and evaporate freely. The illustration below shows how this trench creates a clear, dry zone around the foundation.
This “sacrificial zone” ensures that air bricks remain unobstructed and that the base of the wall is not subject to constant saturation. It is a robust, long-term solution for managing water at the wall-ground interface and is a standard remedial measure in professional damp surveying.
Your Action Plan: Installing a Perimeter Gravel Trench
- Cut Back Existing Surface: Mark out and cut back a strip of the patio or path around the house, typically between 200-300mm in width.
- Excavate the Trench: Carefully excavate the trench down to expose the damp proof course. The target depth should be at least 150mm below the internal floor level to ensure a clear margin.
- Backfill with Aggregate: Fill the trench with a clean, angular shingle (typically 20mm). The angular shape of the stones ensures there are sufficient voids to allow for both drainage and airflow.
- Check and Add Air Bricks: Ensure all existing air bricks are clear and unobstructed by the new trench. Consider adding new air bricks at approximately 1.5 to 2-metre intervals to improve cross-ventilation.
Splashback: How Hard Surfaces Near Walls Soak Brickwork
Water doesn’t only come from the ground up; it also comes from the sky down, and how it behaves when it hits the ground next to your house is critically important. When raindrops fall on a hard, non-absorbent surface like a concrete path, tarmac driveway, or stone patio, they don’t soak in. Instead, they splash. This “splashback” effect concentrates a significant amount of water onto the lower 30-50cm of your external walls. Over time, this constant, repetitive wetting of the lower brickwork can lead to severe saturation, especially in porous period bricks.
This issue is distinct from rising damp, as the moisture source is from above the DPC, but its effects can be just as damaging. It leads to moss and algae growth on the external face, frost damage (spalling) in winter as the trapped water freezes and expands, and eventual moisture penetration to the interior. As one specialist firm notes, the effect is cumulative and targeted.
Rain splash-back causes a concentration of water to land on the vertical lower wall areas. Over a time period of several years, the lower area of brick is exposed to much more moisture than the upper areas.
– IDS Damp Surveys, Splash-back onto brick walls and the relationship of the location of the DPC
The vulnerability is amplified in older homes. While modern cement mortar is hard and impermeable, the soft lime mortar used in pre-20th-century properties is designed to be breathable. This is a significant benefit for the overall health of the building, but it also means it can absorb water more readily from a constant source like splashback. Mitigating splashback can involve creating a soft border, like a gravel trench at the wall-patio junction, or ensuring the hard surface has an adequate fall away from the building.
Case Study: Lime Mortar’s Vulnerability in Period Homes
Period homes featuring traditional lime mortar are particularly susceptible to the effects of constant splashback. This mortar is more breathable than modern cement but also more porous. When exposed to persistent wetting without the chance to dry, this can cause the external mortar to crumble and internal plaster to flake and peel. In severe cases, it can even lead to the decay of internal timbers, such as skirting boards and floor joist ends, without effective intervention to reduce the external moisture load.
The Downpipe Error Dumping Tonnes of Water on Foundations
A single roof can collect a staggering volume of water during a rainstorm. The entire guttering and downpipe system is designed to safely collect this water and discharge it into a drain or soakaway, far from the building’s foundations. A failure at any point in this system can have catastrophic consequences for the structural dampness of a house, by concentrating thousands of litres of water in one small, vulnerable area. Common failures include gutters blocked with leaves, cracked or disconnected downpipe sections, and, most critically, a downpipe that discharges directly onto the ground at the base of the wall.
When a downpipe is not properly connected to a gully or drain, it deposits the entire roof’s runoff directly against the foundations. The ground becomes super-saturated, creating immense hydrostatic pressure that forces water into and through the brickwork below the DPC. This is not rising damp; it is penetrating damp on a massive scale. The volume of water is hard to overstate.
A heavy rain of 2 inches in an hour can produce 200 gallons of water from downspout discharge alone. If a downspout is clogged or broken, it can’t carry water away from the house, which is its function. The ground around the foundation quickly becomes oversaturated.
– National Park Service, All Wet & How to Prevent It: Managing Moisture in Your Historic House
A regular inspection of your rainwater goods is one of the most crucial and cost-effective maintenance tasks a homeowner can perform. During heavy rain, visually check that water is flowing freely through gutters and downpipes and discharging correctly into the drainage system. Look for overflowing gutters or water sheeting down the face of the wall. A simple repair, such as clearing a blockage or reconnecting a downpipe to a gully shoe, can prevent tonnes of water from being dumped against your foundations each year.
How Far Must a Soakaway Be From Foundations to Be Safe?
When a downpipe can’t be connected to a mains surface water drain, the standard solution is to direct the water to a soakaway. A soakaway is essentially a large, excavated pit, filled with rubble or modular plastic crates, which allows the collected rainwater to percolate slowly and safely back into the surrounding ground. However, its location is absolutely critical. If a soakaway is placed too close to the building, it will do the exact opposite of what’s intended: it will saturate the ground next to your foundations, artificially raising the local water table and creating the very damp problems it was meant to prevent.
UK Building Regulations (Part H) provide a clear and non-negotiable rule: a soakaway must be located at least 5 metres away from any building foundation. This distance is a minimum safety requirement to ensure that the large volume of water being discharged does not compromise the structural stability or dryness of the building’s footings. Installing a soakaway closer than this is a serious error and a common cause of persistent, localised damp problems that are often mistaken for foundation failures.
The 5-metre rule is a general guideline, and the actual effectiveness of a soakaway also depends heavily on the soil type. Heavy clay soils, which are common across the UK, have very poor percolation rates. Water drains away extremely slowly, meaning a soakaway in clay can remain full for long periods, creating a permanent reservoir of water. Before installing a soakaway, a professional should perform a percolation test to determine the soil’s drainage capacity and ensure the soakaway is sized and located appropriately. This involves digging a test pit, filling it with water, and timing how long it takes to drain away.
This practical test is fundamental to good drainage design. It demonstrates that simply digging a hole and filling it with rubble is not sufficient; the ground itself must be ableto accept the water. For homeowners with existing damp issues, checking the location of any soakaways relative to the house is a key diagnostic step.
Why Your New Driveway Needs to Be Permeable by Law?
Since 2008, regulations in the UK have governed how homeowners can pave over their front gardens. You are no longer permitted to simply lay a large, impermeable surface (like concrete or traditional asphalt) of more than five square metres without planning permission. The reason for this legislation is to combat the increasing risk of surface water flooding caused by the loss of naturally absorbent green space in urban areas. An impermeable driveway prevents rainwater from soaking into the ground, instead directing it into the public drainage system, which can become overwhelmed during heavy downpours. To comply with the law without needing planning permission, any new driveway must be made of a permeable material or drain to a suitable permeable area (like a lawn or soakaway) on the property.
While the law was designed primarily to manage public flood risk, it has a direct and significant benefit for your property’s foundations. A traditional, impermeable driveway that slopes towards the house acts like a funnel, collecting rainwater and channelling it directly to the base of your walls. This creates the same issues of saturation and hydrostatic pressure we’ve discussed. By opting for a permeable solution, you allow rainwater to soak into the ground across the entire surface of the driveway, dissipating its energy and preventing it from concentrating in one place.
However, a crucial error can be made when interpreting the rules. The regulations allow for an impermeable surface if it drains to a soakaway on site, but this can inadvertently create a new problem.
Case Study: The Danger of Concentrated Runoff
Homeowner forums often feature stories of well-intentioned drainage solutions going wrong. One such case involved a homeowner who installed an impermeable drive that drained to a single soakaway, as permitted. This system concentrated all the runoff from the large paved area into one point, which was located near a stone-built wall. The result was persistent, severe damp in that section of the house, as the soakaway could not handle the volume and was constantly saturating the ground next to the foundations. The eventual fix required costly excavation and the installation of a new drainage system further from the house.
What is the Minimum Gradient Needed to Shed Water off a Patio?
For any impermeable hardscaping, such as a traditional stone or concrete patio, the single most important design feature for preventing water damage is the gradient, or “fall”. The surface must be sloped to direct rainwater away from the building and towards a suitable drainage point, such as a lawn, a flower bed (away from the house), or a channel drain. If a patio is laid perfectly flat, or worse, slopes back towards the house, water will pool against the walls, leading to guaranteed saturation and damp penetration.
The generally accepted minimum gradient for a patio is a fall of 1 in 80. This means for every 80 units of distance away from the house, the patio should drop by 1 unit. For example, over a 4-metre (4000mm) wide patio, the far edge should be at least 50mm lower than the edge adjoining the house. This is a subtle slope, often barely noticeable to the eye, but it is sufficient to ensure that water flows away and does not pool.
However, from a surveyor’s perspective, simply meeting the minimum is not always enough, especially when dealing with period properties and the ground conditions around them. An expert will always advise building in a greater tolerance.
A new patio’s sub-base will settle over time, especially on made-up ground or near foundations. Building in a slightly more generous gradient from the start ensures it still drains correctly after several years.
– Sussex Damp Experts, Bridging Damp Survey: Treating the Bridges That Bypass Your DPC
This is crucial advice. The ground around a building is often disturbed from the original construction, making it more prone to settlement. Opting for a slightly steeper gradient, perhaps 1 in 60, provides a vital margin of safety, ensuring the patio continues to perform its function for decades, even as the ground beneath it shifts and settles. When checking an existing patio, a long spirit level and a tape measure are all that’s needed to verify if it has a correct and adequate fall away from your property.
Key Takeaways
- Most damp issues are caused by “bridging,” where external ground levels bypass the DPC, not by “rising” damp from a failed course.
- High external ground levels, impermeable surfaces, and poor drainage are the primary culprits for water stagnation against foundations.
- A full external perimeter audit is the essential and most cost-effective first step in any damp diagnosis before considering internal works.
Hardscape Features That Comply With UK Permeable Paving Regulations
Having systematically identified the external causes of water stagnation, the final step is to understand the solutions. Complying with UK permeable paving regulations is not just a legal necessity to avoid planning permission; it is a practical blueprint for creating a landscape that protects your home’s foundations. The goal is to manage rainwater where it falls, allowing it to soak into the ground naturally rather than concentrating it into a destructive force. This holistic approach to the entire perimeter is the most effective long-term strategy for preventing damp.
Several types of hardscape features achieve this goal. These include:
- Permeable Block Paving: These blocks look similar to standard paving but have larger joints filled with grit or are made from a porous concrete mix, allowing water to pass directly through them into the sub-base below.
- Gravel or Shingle Driveways: A classic and highly effective permeable solution. Rainwater simply soaks in between the stones.
- Reinforced Grass Grids: Plastic grids laid on a prepared base and filled with soil and grass seed. They provide a durable surface capable of supporting vehicles while remaining almost entirely green and permeable.
- Channel Drains (Aco Drains): For situations where an impermeable surface is unavoidable (like an existing patio), installing a linear channel drain at the junction with the house wall is essential. This intercepts surface water and pipes it away to a suitable drainage point.
By implementing these strategies, you are tackling the root causes of the vast majority of damp issues. The evidence shows that genuine, untreatable rising damp is far rarer than people think. By controlling external water, you eliminate the main source of moisture that is so often misdiagnosed. While studies suggest up to 15% of damp issues may be attributable to genuine rising damp, that means 85% are due to other, more controllable factors. By methodically working through the issues of DPC bridging, poor ventilation, splashback, and surface water runoff, you are addressing the lion’s share of the risk.
Your property’s long-term health depends on this external vigilance. Begin your perimeter audit today to diagnose the true source of moisture and protect the structural integrity of your home for the future.