In summary:
- Stop waiting for wilting or yellowing; these are late-stage symptoms of severe root distress.
- Learn to read chlorosis patterns on leaves like a map to diagnose specific nutrient lockouts at the root level.
- Use non-invasive checks like the « lift test » and the « sniff test » to assess root health without disturbing the plant.
- Understand that leaf spots and pests are often secondary infections invited by a primary, unseen problem in the soil.
There is a unique frustration every gardener knows: the sight of a cherished plant suddenly wilting, its leaves turning a sickly yellow despite consistent care. We react by watering more, or maybe less, adding fertilizer, and moving it into or out of the sun. This reactive approach is common because we’ve been taught to look for the most obvious signs of trouble. We wait for the plant to shout that it’s in crisis.
But what if the plant has been whispering about its problems for weeks? The conventional wisdom to « look for yellowing leaves » is often too little, too late. It treats the symptom, not the underlying cause, which frequently originates unseen, deep within the soil. The real secret to a thriving garden lies not in reacting to these alarms, but in proactively investigating the subtle clues that precede them.
The key is to shift your mindset from a simple caretaker to a plant diagnostician. This article rejects the wait-and-see approach. Instead, it equips you with a forensic framework to interpret the early, subtle visual signs of root stress. You will learn to read the leaves not as a simple health gauge, but as a detailed diagnostic dashboard pointing directly to problems at the root level, long before they become fatal.
This guide will walk you through a series of observational techniques that transform how you see your plants. We will decode the language of leaf discoloration, differentiate between pest and disease, and even use your sense of smell to assess the health of the hidden world beneath the soil. By mastering these skills, you can intervene with precision and save your plants before they even know they need saving.
Table of Contents: A Forensic Guide to Early Plant Health Assessment
- Veins or Margins: What Chlorosis Patterns Tell You About Nutrients?
- Holes or Spots: Distinguishing Insect Damage From Fungal Infection?
- The Silent Carrier: Why Healthy-Looking Plants Spread Viruses?
- How to Check Roots Without Killing the Plant?
- When to Spray: The Biological Window for Nematode Effectiveness
- The pH Lock-Out: Why Adding More Manure Won’t Fix Yellow Leaves?
- The Sniff Test: What Does Healthy Soil Smell Like vs Rot?
- Preventing Fatal Root Rot: The Hydrogen Peroxide Rescue Technique
Veins or Margins: What Chlorosis Patterns Tell You About Nutrients?
Chlorosis, the clinical term for yellowing leaves, is not a single symptom but a complex language. A plant doesn’t just « turn yellow »; it displays distinct patterns that a trained eye can interpret to diagnose specific problems at the root level. Thinking like a diagnostician means practicing symptom cartography: mapping where the yellowing appears and what pattern it follows. This approach moves beyond generic « nutrient deficiency » and points to the precise imbalance.
The most telling pattern is interveinal chlorosis, where the leaf tissue between the veins turns yellow while the veins themselves remain green. This creates a striking, net-like appearance. This specific pattern is a classic sign that the roots are failing to absorb essential micronutrients like iron or manganese, even if they are plentiful in the soil. It’s not a sign of absence, but of inaccessibility—a crucial distinction for effective treatment.
As the image above illustrates, the sharp contrast between the green vascular system and the pale tissue is the key diagnostic marker. This isn’t just a random discoloration; it’s a specific message from the plant about a metabolic failure. Understanding how to read these patterns is the first step in forensic horticulture, allowing you to identify a root problem long before the entire leaf succumbs and falls.
Your Action Plan: Visual Leaf Decoder for Root Problems
- Pinpoint the Location: First, check WHERE the yellowing appears. Iron deficiency typically starts on the youngest, terminal leaves and moves inward. In contrast, manganese and zinc deficiencies often begin on older, inner leaves and progress outward.
- Examine the Pattern: Analyze the pattern of discoloration. Classic interveinal chlorosis (yellow tissue between green veins) strongly indicates a micronutrient issue, signaling that roots cannot absorb iron, manganese, or zinc, often due to a pH problem.
- Assess the Scope: Differentiate between partial and full-leaf yellowing. Discoloration concentrated on the leaf margins or edges suggests a potassium deficiency. Uniform, widespread yellowing across the entire leaf, including the veins, typically points to a deficiency in a mobile nutrient like nitrogen.
- Connect to the Root Environment: If patterns suggest micronutrient lockout, the next step is to test your soil’s pH. High alkalinity (a pH above 7.0) chemically binds iron and manganese, making them unavailable to the plant’s roots even when they are physically present in the soil.
Holes or Spots: Distinguishing Insect Damage From Fungal Infection?
When you discover damage on a leaf, the first instinct is to identify the pest or disease. A forensic approach, however, asks a deeper question: why is the plant vulnerable in the first place? Often, pests and pathogens are not the primary problem but secondary opportunists attacking a plant already weakened by underlying root stress. A healthy, vigorous plant has robust natural defenses, but these defenses crumble when the root system is compromised.
Distinguishing between the two is a matter of close observation. Insect damage is typically mechanical. You’ll find chewed edges, clear holes (from caterpillars or beetles), or stippling patterns where insects with piercing-sucking mouthparts (like spider mites or aphids) have drained individual cells. Fungal infections, on the other hand, are more chemical and biological. They appear as spots or lesions that often have a distinct, « target-like » ring, a fuzzy or powdery texture (mildew), or a water-soaked, spreading blight. The edges of fungal spots are often less defined than the clean-cut holes from an insect.
The crucial connection for a plant diagnostician is that research confirms that stressed plants become primary targets for pests and diseases. An overwatered plant with early root rot, for example, is an open invitation for fungus gnats and pathogenic fungi that thrive in moist, low-oxygen environments. Therefore, treating the bug or the fungus with a spray is only half the battle. The true, long-term solution lies in addressing the root cause of the stress that made the plant a target.
The Silent Carrier: Why Healthy-Looking Plants Spread Viruses?
One of the most perplexing challenges in plant diagnostics is the « silent carrier »—a plant that is infected with a virus but shows few or no symptoms. These healthy-looking plants can act as a hidden reservoir for disease, allowing viruses to spread undetected throughout a garden or collection of houseplants. This phenomenon is why a forensic approach requires observing the entire plant community, not just the ones that are visibly sick.
Think of it like an asymptomatic human carrier of a cold. The person feels fine, but they are actively shedding the virus and infecting others. In the plant world, this transmission is usually facilitated by vectors. Insects like aphids, thrips, and whiteflies act as tiny, flying hypodermic needles. They feed on an infected but asymptomatic plant, pick up the virus particles in their mouthparts, and then fly to a healthy plant, injecting the virus as they feed. Because the source plant looks healthy, the gardener has no reason to isolate it or control the insect vector, allowing the disease to propagate silently.
The diagnostic clue here is not a single plant’s symptoms, but a pattern of decline across multiple, unrelated plants. If you see widespread, inexplicable mottling, mosaic patterns, or stunted growth appearing in your garden, a silent carrier is a likely culprit. The investigation then shifts to identifying potential vectors and removing suspect plants, even if they look « mostly healthy. » This is a difficult but necessary step in disease management, prioritizing the health of the many over the perceived health of one.
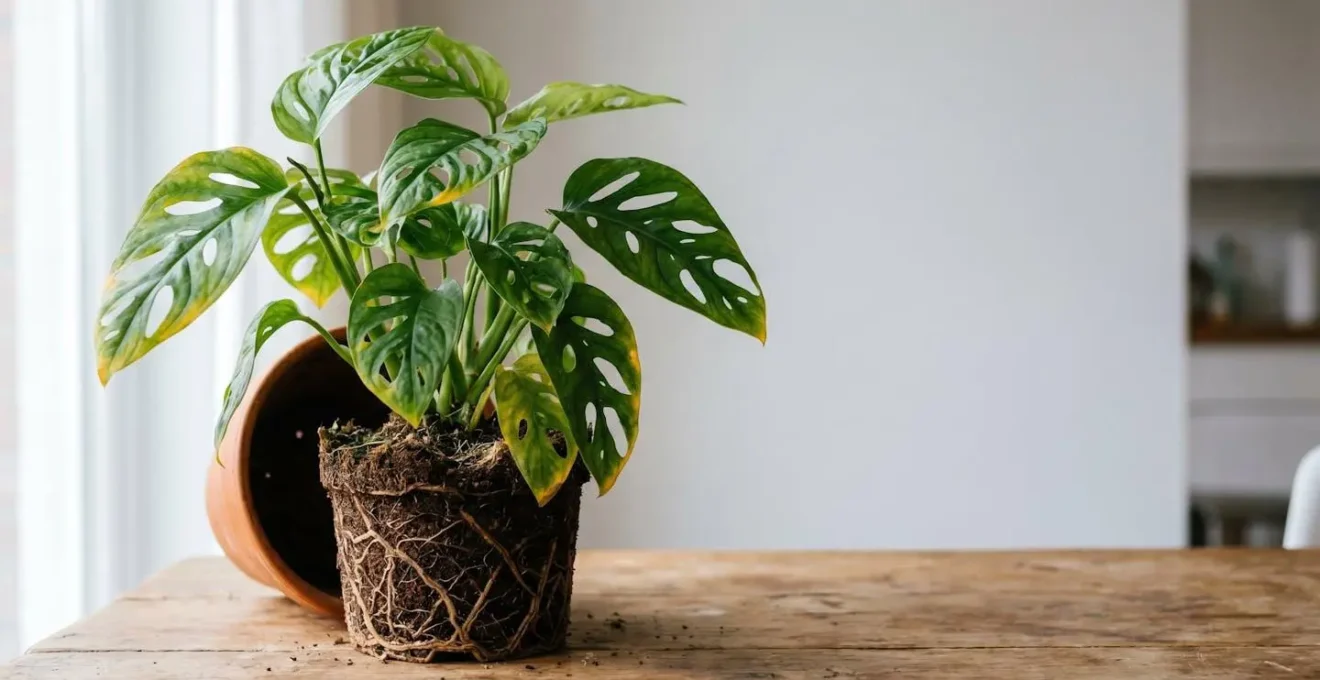
How to Check Roots Without Killing the Plant?
The ultimate confirmation of root health lies in direct observation, but many gardeners fear that unpotting a plant will cause fatal shock. While there is some risk, several non-invasive or minimally invasive techniques can give you a clear picture of what’s happening below the soil line without causing undue stress. These methods are essential tools in the plant diagnostician’s kit.
The simplest method is the « lift test, » which uses weight to infer moisture content at the root level. A pot that feels surprisingly heavy days after its last watering may indicate poor drainage and waterlogged soil. Conversely, a pot that is feather-light soon after watering could mean the soil is hydrophobic and not absorbing water, starving the roots. Another technique is a gentle visual inspection. For plants in smaller nursery pots, you can carefully tip the plant on its side and slide the entire root ball out of the container. A healthy root system will hold the soil in a firm, coherent shape. If the soil crumbles and falls away, it’s a sign of a weak or underdeveloped root system.
For proactive, continuous monitoring, the best method is preventative. Using clear plastic nursery pots (which can be slipped inside more decorative cachepots) allows for constant visual access to the root zone. This « clear pot method » lets you see root growth, monitor moisture levels, and spot the tell-tale signs of trouble—like browning or circling roots—at the earliest possible stage, completely removing the guesswork.
- The Lift Test: Learn the weight difference between a well-watered plant and a dry one by lifting the pot. A significantly lighter pot indicates dry soil and potential root stress, while an unexpectedly heavy pot may signal drainage problems.
- Visual Root Inspection: For smaller containers, gently tip and slide the plant out. Healthy roots should hold the soil in a firm, cake-like shape. If soil falls away easily, root development may be inadequate.
- Color Assessment: Generally, the whiter the roots, the healthier the plant. Brown, black, soft, or mushy roots are clear indicators of rot or disease.
- Clear Pot Method: Use transparent plastic nursery pots to allow for constant visual monitoring of root growth and early detection of issues without disturbing the plant.
When to Spray: The Biological Window for Nematode Effectiveness
Beneficial nematodes are microscopic roundworms that act as powerful biological control agents against soil-dwelling pests like fungus gnat larvae and root weevils. However, they are not a « spray and forget » chemical solution. As living organisms, their effectiveness is entirely dependent on applying them within their specific « biological window »—the narrow set of environmental conditions required for their survival and success. Applying them outside this window is not only a waste of money but can lead a gardener to falsely conclude that they « don’t work. »
The two most critical factors governing this window are temperature and moisture. According to biological pest control guidelines, nematodes are active hunters at soil temperatures between roughly 42°F and 95°F (5°C-35°C), but they are extremely vulnerable to UV radiation and desiccation. This means spraying them in the midday sun on dry soil is a death sentence. They require a « water highway » to move through the soil particles and hunt down their prey. Applying them correctly is a precise, tactical operation.
A forensic approach to pest control means using the right tool, at the right time, under the right conditions. Understanding the biological needs of your allies is just as important as understanding the weaknesses of your enemies. Following a strict protocol ensures these microscopic predators can do their job effectively.
- Timing: Apply nematodes in the early morning or at dusk when temperatures are cooler and UV exposure is minimal. They are highly sensitive to ultraviolet light.
- Soil Preparation: The soil must be moist before application and kept moist for at least 3-5 days afterward. Nematodes need a film of water to travel through the soil.
- Temperature Window: Ensure the soil temperature is within the active range for the specific nematode species you are using, typically between 50°F and 86°F (10°C-30°C). They become dormant or die outside this range.
- Post-Application Care: Water the treated area immediately after applying the nematodes to wash them from the foliage and into the soil. Avoid using any chemical pesticides or strong fertilizers that could harm them.
The pH Lock-Out: Why Adding More Manure Won’t Fix Yellow Leaves?
One of the most common gardener mistakes is seeing yellow leaves and immediately reaching for more fertilizer or rich compost like manure. When the plant fails to improve, the conclusion is often that it needs even *more* nutrients. This is a fundamental misunderstanding of soil chemistry. In many cases, the soil is already rich in nutrients; the problem is that the plant simply cannot access them. This phenomenon is known as nutrient lockout, and it is almost always caused by improper soil pH.
Think of your soil’s pH as a gatekeeper. Nutrients like iron, manganese, and zinc are only « unlocked » and available for root absorption within a specific, slightly acidic pH range. As the soil becomes more alkaline (high pH), these micronutrients become chemically bound to soil particles, rendered insoluble and inaccessible to the plant’s roots. It’s like having a pantry full of food, but the door is locked. Adding more food (fertilizer) outside the door does nothing.
This is why a soil test is a diagnostician’s most powerful tool. It reveals the true problem. In fact, research from The Morton Arboretum demonstrates that micronutrients are most available when soil pH is between 5.0 and 6.5. Adding manure, which is often alkaline, to an already alkaline soil will only worsen the lockout and intensify the yellowing. The solution isn’t more fertilizer, but rather adjusting the pH with soil acidifiers like elemental sulfur or sphagnum peat moss to « unlock » the nutrients that are already there.
The Sniff Test: What Does Healthy Soil Smell Like vs Rot?
Long before leaves turn yellow or the plant begins to wilt, the soil itself can broadcast the health of the root system through its scent. The « sniff test » is one of the oldest and most effective diagnostic tools available to a gardener. It’s a purely sensory technique that provides immediate feedback on the microbial environment where the roots live. Your nose can detect the difference between a thriving, aerobic ecosystem and a dying, anaerobic one.
Healthy, well-aerated soil has a distinct and pleasant smell. It’s often described as earthy, sweet, or like a forest floor after rain. This signature scent comes from a compound called geosmin, which is produced by beneficial bacteria (Actinomycetes) that are essential for healthy soil structure and nutrient cycling. This is the smell of life. It tells you that the soil is breathing, and that the roots have the oxygen they need to function properly.
Conversely, unhealthy, waterlogged soil has a foul and unmistakable odor. If you unpot a plant and are met with a smell that is sour, swampy, or reminiscent of rotten eggs, you are smelling the byproducts of anaerobic bacteria. These are microbes that thrive in the absence of oxygen. Their presence is a definitive sign of overwatering and the onset of root rot. This sharp, unpleasant smell is a biological alarm bell, warning you of a critical lack of oxygen at the root zone, a condition that will quickly lead to cell death and plant collapse if not corrected.
Key Takeaways
- Look for Patterns, Not Just Color: Interveinal chlorosis (green veins, yellow tissue) is a specific sign of root-level nutrient lockout, not just general « yellowing. »
- Symptoms are Secondary Clues: The presence of pests or fungal spots often indicates a plant is already weakened by primary root stress, making it an easy target.
- Use All Your Senses: Healthy soil has a sweet, earthy smell (geosmin), while root rot produces a distinct sour or swampy odor from lack of oxygen.
Preventing Fatal Root Rot: The Hydrogen Peroxide Rescue Technique
Root rot is the silent killer in many gardens and houseplant collections. As horticultural research indicates, root rot is a common problem that begins quietly below the soil, only revealing itself through wilting and yellowing leaves when the damage is already severe. It is caused by a lack of oxygen in the root zone, usually due to overwatering, which allows pathogenic fungi to thrive. While prevention is the best strategy, a well-timed intervention can sometimes rescue a plant from the brink.
For a plant suffering from severe waterlogging, the hydrogen peroxide (H2O2) rescue technique can be a last-ditch effort. Standard 3% hydrogen peroxide, when diluted with water (typically 1 part H2O2 to 2 parts water), releases an extra oxygen atom as it breaks down. Drenching the soil with this solution can provide a temporary boost of oxygen to suffocating roots, helping to kill off the anaerobic bacteria and fungi causing the rot. This is an emergency medical procedure for a plant in critical condition, not a regular maintenance task.
Ultimately, the most effective approach is to create an environment where root rot can’t begin. This means focusing on the three pillars of root health: proper drainage, appropriate watering, and a well-aerated potting medium. Mastering these fundamentals is the true secret to preventing this fatal condition.
- Use Proper Potting Medium: Always use a pasteurized, well-draining soil mix that contains an aerating amendment like perlite or pumice. Never reuse old potting soil, which can harbor pathogens.
- Ensure Adequate Drainage: Your pot must have drainage holes. Contrary to old advice, adding a layer of rocks at the bottom does not improve drainage; it actually raises the water table and can make root rot more likely.
- Water Correctly: The most reliable method is to test the soil moisture. Stick your finger two inches into the soil; if it feels moist, do not water. Overwatering is the number one cause of root rot.
- Choose the Right Pot Size: A pot that is too large for the root system will hold excess moisture, creating a perfect environment for rot. Match the pot size to the plant’s current root ball.
Begin applying these forensic observation skills to your plants today. By shifting your focus from reacting to obvious crises to reading the subtle, early warnings, you transform your role from a simple gardener into a skilled and proactive plant diagnostician.