Limescale from hard water is the #1 enemy of drip irrigation, but simply soaking emitters in vinegar isn’t a long-term engineering solution.
- True system reliability comes from a systematic maintenance protocol, choosing self-flushing components, and implementing proper winterization procedures.
- Understanding the physics of water flow and soil drainage is more critical than the brand of emitter you use.
Recommendation: Adopt a maintenance engineer’s mindset to diagnose and fix the root cause of blockages—from mineral buildup to pest ingress—to create a truly resilient and efficient watering system.
For gardeners in London and the South East, the sight is painfully familiar: a sophisticated drip irrigation system, installed to save time and water, slowly failing. Patchy growth and dry pots appear, all because the hard water—rich in calcium and magnesium—is methodically choking the life out of your emitters. The common advice is to simply soak the clogged parts in vinegar, a temporary fix that treats the symptom, not the cause. This approach is like putting a plaster on a broken pipe; it’s bound to fail again.
A true solution requires a different perspective. As a maintenance engineer, I don’t just fix what’s broken; I analyse the system to understand its failure points and implement protocols to prevent future breakdowns. Your drip irrigation system isn’t just a collection of parts; it’s a machine designed for precision delivery. To keep it running, you need to think about limescale dissolution, component selection, pest ingress prevention, and frost damage mitigation not as separate chores, but as integrated parts of a single maintenance strategy.
This guide moves beyond generic tips. It provides a systematic framework for diagnosing issues, implementing effective cleaning protocols, and making strategic choices that will future-proof your system. By understanding the ‘why’ behind the blockages, you can build a resilient irrigation network that not only survives the challenges of UK hard water but thrives during the increasing reality of hosepipe bans, ensuring every precious drop goes exactly where it’s needed.
To navigate this engineering approach to garden maintenance, we’ve structured this guide to tackle each potential failure point systematically. The following sections break down the core challenges and provide actionable, protocol-driven solutions to ensure your drip irrigation system operates at peak efficiency.
Summary: Cleaning Drip Emitters: A Maintenance Engineer’s Guide to Limescale in Hard Water Areas
- Vinegar or Acid: Safe Ways to Dissolve Limescale in Emitters?
- Turbulent Flow Emitters: Do They Really Prevent Clogging?
- The Earwig Problem: Why Insects Block Emitters and How to Stop It?
- How to Drain Emitters to Prevent Frost Damage Splitting?
- 2L/h or 4L/h: Matching Emitter Flow to Pot Volume?
- The Bucket Test: How Fast Should Water Drain for Lavender?
- Soaker Hose or Drippers: Which Wastes Less Water in Borders?
- Strategic Drip Irrigation Methods to Survive UK Hosepipe Bans
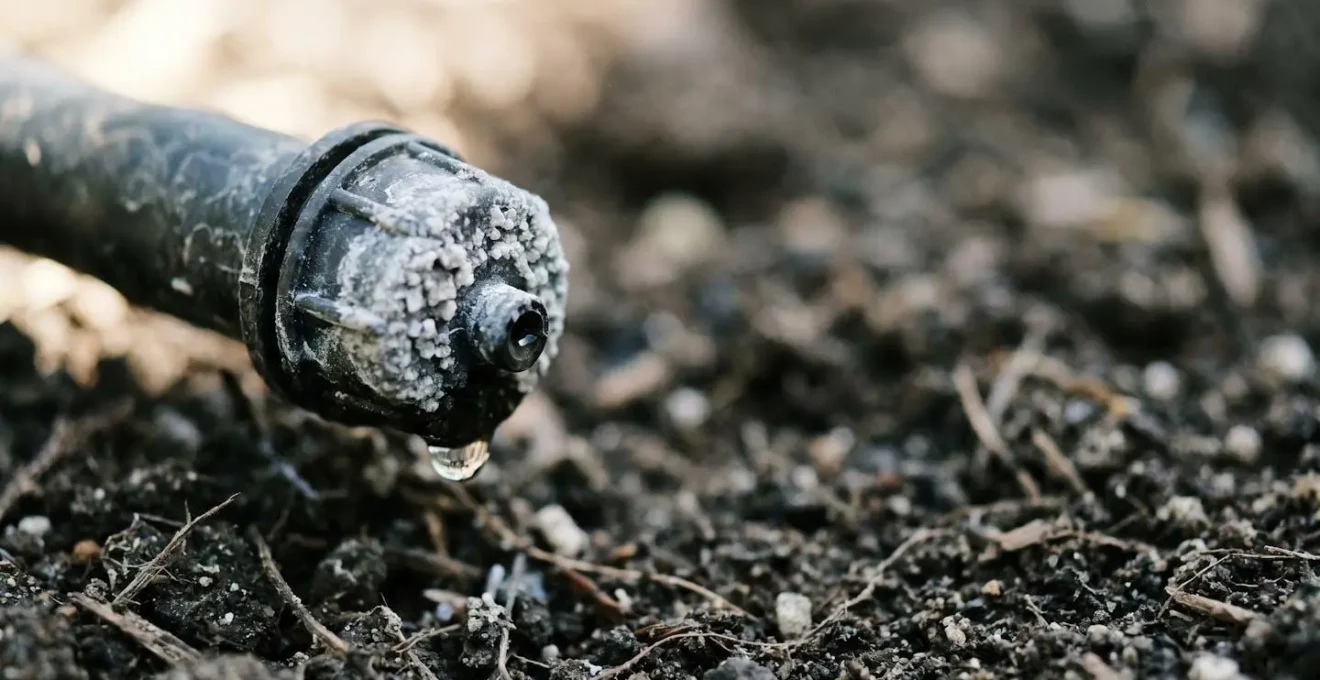
Vinegar or Acid: Safe Ways to Dissolve Limescale in Emitters?
The primary culprit in hard water areas is calcium carbonate, or limescale. While household vinegar (acetic acid) is a common suggestion, its effectiveness depends on a consistent process. For a more reliable outcome, a Systematic Descaling Protocol is necessary. The core issue arises when the water chemistry is out of balance; pH higher than 6.0 leads to precipitation of calcium and magnesium salts which clog emitters. An acid-based solution directly tackles this by dissolving the mineral deposits.
For a safe and effective clean, you can create a controlled environment for the descaling process. It’s less about the specific acid and more about the methodology: isolation of parts, sufficient soaking time, and mechanical agitation. This turns a frustrating chore into a predictable maintenance task. The illustration below shows the simple setup for this process, which can be done safely in a kitchen or workshop.
As you can see, the process is straightforward. Tiny bubbles forming on the emitters are a visual confirmation that the acid is reacting with and breaking down the limescale. Following a clear, multi-step protocol ensures every emitter is restored to full functionality, rather than hoping a quick rinse will do the job. The key is to be thorough, especially the final mechanical cleaning step to remove loosened debris.
Ultimately, a successful descaling operation isn’t about using the strongest chemicals, but about applying a patient, repeatable process that respects both the equipment and the safety of the user.
Turbulent Flow Emitters: Do They Really Prevent Clogging?
While cleaning is a crucial reactive measure, a proactive engineering approach involves selecting components designed to resist failure. This is where « turbulent flow » and « pressure-compensating » (PC) emitters come in. Unlike simpler emitters with a basic hole (laminar flow), these advanced designs create a more chaotic water path. This turbulence helps to keep small particles and mineral deposits in suspension, effectively flushing them out before they can accumulate and form a blockage. It’s a self-cleaning mechanism built directly into the component.
This design principle is not just marketing; it’s based on fluid dynamics. The internal structure, often a flexible diaphragm, constantly moves and changes the shape of the water channel. This action is key to their superior performance in hard water conditions, as it physically dislodges nascent clogs.
Engineering in Action: Pressure-Compensating Emitters in Hard Water
Pressure-compensating emitters significantly reduce maintenance because they are rarely clogged. They have a flexible diaphragm inside that regulates the water flow and flushes particles from the system, maintaining consistent water delivery from the beginning of a 100-foot run to the end, even on slight slopes. This self-flushing mechanism makes them particularly effective for gardeners in hard water areas who need a low-maintenance, « fit-and-forget » solution for their system’s core components.
The initial investment in PC or turbulent flow emitters is often higher, but this must be weighed against the long-term cost of maintenance labour and potential plant loss from system failure. For any new installation or major overhaul in a hard water area, specifying these types of emitters is the single most effective decision you can make to ensure long-term reliability and reduce the frequency of manual cleaning.
In essence, you are choosing a system that is designed to actively combat the primary cause of failure, rather than one that passively succumbs to it.
The Earwig Problem: Why Insects Block Emitters and How to Stop It?
Limescale isn’t the only enemy; your irrigation system offers a perfect, dark, and occasionally moist habitat for insects, particularly earwigs. Pest Ingress Prevention is a critical, yet often overlooked, aspect of irrigation maintenance. An earwig seeking shelter inside an emitter orifice can create a complete blockage that no amount of acid will clear. The problem is mechanical, so the solution must be too.
The goal is to create physical barriers that deny insects entry, especially during the autumn and winter when the system is used less frequently or is shut down entirely. This involves a systematic audit of every potential entry point in your system, from the main hose connection right down to the last emitter. It’s about sealing the system when not in use, making it an inhospitable environment for pests seeking a home.
Implementing a few simple, physical deterrents can eliminate this frustrating cause of blockages. This doesn’t require pesticides, but rather a change in how you decommission your system at the end of the season. Turning pest management into a simple checklist ensures your system is secure and ready for the next season.
Your Action Plan: Implementing a Pest Deterrence Strategy
- Seal Open Lines: Never leave irrigation lines open. Use female hose plugs or create simple plastic barriers to cover all system openings where insects could enter.
- Manage End Fittings: After draining for winter, replace all end fittings but leave them loose. This allows any residual water to drain while physically preventing insect entry.
- Secure the Source: The point where the faucet assembly was removed is a primary entry point. Seal the beginning of the main line with a dedicated plug or a securely tied plastic bag.
- Create Alternative Traps: Make pest management a family activity. Use rolled-up damp newspaper or small cans baited with oil as simple, more attractive earwig traps away from your emitters.
- Elevate Emitters: Raise emitters slightly off the soil surface using small stakes or clips. This makes them less accessible and less attractive to ground-dwelling insects looking for dark, moist shelter.
This proactive strategy transforms the system from an attractive insect hotel into a sealed, secure water delivery network, eliminating a whole class of frustrating and difficult-to-diagnose blockages.
How to Drain Emitters to Prevent Frost Damage Splitting?
In the UK, the transition from autumn to winter brings the most catastrophic threat to an irrigation system: frost. Water left in tubing, filters, or emitters will freeze and expand with immense force. This is a primary cause of system failure, leading to split pipes and cracked emitter bodies. A proper Winterization Protocol is not optional; it is essential preventative maintenance to avoid costly repairs. The principle is simple: get the water out.
There are two main methods: gravity draining and blow-out. For most domestic systems, a thorough gravity drain is sufficient. This involves disconnecting the system from the water source and opening all the low points to let water run out. The key is to be methodical, walking the lines and physically lifting low sections to ensure no pockets of water remain trapped. According to professional irrigation winterization guidelines, even a small amount of water can freeze, expand, and cause cracks that lead to expensive repairs.
The image below demonstrates the critical step of lifting the tubing at its lowest point, a simple action that ensures complete drainage and prevents hidden water pockets from becoming destructive ice plugs.
While an air compressor can be used for a « blow-out, » it carries risk; excessive pressure can damage the very components you’re trying to protect. For the average gardener, a meticulous gravity drain, followed by sealing the system openings to prevent pest ingress (as discussed in the previous section), provides robust protection. This annual protocol is the best insurance policy for your irrigation investment.
This isn’t just about preventing leaks; it’s about preserving the integrity of the entire system, ensuring it’s ready to perform flawlessly as soon as the growing season begins.
2L/h or 4L/h: Matching Emitter Flow to Pot Volume?
Selecting the correct emitter is a crucial engineering decision. It’s not just about delivering water, but about delivering it at a rate the soil can absorb without wastage. This is the principle of Flow Rate Matching. A 4 L/h (litres per hour) emitter might seem better because it’s faster, but if it’s placed in a small pot with fast-draining compost, most of that water will run straight out the bottom before the root ball is saturated. Conversely, a 2 L/h emitter in heavy, clay-like soil allows for slow, deep percolation, preventing runoff and ensuring the water reaches the roots.
The choice between a 2 L/h and 4 L/h emitter depends on a balance of three factors: the soil or compost type, the volume of the container, and the plant’s needs. Getting this balance right is the key to water efficiency. Done correctly, research on drip irrigation efficiency shows that a well-installed drip system can save up to 80% water compared to traditional methods like hand watering. This efficiency is paramount, especially when operating under water restrictions.
The following table provides an engineering-style selection guide. Use it to diagnose your setup or plan a new one, ensuring each plant gets the « slow sip » it needs rather than a wasteful deluge.
| Soil Type / Condition | Pot Size (Liters) | Sun Exposure | Recommended Flow Rate | Watering Duration |
|---|---|---|---|---|
| Sandy / Fast-draining | 5-10L | Full sun | 4 L/h (higher flow) | 15-20 min |
| Sandy / Fast-draining | 5-10L | Part shade | 2 L/h | 20-30 min |
| Loam / Balanced | 10-20L | Full sun | 4 L/h | 20-30 min |
| Loam / Balanced | 10-20L | Part shade | 2 L/h | 30-40 min |
| Clay / Heavy / Slow-draining | 10-20L | Full sun | 2 L/h (slow sip) | 30-45 min |
| Clay / Heavy / Slow-draining | 10-20L | Part shade | 2 L/h adjustable | 25-35 min |
| Large containers | 20-40L+ | Full sun | 4-8 L/h | 30-45 min |
Think of it as calibrating your system. By matching the output to the environment’s capacity, you achieve maximum efficiency and eliminate the single biggest source of water waste in drip systems: runoff.
The Bucket Test: How Fast Should Water Drain for Lavender?
Before you can match your emitter flow rate, you need to understand the material you’re working with: your soil. Guessing your soil type is a recipe for failure. A simple, practical diagnostic tool that any maintenance engineer would appreciate is the Bucket Test. This quick percolation test tells you exactly how fast your soil can absorb water, removing all guesswork from your irrigation planning. It’s particularly crucial for plants like lavender, which thrive in well-drained soil and will quickly suffer from root rot in waterlogged conditions.
The procedure is straightforward. You dig a small hole, fill it with water, and time how long it takes for the water to drain away. This single data point is more valuable than any generic soil description. It tells you whether you have sandy soil that will require more frequent, shorter watering cycles, or heavy clay soil that needs slow, infrequent applications to prevent pooling and runoff. Performing this test in different areas of your garden can reveal surprising variations, allowing you to create customised « hydro-zones » with different irrigation schedules.
To conduct this essential diagnostic, follow these steps:
- Prepare the Test Site: In the area you want to test (e.g., a lavender bed or new planting spot), dig a hole roughly the size of a 1-litre pot (about 6 inches wide and 6-12 inches deep).
- Saturate the Soil: Fill the hole with water and let it drain completely. This pre-wets the surrounding soil, ensuring your test measures the saturated percolation rate, not the initial absorption into dry soil.
- Conduct the Measurement: Refill the hole with water and place a ruler or stick vertically inside. Immediately measure the water depth.
- Time the Drainage: Record the water level every hour. The rate at which the water level drops is your soil’s drainage rate in inches per hour.
- Interpret the Results: A drop of 1-2 inches per hour is ideal for most plants, including lavender. If it drains much faster (sandy soil), you’ll need to water more often. If it’s much slower (clay soil), you risk root rot and must adjust your watering to be very slow and infrequent.
By treating your garden soil as an engineering material with measurable properties, you can design a watering system that works in harmony with it, not against it, ensuring plants like lavender get the excellent drainage they demand.
Soaker Hose or Drippers: Which Wastes Less Water in Borders?
When watering dense borders or vegetable rows, the choice often comes down to soaker hoses versus individual drippers. From a cost and simplicity standpoint, soaker hoses seem appealing. They are cheap and easy to lay out. However, from a water efficiency and maintenance engineering perspective, they are a deeply flawed technology, especially in the long run. Their primary failing is uneven water distribution.
Due to pressure and friction loss along the length of the hose, a soaker hose delivers significantly more water at the beginning of its run than at the end. In fact, irrigation engineering studies demonstrate that a 50-foot soaker hose might deliver 2-3 times more water in the first 10 feet compared to the last 10 feet. This leads to over-watered plants near the tap and under-watered plants at the far end. Furthermore, they are nearly impossible to clean in hard water areas and have a very short lifespan, typically needing replacement every couple of seasons.
A system built with individual drip emitters, particularly pressure-compensating ones, represents a higher initial investment but is vastly superior in performance, longevity, and adaptability. The following table breaks down the engineering trade-offs.
| Factor | Soaker Hose | Drip Irrigation |
|---|---|---|
| Initial Cost | Low (under £30 for 25 metres) | High (£75-150+ for complete system) |
| Installation Time | 30 minutes (snake and connect) | 2-4 hours (planning + assembly) |
| Water Distribution | Uneven: 2-3x more at start vs end | Consistent throughout entire run |
| Maximum Effective Length | 15 metres absolute max | 30+ metres with no pressure loss |
| Hard Water Maintenance | Difficult (cannot soak entire hose in vinegar) | Easy (remove individual emitters to clean/replace) |
| Lifespan | 2-3 seasons (frequent replacement) | 5+ years (repairable components) |
| Best For | Dense planting, raised beds, small gardens | Spaced plants, large gardens, slopes, long-term investment |
| Adaptability | Low (hard to modify or expand) | High (infinitely customizable and expandable) |
For any gardener serious about water conservation and creating a low-maintenance, long-lasting system, drip emitter lines are the only logical engineering choice. It is an investment in precision, efficiency, and peace of mind.
Key Takeaways
- Systematic maintenance is not a chore, but a protocol to ensure reliability. Cleaning, winterizing, and pest prevention are interconnected.
- Component selection is your first line of defense. Pressure-compensating emitters and proper flow rates prevent problems before they start.
- Data, not guesswork, drives efficiency. Use the bucket test to understand your soil and tables to select the right parts.
Strategic Drip Irrigation Methods to Survive UK Hosepipe Bans
In the face of climate change and drier summers, hosepipe bans (Temporary Use Bans or TUBs) are becoming a regular feature of UK gardening. This is where a well-designed drip irrigation system transitions from a convenience to a critical lifeline. The single most important advantage is that they are often exempt from restrictions. As recent UK water company guidelines indicate that drip irrigation systems are frequently exempt, because they use a fraction of the water of a hosepipe—delivering 2-4 litres per hour directly to the root zone, compared to a hosepipe’s 1,000 litres per hour sprayed indiscriminately.
However, an exemption is not a license for waste. Surviving a ban requires a strategic approach. This means implementing a Water Triage Framework, prioritising which parts of your garden receive the limited water available. The goal is survival of the most valuable and vulnerable plants.
During a drought, your priorities should be:
- Priority 1 (Essential): Newly planted trees and shrubs (in their first two years) and your vegetable patch. These have high value and cannot easily recover from severe drought stress.
- Priority 2 (Important): Plants in pots and containers. They have limited access to ground moisture and dry out extremely quickly.
- Priority 3 (Expendable): Established lawns and mature, drought-tolerant perennials. These can be allowed to enter summer dormancy; they will almost always recover with the autumn rains.
Most UK water companies permit drip irrigation and soaker hoses for garden plants (not lawn), but the specific wording varies by company. Check your company’s TUB notice for the exact list of prohibited and permitted uses.
– LawnBySeason UK Water Regulations Team, UK Water Restrictions 2026 – Hosepipe Bans & TUBs Guide
A drip system allows you to direct your water budget exclusively to Priority 1 and 2 areas. Enhance this efficiency by applying a thick 3-4 inch layer of organic mulch (like bark or compost) around every emitter. This simple step can halve water loss to evaporation, making every drop count. Combining a drip system with strategic mulching and grey water use for less critical plants is the ultimate resilient gardening strategy for the modern British climate.
Start implementing these engineering-led maintenance protocols and strategic watering plans today. By doing so, you build a resilient garden that not only survives but thrives, regardless of hard water, pests, or drought regulations.