Effective pest control isn’t a battle fought with sprays; it’s a carefully timed dance with nature’s own rhythms.
- By understanding when plants are most vulnerable and when predators are most active, you can prevent most infestations before they begin.
- Key skills include recognizing beneficial insect larvae, creating habitat for them, and harvesting plants according to their internal “chemical clock” for peak potency.
Recommendation: Shift your mindset from reacting to pests to proactively choreographing your garden’s life cycles for a resilient, self-regulating ecosystem.
For many gardeners, the joy of planting a seed is often followed by the frustration of a seemingly endless war against pests. You nurture a tender seedling only to find it decimated overnight. You spot a few aphids and, within days, they’ve colonized your prize-winning roses. The common response is to reach for a spray, whether it’s a store-bought chemical or a homemade soap solution. But this approach traps us in a reactive cycle of fighting symptoms rather than addressing the root cause.
The conventional wisdom tells us to use companion planting or release store-bought ladybugs, but these are often just fragments of a much larger, more elegant solution. What if the most powerful tool for pest control wasn’t a product in a bottle, but knowledge? What if you could design a garden that largely polices itself, simply by understanding time?
This is the core of a truly holistic approach. It’s about developing your ecological literacy—the ability to read the interconnected life cycles of your plants, the pests that feed on them, and the beneficial insects that prey on those pests. It’s a shift from being a garden warrior to becoming a temporal strategist, masterfully choreographing these cycles to create a resilient, low-intervention, and thriving ecosystem. This guide will walk you through the fundamental life cycle knowledge that allows you to work with nature, not constantly against it.
In the following sections, we will explore the critical moments in a plant’s life and how to leverage them, from protecting vulnerable seedlings to attracting a permanent army of beneficial predators. This is your almanac for a smarter, more peaceful garden.
Contents: The Gardener’s Almanac for a Pesticide-Free Garden
- Why Pests Target Seedlings and How to Protect Them Naturally?
- How to Time Your Flowering to Feed Pollinators When They Emerge?
- Biennials vs Perennials: Why Your Foxgloves Didn’t Flower This Year?
- The Seeding Error That Multiplies Weeds by 1000% Next Season
- When to Harvest Herbs: The Chemical Peak for Maximum Flavour
- Larvae vs Adult: Recognizing a Ladybird Larva Before You Squish It?
- The 2-Week Rule: When to Wait for Ladybirds Instead of Spraying?
- How to Attract Beneficial Insects to Eat 90% of Your Aphids?
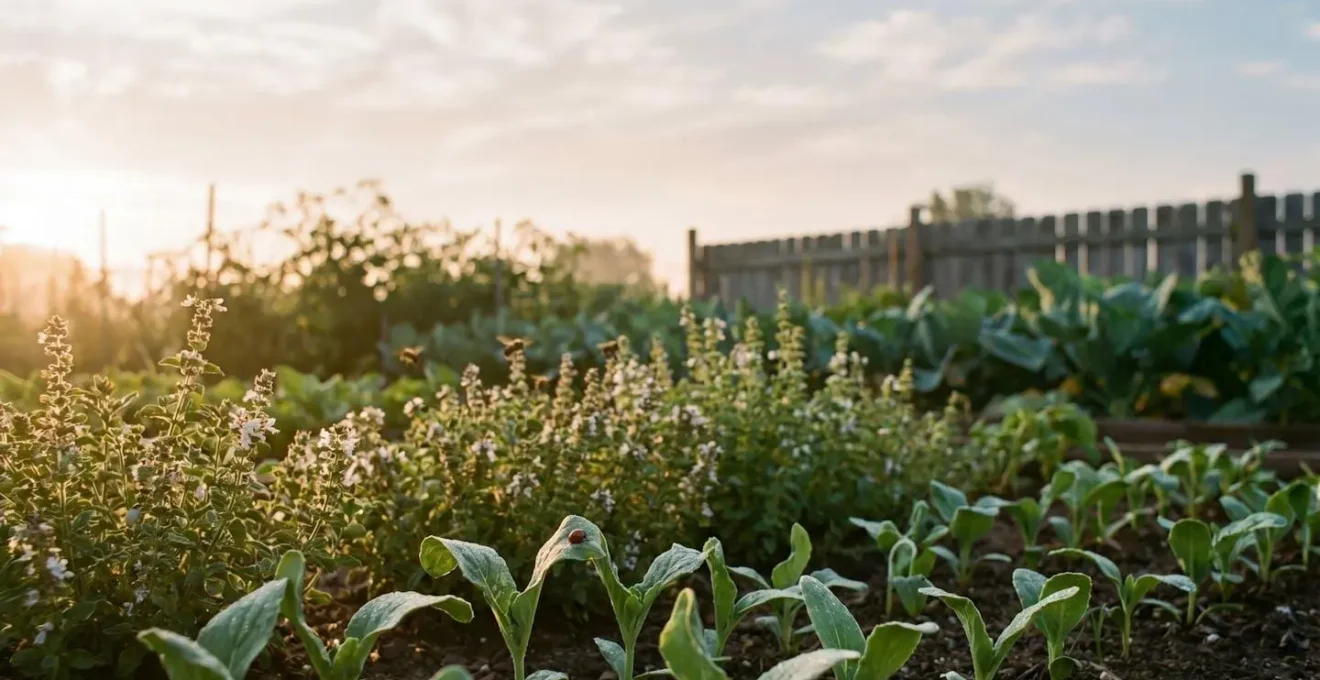
Why Pests Target Seedlings and How to Protect Them Naturally?
A seedling is a plant in its most vulnerable stage, the equivalent of an infant. Its tissues are soft, tender, and packed with concentrated nutrients, making it an irresistible and easy meal for a host of pests, from slugs and snails to flea beetles and cutworms. This isn’t a random attack; it’s a strategic exploitation of a lifecycle’s weakest point. A mature, established plant has developed tougher leaves, a more extensive root system, and often a profile of chemical defenses that make it less appealing. The seedling, however, has none of these advantages. Its survival depends entirely on reaching the next stage of growth before being consumed.
Therefore, the first act of temporal choreography in your garden is to create a physical fortress around these young plants. This isn’t about chemical warfare; it’s about simple, physical exclusion during this critical, short-term window of vulnerability. By providing a safe nursery, you ensure the plant has the time it needs to develop its own defenses.
As the illustration shows, these barriers don’t need to be complex or expensive. A simple cardboard collar can stop a cutworm, and a repurposed plastic bottle can act as a mini-greenhouse that shields a seedling from both frost and flying pests. The key is to match the barrier to the threat. Effective methods include:
- Floating row covers: These lightweight fabric barriers create a physical shield against flying insects like cabbage moths and flea beetles while allowing light, air, and water to penetrate.
- Cutworm collars: A simple ring made from a toilet paper roll or cardboard, pushed an inch into the soil around the stem, creates an impassable wall for cutworms that girdle seedlings at the soil line.
- Slug and snail moats: A ring of coarse sand, crushed eggshells, or diatomaceous earth creates a gritty, abrasive surface that soft-bodied pests are reluctant to cross.
- Companion planting for camouflage: Interplanting seedlings with strongly scented herbs like chives or mint can help mask the scent of the vulnerable plant, confusing pests that hunt by smell.
By focusing your energy on protecting seedlings for the first few weeks, you set the stage for a stronger, more resilient plant that will require far less intervention later in its life.
How to Time Your Flowering to Feed Pollinators When They Emerge?
A successful garden ecosystem relies on a thriving population of pollinators, but simply planting “pollinator-friendly” flowers is not enough. The key is timing. Pollinators, especially native bees, have their own life cycles and emerge at specific times of the year, often hungry and in search of the season’s first available nectar. The gardener’s role as a temporal strategist is to ensure that your garden’s “pantry” is open for business the moment these crucial allies wake up.
This principle of lifecycle mismatch—or in this case, a planned lifecycle *match*—is critical. Providing a food source in early spring, when little else is blooming, can be the deciding factor in whether a queen bumblebee establishes her nest in your yard or moves on. An early, reliable food source supports a larger, healthier population of beneficial insects that will, in turn, provide pollination and pest control services throughout the season. This strategic thinking transforms your garden from a passive collection of plants into an active support station for the local ecosystem.
This isn’t just theory; it’s backed by observation. A case study in Nature on the early-flowering Pulsatilla vulgaris provided clear evidence for this strategy. The researchers explained their findings:
Early Flowering Plants and Pollinator Visitation Success
Research on Pulsatilla vulgaris across eight grassland sites demonstrated that early-flowering plants received higher bee visitation rates despite lower overall bee abundances at the start of the season. Early flowers benefited from reduced competition with other co-flowering plants, resulting in higher estimated total bee visits and improved seed set compared to later-blooming individuals. This study confirms that strategic timing of garden flowering sequences can maximize pollinator support even when absolute pollinator numbers are initially low.
To implement this, focus on planting a succession of blooms, paying special attention to the very beginning and very end of the season. Include plants like crocuses, lungwort (Pulmonaria), and willows for the earliest spring emergers, and asters, goldenrod, and sedum for the late-autumn foragers.
By providing a continuous buffet, you are not just feeding bees; you are investing in the long-term health and productivity of your entire garden ecosystem.
Biennials vs Perennials: Why Your Foxgloves Didn’t Flower This Year?
One of the most common frustrations for a developing gardener is when a plant fails to flower. You’ve watered it, fed it, and protected it, yet it remains a stubborn clump of leaves. Often, this isn’t a sign of failure but a misunderstanding of the plant’s internal clock and life cycle. The classic example is the foxglove (Digitalis), a biennial plant. This is a perfect lesson in ecological literacy: knowing your plant’s life story is essential to understanding its behavior.
Unlike annuals (one-year lifecycle) or perennials (live for many years), biennials have a distinct two-year plan.
- Year One: The plant focuses entirely on vegetative growth. It establishes a strong root system and a low-lying clump of leaves called a rosette. It will not flower. This is its energy-gathering phase.
- Year Two: After a period of cold dormancy, a process known as vernalization, the plant uses its stored energy to send up a tall flower stalk, set seed, and then die, completing its lifecycle.
So, if your first-year foxglove didn’t flower, it wasn’t failing—it was doing exactly what it was supposed to do. The “problem” was an expectation based on a perennial or annual lifecycle. To have foxgloves every year, you must practice temporal choreography by planting new seeds for two consecutive years. From the second year on, you’ll have one generation in its vegetative state and another in its flowering state, ensuring a continuous display.
If you suspect a plant is a non-flowering biennial, you can become a plant detective. Use this checklist to diagnose the situation:
- Step 1: Examine the base. Is there a healthy rosette of leaves at ground level? If so, congratulations are in order for a successful first year.
- Step 2: Check for damage. If no rosette is visible, look for signs of pest damage or disease that might have weakened the plant.
- Step 3: Verify vernalization. Did the plant experience a proper winter? Biennials like foxgloves and Canterbury bells need 6-8 weeks of temperatures below 45°F (7°C) to trigger flowering.
- Step 4: Implement overlapping generations. If you want continuous blooms, ensure you’ve planted seeds in two consecutive years.
- Step 5: Mark your plants. Use simple, natural markers to track first-year biennials so you don’t mistake their healthy vegetative growth for a failure to thrive.
Understanding these different life cycles transforms frustration into appreciation. You learn to celebrate the first-year rosette as a promise of spectacular things to come.
The Seeding Error That Multiplies Weeds by 1000% Next Season
In the temporal choreography of the garden, no action has more long-term consequences than allowing weeds to set seed. It may seem like a small, insignificant event—a single dandelion puffball or a stalk of pigweed going to flower—but it is an ecological time bomb. This single mistake doesn’t just create a few more weeds for next year; it deposits hundreds or thousands of seeds into the soil’s “seed bank,” where they can lie in wait for years, even decades.
This is a critical concept in organic gardening. Every time you cultivate the soil, you bring a new batch of these dormant seeds to the surface, giving them the light they need to germinate. This is why you can diligently weed an area for a whole season, only to have it covered in weeds again the following spring. You aren’t fighting new invaders; you’re fighting the ghosts of weeds past. The persistence of these seeds is astonishing; studies have documented viable weed seeds can remain dormant for up to 40 years for some species.
The only way to win this long-term battle is to stop making deposits into the seed bank. Prevention is exponentially more effective than removal. A study from Colorado powerfully quantifies this benefit.
Six-Year Weed Seed Bank Reduction Through Prevention
A study tracking common lambsquarters and redroot pigweed at a site managed by Michigan State University Extension researchers demonstrated dramatic seed bank depletion when weeds were prevented from setting seed. Over six years, with consistent prevention, lambsquarters seeds were reduced to just 6% of the original seed bank, while redroot pigweed declined to only 1% of initial levels. This research proves the immense long-term benefit of preventing even a single generation of weed seeds from entering the soil.
The lesson is clear: prioritize the removal of any weed that is starting to flower. It’s the most high-leverage activity you can perform for the future health and low-maintenance nature of your garden.
When to Harvest Herbs: The Chemical Peak for Maximum Flavour
Just as plants have annual or biennial life cycles, they also have daily and seasonal rhythms governed by an internal chemical clock. This clock dictates the concentration of essential oils, which are the compounds that give herbs their potent flavour and aroma. As a gardener, understanding this clock allows you to harvest at the precise moment of peak quality, transforming a good herb into an extraordinary one.
The most important rhythm to understand is the daily one. In the cool of the night, plants conserve moisture. As the morning sun appears, the plant begins to photosynthesize, and the concentration of essential oils in the leaves builds. This concentration typically peaks in the mid-morning, after the dew has evaporated but before the intense heat of midday causes the oils to volatilize and dissipate into the air. Harvesting a mint leaf at 10 a.m. versus 3 p.m. can make a remarkable difference in its pungency.
The plant’s larger life cycle also plays a crucial role. When an herb like basil or oregano begins to produce flower buds, it signals a major shift in the plant’s energy allocation. The plant is moving from vegetative growth (making leaves) to reproductive growth (making flowers and seeds). During this process, energy and flavour compounds are diverted from the leaves to the flowers, resulting in less flavourful foliage. This is why pinching off flower buds, a practice known as preventing “bolting,” is so critical for maintaining a supply of flavourful culinary herbs.
To put this knowledge into practice, here are five principles for timing your herb harvest for peak essential oil content:
- Harvest in the morning. Aim for a window between 9 and 10 a.m., after the dew has dried but before the sun gets too hot.
- Conduct a family sensory experiment. Pick two identical leaves of basil or mint—one at 9 a.m. and one at 4 p.m. Crush each and compare the scent intensity to experience the difference in oil concentration firsthand.
- Pinch off flower buds. As soon as you see flower buds forming on basil, oregano, or mint, pinch them off to redirect the plant’s energy back into leaf production.
- Harvest outer leaves on basal-growth herbs. For “cut-and-come-again” herbs like parsley and cilantro, harvest the outer, more mature leaves first, allowing the center rosette to continue producing new growth.
- Pinch stems on apical-growth herbs. For herbs that grow from the tip like basil, pinch the stem just above a set of leaves. This encourages the plant to branch out, creating a bushier plant with more leaves to harvest.
By aligning your harvest with the plant’s natural rhythms, you are accessing the very peak of what the plant has to offer, a reward for your deepening ecological literacy.
Larvae vs Adult: Recognizing a Ladybird Larva Before You Squish It?
One of the biggest mistakes well-intentioned organic gardeners make is accidentally eliminating their greatest allies. We’ve been trained to recognize the cute, dome-shaped adult ladybug as a “good bug,” but what about its offspring? The tragic irony is that the larval stage of many beneficial insects is not only unrecognizable to most people but is also the most voracious predator stage. A gardener who doesn’t know what a ladybug larva looks like is likely to squish it, thinking it’s a strange new pest.
This is where developing your ecological literacy pays huge dividends. Learning to identify the “baby pictures” of your garden’s superheroes is a transformative skill. The ladybug larva, for instance, looks like a tiny, spiky, black alligator with orange spots. It is an aphid-eating machine, far more effective at pest control than the adult. An adult ladybug may eat a few dozen aphids a day, but its larva is a true predator-in-training. Over its larval lifespan, a single one can consume an astonishing number of pests, with some USDA integrated pest management data showing over 5,000 aphids in their lifetime.
This isn’t limited to ladybugs. The lacewing, another garden champion, lays its eggs on delicate stalks. The emerging larva, nicknamed the “aphid lion,” is a fearsome-looking predator that devours aphids, mites, and other small pests. The University of Minnesota’s IPM program highlights the importance of this recognition.
Beneficial Insect Larval Stage Identification for Garden Heroes
Educational programs from institutions like the University of Minnesota emphasize that gardeners must learn to recognize the immature stages of beneficial insects. Ladybug and lacewing larvae, though appearing alien and spiky, are actually more effective pest controllers than their adult counterparts. Teaching gardeners to identify these ‘baby pictures’ prevents the accidental destruction of garden allies, shifting the perception from ‘scary pest’ to ‘superhero-in-training’ and dramatically increasing the effectiveness of natural pest control.
Take the time to look up pictures of the larval stages of ladybugs, lacewings, and hoverflies. Print them out if you need to. Making this small effort to recognize your allies in their youth is one of the most significant steps you can take toward a self-regulating garden.
Once you can spot these predators-in-training, you’ll feel a sense of relief and partnership, knowing you have a tiny army working on your behalf.
The 2-Week Rule: When to Wait for Ladybirds Instead of Spraying?
You’ve spotted aphids on your kale. The immediate instinct, ingrained by years of quick-fix thinking, is to *do something*. Mix up a soap spray, order ladybugs online, or start squishing. But the most powerful and strategic action is often to do nothing at all—for a little while. This is the “2-Week Rule,” a core tenet of the temporal strategist’s playbook. It’s an exercise in patience and observation, based on a deep trust in the life cycles you’ve worked to support.
Here’s how it works: the presence of pests is a signal. Aphids, for example, reproduce quickly and create a concentrated food source. This food source sends out a chemical “dinner bell” to beneficial predators like ladybugs and lacewings. However, it takes time for those predators to arrive, lay eggs, and for those eggs to hatch into the hungry larval stage. This recruitment period is typically between 7 and 14 days. If you spray—even with an organic spray—during this window, you not only wipe out the pests, but you also wipe out the food source, telling the incoming beneficials that the “diner is closed.” They will move on, and you’ll be trapped in the spray cycle when the next wave of pests inevitably arrives.
The 2-Week Rule asks you to wait and watch. Monitor the pest population, but also actively scout for the signs of incoming help: adult ladybugs, tiny yellow clusters of ladybug eggs, or the iconic lacewing eggs on their silken stalks. When you see these signs, you know that reinforcements are on the way. Your patience allows the natural predator-prey cycle to engage, creating a more stable and resilient system in the long run. This patient, observation-based approach is at the heart of the growing global interest in natural pest control solutions.
Your Action Plan: Active Waiting During the 2-Week Recruitment Period
- Days 1-3: Observe and Document. Observe the affected plant at the same time daily. Photograph or sketch the pest population to establish a baseline. Resist the immediate reflex to spray.
- Days 4-7: Hunt for Eggs. Actively hunt for ladybug eggs (tiny yellow clusters) on the undersides of leaves near aphid colonies, and check for lacewing eggs (individual eggs on hair-like stalks).
- Days 8-11: Scout for Larvae. Look for the arrival of beneficial larvae. This is the exciting part! Scout for the alligator-shaped ladybug larvae and the pale, active lacewing larvae (“aphid lions”) feeding on pests.
- Days 12-14: Evaluate and Decide. Has the pest population stabilized or decreased? If beneficial insects are present and feeding, the system is working. Continue observation for another week. If the pest population is still exploding and no beneficials have arrived, you can then consider a targeted intervention.
- Throughout the Period: Light Intervention. You can hand-crush aphids on one heavily infested leaf per day to slow their spread without disrupting the recruitment process. Also, provide a shallow water source with pebbles for beneficial insects to drink safely.
By practicing this patient observation, you move from being a frantic firefighter to a calm, confident ecosystem manager.
Key Takeaways
- Timing is Everything: Proactively managing your garden’s life cycles—from seedling protection to timed flowering—is more effective than reacting to problems.
- Know Your Allies: Learning to identify the larval stages of beneficial insects like ladybugs is critical to avoid accidentally eliminating your most powerful pest controllers.
- Prevention Beats Reaction: Stopping a single weed from setting seed is exponentially more effective than pulling hundreds of its offspring for years to come.
How to Attract Beneficial Insects to Eat 90% of Your Aphids?
The ultimate goal of a temporal strategist is to create a garden so rich with life that it requires minimal intervention. This isn’t a fantasy; it’s the result of intentionally designing a habitat that provides for the complete life cycle needs of beneficial insects. If you build it, they will come—and they will stay. Buying a box of ladybugs and releasing them is a temporary fix; creating a permanent habitat for them is a long-term solution.
To create this self-regulating ecosystem, you need to think beyond just planting flowers. Beneficial insects have three fundamental needs, which can be remembered as the “Three S’s”: Sugar, Shelter, and Safety. Providing all three ensures you are supporting every stage of their lives, from egg to larva to adult, and even through winter hibernation.
Here is a blueprint for creating a “Three S” habitat that will become the headquarters for your garden’s predator army:
- Sugar (Nectar): Adult hoverflies and parasitic wasps, whose larvae are voracious aphid eaters, have tiny mouths. They need flowers with easily accessible nectar. Plant umbel-shaped flowers like dill, fennel, yarrow, and Queen Anne’s lace, which provide perfect landing platforms.
- Sugar (Pollen): To ensure a continuous food supply from spring through fall, include a variety of composite flowers. Think of sunflowers, coneflowers, daisies, cosmos, and asters, timing their blooms to create a season-long buffet.
- Shelter (Overwintering): Many beneficial insects, including ladybugs and native bees, need a place to hibernate through the winter. Resist the urge to have a perfectly tidy garden. Leave some undisturbed areas with bunch grasses, piles of leaf litter, and the hollow stems of last year’s perennials standing through the winter.
- Shelter (Daily): Create a dedicated ‘Predator Patch.’ This can be a slightly wild corner of your yard with a permanent planting of native flowers and herbs that you don’t harvest. This serves as a permanent headquarters and breeding ground for your beneficials.
- Safety (Water): Insects need water, but they can easily drown in deep pools. Provide a shallow dish filled with pebbles or marbles and a small amount of water. This creates safe landing platforms for them to drink without risk. Refresh the water weekly to prevent mosquito breeding.
This is the culmination of your work as a temporal strategist. You’ve moved beyond fighting individual pests and are now managing a complex, beautiful, and largely self-sufficient ecosystem that works in partnership with you.