In summary:
- Achieving year-round patio colour isn’t about buying more plants; it’s about mastering plant science.
- Understanding hormonal triggers (deadheading) and light science (grow lights) is crucial for maximizing blooms.
- Strategic succession sowing and a monthly soil-flushing ritual will create a continuous, healthy display.
- Layering bulbs with cold-tolerant annuals fills the spring gap, while structural plants cover winter.
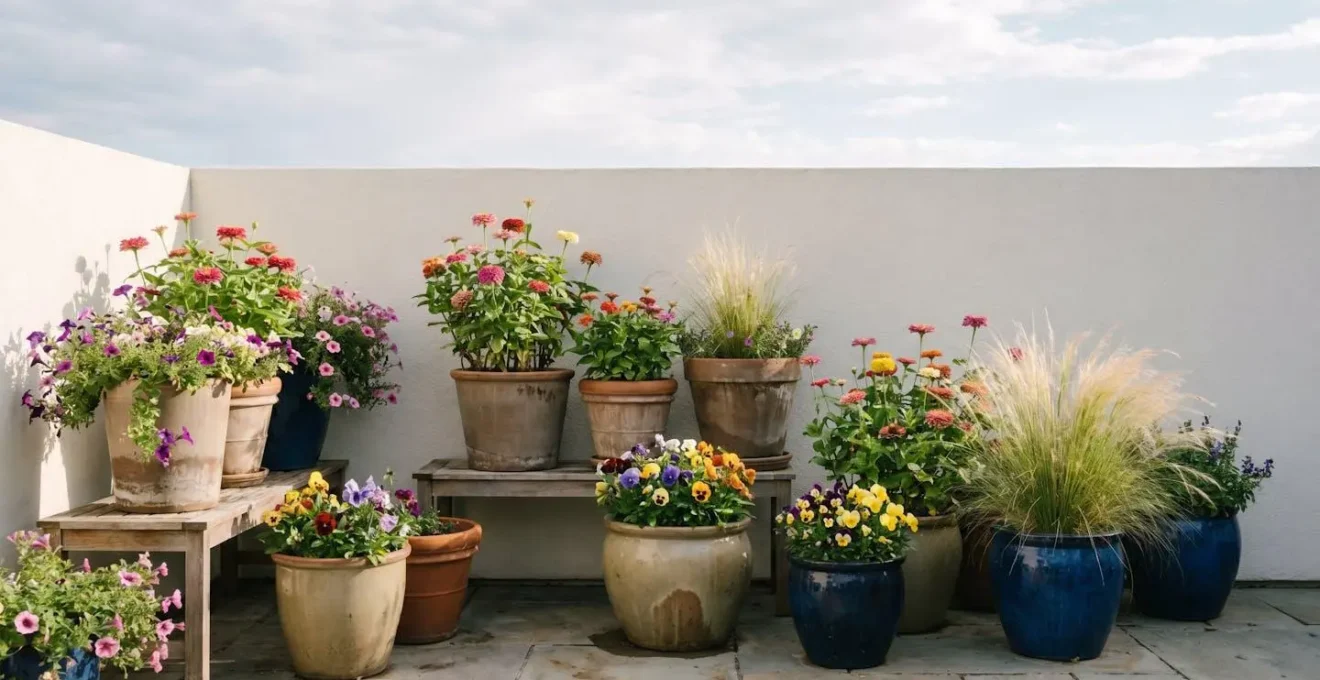
Every urban gardener knows the feeling. Your patio is a riot of glorious colour in late May, a picture-perfect paradise. But by August, it can start to look tired, and by November, it’s often a desolate space. The common solution is to constantly buy new “in-season” plants, a costly and often wasteful cycle. We’re told to deadhead, to fertilize, and to plant bulbs, but these are often presented as isolated chores rather than parts of a cohesive system.
But what if the key to a perpetually vibrant patio wasn’t in constantly replacing plants, but in understanding and orchestrating their natural life cycles? What if you could become the director of your own small-space floral performance? The secret lies in moving beyond simple maintenance and embracing the role of a creative strategist. It’s about mastering the hidden rhythms of plant life—their hormonal responses, their relationship with light, and their needs within the closed environment of a pot.
This guide will walk you through these advanced, yet perfectly achievable, techniques. We will explore how to manipulate plant hormones to encourage more flowers, how to create a continuous harvest of bouquets from a single sowing, and how to manage the critical resources of soil and light. By the end, you’ll have a new framework for thinking about your patio garden, transforming it from a series of seasonal displays into a single, year-long, breathtaking show.
Summary: A Designer’s Guide to Non-Stop Patio Blooms
- Why Deadheading Triggers Hormones for More Flowers?
- How to Sow ‘Cut-and-Come-Again’ Flowers for 6 Months of Bouquets?
- Plugs or Seeds: Which is More Cost-Effective for Filling Gaps?
- The False Spring Mistake That Kills 80% of Bedding Plants
- How to Feed Annuals in Pots Without Causing Salt Buildup?
- Windowsill vs Grow Light: Is Natural Light Enough for February Sowing?
- The Lasagna Method: Layering Bulbs for 3 Months of Color?
- Year-Round Seasonal Colour: Filling the November and February Gaps
Why Deadheading Triggers Hormones for More Flowers?
Deadheading isn’t just about tidying up your plants; it’s a strategic act of hormonal manipulation. An annual flower has one primary biological goal: to produce seeds and ensure the next generation. Once a flower is pollinated and begins to form a seed head, it sends a powerful hormonal signal to the rest of the plant to slow down or stop producing new blooms. The plant’s energy is redirected from creating beautiful petals to the vital work of seed maturation. This process is driven by specific plant hormones, particularly ethylene. As research on plant hormones shows, when pollinated flowers form seed heads, the plant’s resources are actively diverted away from flowering.
By deadheading—removing the spent flower before it has a chance to produce seeds—you are essentially tricking the plant. You interrupt this hormonal signal. The plant, sensing it has failed in its reproductive mission, is spurred into action, putting its energy back into producing more flowers in a renewed attempt to create seeds. This is why consistent deadheading is the single most effective way to extend the blooming season of many annuals like petunias, zinnias, and marigolds. It forces the plant to remain in a perpetual state of “trying,” giving you a much longer and more prolific display of colour.
The technique varies slightly by plant. For some, like petunias, you simply pinch the faded bloom. For others with thicker stems, like geraniums or zinnias, you should cut the entire flower stalk back to a set of leaves. This not only prevents seed formation but also encourages the plant to branch out, leading to a bushier, fuller appearance with even more flowering sites. Mastering this simple task is the first step to becoming an active manager of your patio’s floral output, rather than a passive observer.
Ultimately, deadheading is a conversation with your plant. You are actively guiding its energy to where you want it most: into creating a non-stop spectacle of colour all summer long.
How to Sow ‘Cut-and-Come-Again’ Flowers for 6 Months of Bouquets?
There’s a unique joy in bringing a bouquet of fresh, vibrant flowers into your home that you’ve grown yourself. On a small patio, this might seem like a luxury, but with a category of plants known as “cut-and-come-again” flowers, it’s incredibly achievable. These prolific bloomers respond to harvesting in the same way other annuals respond to deadheading: the more you cut, the more they flower. This creates a wonderfully rewarding cycle where tidying your garden and creating indoor arrangements are one and the same activity.
The key to a long season of bouquets is selecting the right varieties. Flowers like Zinnias, Cosmos, and Calendula are champions of this category. They are bred to produce blooms on long, strong stems, and they recover quickly from being cut. To get the most out of them, it’s essential to harvest correctly. Instead of just snipping the flower head, you should cut a long stem, going down to just above a set of leaves. This deep cut stimulates the plant to send out new, branching stems from that point, leading to an even more abundant crop of flowers in the following weeks.
Case Study: The Two-Wave Succession Sowing Strategy
A smart, family-focused approach to ensure a non-stop supply of flowers involves strategic timing. One family implemented a “two-wave” system by sowing an initial batch of zinnias, cosmos, and calendula in early spring. Then, 4-6 weeks later, they planted a second wave of seeds in the gaps between the now-established first plants. This simple staggered approach guaranteed a continuous, robust supply of flowers from June all the way through to the first frosts in October. It effectively filled the late-season gap when the first plantings would naturally start to decline, providing an uninterrupted source of bouquets for their home and as gifts.
This strategy turns your patio pots into a miniature, highly productive flower farm. It’s an incredibly efficient use of space that provides dual benefits: a beautiful outdoor display and a constant source of indoor beauty. The minimal effort of sowing a second batch of seeds pays off enormously in late summer and autumn.
This method not only maximizes your colour display but also provides a deeply satisfying connection to the seasons, marked by the changing arrangements on your kitchen table.
Plugs or Seeds: Which is More Cost-Effective for Filling Gaps?
As the season progresses, gaps will inevitably appear in your patio containers. A plant may fail, or the space left by spring bulbs needs filling. The patio gardener’s dilemma then becomes: do you fill that gap with instant-gratification plug plants or with economical seeds? The answer isn’t just about the upfront cost; it’s a strategic trade-off between time, money, effort, and desired outcome. Understanding the “true cost” of each option allows you to make the smartest choice for your specific situation.
Seeds are the undisputed champion of financial economy. A single packet can provide dozens of plants for the price of a single coffee. They also offer a far greater variety of unique and heirloom options not available as plugs. However, this low financial cost comes with a high investment of time and a degree of uncertainty. You must factor in the 8-12 weeks from sowing to flowering, plus the effort of nurturing seedlings. Plugs, on the other hand, offer instant impact. They are established plants, ready to take off and fill a gap within weeks, not months. Their success rate is much higher for beginners, but this convenience comes at a higher price per plant and often involves more plastic waste.
This comparative table from the Farmer’s Almanac guide to container gardening breaks down the trade-offs clearly.
| Factor | Seeds | Plugs |
|---|---|---|
| Financial Cost | Low ($2-5 per packet, 20-50 seeds) | Medium-High ($3-8 per 6-pack) |
| Time to Bloom | 8-12 weeks from sowing | 2-4 weeks from planting |
| Time Investment | High (sowing, monitoring, thinning) | Low (direct planting) |
| Plastic Waste | Minimal (seed packets recyclable) | Higher (plastic cell packs) |
| Educational Value for Children | High (patience, germination process) | Low (instant gratification) |
| Success Rate for Beginners | Variable (60-80% depending on species) | High (90%+ if properly watered) |
So, which should you choose? For a large gap in May, plugs make sense for immediate impact. For small, fist-sized gaps in early spring, direct-sowing fast-germinating seeds like alyssum is a smart, cheap option. If you’re planning ahead and have a sunny windowsill, sowing seeds indoors 6-8 weeks before the last frost is the most cost-effective way to produce a large number of plants. The most sustainable option of all is to allow certain plants, like calendula, to self-seed, providing you with free plants to fill gaps the following year.
Ultimately, a savvy patio gardener uses a hybrid approach, leveraging the speed of plugs for high-impact areas and the economy of seeds for succession planting and filling smaller spaces over time.
The False Spring Mistake That Kills 80% of Bedding Plants
There is a particularly cruel trick the weather plays in early spring. After a long winter, a week of gloriously warm, sunny weather arrives, tempting even the most seasoned gardeners. It feels like spring has truly sprung, and the urge to fill your patio with tender annuals is overwhelming. This is the “false spring,” and succumbing to it is the single most common and devastating mistake a container gardener can make. A single, unexpected late frost can wipe out your entire investment of time and money overnight, as gardening experts warn that premature planting can result in total crop loss for most tender annuals.
Plants grown in the protected, stable environment of a greenhouse or your windowsill are not equipped to handle the volatile conditions of the outdoors. They need to be gradually acclimated to changes in temperature, sunlight, and wind. This critical process is called “hardening off.” Skipping this step is like asking a person who has been indoors for months to run a marathon without any training. The plants will suffer from shock, sunburn, or frost damage, often leading to their demise.
The hardening-off process is a slow, methodical, week-long dance. It involves bringing your plants outside for a few hours a day, starting in a sheltered, shady spot, and gradually increasing their exposure to sun and longer periods outdoors. It requires patience, but it is the non-negotiable insurance policy for your plants’ survival and future health. A plant that has been properly hardened off will be stronger, more resilient, and will establish itself much more quickly once planted in its final container.
Your Hardening-Off Audit: A 7-Day Plan
- Days 1-2: Initial Exposure. Place plants in a sheltered, shaded outdoor spot for just 2-3 hours during the warmest part of the day. Bring them in well before evening.
- Days 3-4: Introducing Sun. Increase outdoor time to 4-5 hours. Introduce them to a couple of hours of gentle morning sun, avoiding harsh midday rays.
- Days 5-6: Full-Day Acclimation. Leave plants outdoors for a full 6-8 hours in a spot with partial sun. Continue to bring them in at night. Monitor for wilting.
- Day 7: The Overnight Test. If nighttime temperatures are forecast to stay consistently above 50°F (10°C), leave the plants out overnight in their sheltered spot.
- Final Check & Planting: After a successful overnight stay, your plants are hardened off and ready to be planted into their final containers. Always have fleece or an old sheet ready to cover them if an unexpected late frost is forecast.
Remember, the official “last frost date” for your area is a guideline, not a guarantee. Patience in spring is rewarded with healthy, thriving plants all summer long.
How to Feed Annuals in Pots Without Causing Salt Buildup?
Annuals in containers are hungry plants. To produce a constant profusion of blooms, they need a steady supply of nutrients, which quickly gets depleted from the limited volume of potting soil. The intuitive answer is to fertilize regularly. However, this is where many well-intentioned gardeners go wrong. Synthetic fertilizers are essentially salts, and over time, these salts can accumulate in the soil, creating a toxic environment for plant roots. This salt buildup can scorch roots, inhibit water uptake, and cause the very plants you’re trying to help to sicken and decline, often showing up as brown, crispy leaf edges.
The solution is not to stop feeding but to adopt a smart, two-part ritual: Flush and Feed. This involves periodically leaching the soil with a large volume of plain water to wash away the accumulated salts before applying a new dose of fertilizer. It’s like hitting the reset button for your container’s soil. This simple monthly practice ensures that your plants can access the nutrients you provide without suffering the negative consequences of chemical buildup. It is the single most important technique for maintaining healthy container plants over a long season.
The process is simple. Once a month, before you apply fertilizer, take your pots to a spot where they can drain freely. Slowly pour a volume of plain water equal to at least twice the volume of the pot through the soil. For a 2-gallon pot, you’d use 4 gallons of water. You’ll see the water run out of the drainage holes. This deep flush dissolves and carries away the excess mineral salts. After flushing, you can apply your fertilizer, usually at half the recommended strength to be safe, confident that the plant’s roots are in a healthy environment to absorb it.
Over-fertilizing is a major contributor to excessive salt levels in container gardening. Use slow-release fertilizers which release nutrients gradually over time rather than soluble ones that may spike salt levels quickly.
– Live to Plant gardening resource, How to Mitigate Salt Build-Up in Container Gardening
By incorporating this flushing ritual into your monthly gardening routine, you move from being a simple “feeder” to a savvy “soil manager,” ensuring a long and healthy life for your hardworking annuals.
Windowsill vs Grow Light: Is Natural Light Enough for February Sowing?
For the ambitious patio gardener, February is the month when the seed-sowing itch begins. Getting a head start indoors promises bigger, better plants earlier in the season. The common wisdom is to line up your seed trays on a “sunny windowsill.” However, for most climates, especially in northern latitudes, this is a recipe for disappointment. The result is often a tray of pale, spindly, and weak seedlings that are poorly equipped for life outdoors. This is because “sunny” in February is a relative term. The intensity and duration of the light passing through a window are often vastly overestimated.
The issue is twofold: duration and quality. As northern gardeners have documented, on a typical February day, you might only get 10 hours of natural daylight, whereas seedlings need 14-16 hours of bright light to develop strong, compact growth. Furthermore, the light from a window is unidirectional, causing seedlings to stretch and bend dramatically towards the source, a phenomenon known as etiolation. This creates long, weak stems that are prone to breaking.
Case Study: The Dramatic Difference of a Grow Light
A controlled experiment documented on the blog NWEdible dramatically illustrates this point. Broccoli seedlings were grown side-by-side, one on a windowsill and one under a simple grow light. The difference was stark. The seedling under the grow light was a picture of health: stocky, dark green, with a thick stem and robust root development. The windowsill seedling was its tragic cousin: pale, with a spindly stem twice as long, and minimal root growth. The conclusion was undeniable: winter sun through a typical window is simply not strong enough to produce healthy, transplant-ready seedlings.
This is where a grow light, even a very simple one, becomes a game-changer. It is not a professional-only tool; it’s the key to unlocking successful seed-starting for anyone. A full-spectrum LED bulb in a cheap clamp lamp, positioned just a few inches above your seedlings and run on a simple timer for 16 hours a day, provides the consistent, high-quality light that mimics ideal growing conditions. This small investment yields a massive return in the form of healthy, vigorous plants that will thrive when moved to your patio.
Investing in a basic grow light setup is the single most impactful step you can take to level up your seed-starting game, ensuring your plants start their life with the strength they need to perform all season long.
The Lasagna Method: Layering Bulbs for 3 Months of Color?
One of the most creative and efficient techniques for small-space gardening is the “Lasagna Method” of planting bulbs. This clever strategy treats a single container like a stage for a three-act floral play, ensuring a continuous succession of blooms for up to three months from the same pot. Instead of planting all your bulbs at one depth, you layer them according to their bloom time, creating a time-release display of colour that unfolds throughout the spring. It’s a brilliant way to maximize the floral output of a single container, providing a dynamic and evolving show.
The method is as logical as its name suggests. In the autumn, you start with a deep container. The bottom layer consists of the largest and latest-blooming bulbs, typically tulips or daffodils. You cover them with a layer of soil. The middle layer is for mid-spring bloomers like hyacinths. Another layer of soil goes on top. Finally, the top layer, closest to the surface, is for the earliest, smallest bulbs like crocus or muscari. As spring arrives, the crocuses will bloom first. As they fade, the hyacinths will emerge, followed by the grand finale of the tulips. The bulbs’ stems naturally find their way around each other to reach the light.
Case Study: The “Super-Lasagna” with an Annual Topping
An even more advanced strategy takes this a step further. After layering the bulbs in autumn, the very top layer of the pot is immediately planted with cold-tolerant winter annuals like pansies or violas. This “super-lasagna” provides instant colour for the autumn and winter months while the bulbs are dormant underneath. When spring arrives, the bulb foliage and flowers push right up through the annuals, creating a lush, multi-layered display. Once the bulb foliage dies back, the pansies can be swapped out for summer annuals, creating a truly year-round container.
Getting the planting depths right is crucial for success, but it doesn’t need to be complicated. You can use simple, memorable hand-guides: plant crocuses as deep as your thumb, hyacinths as deep as a closed fist, and tulips just a little deeper than that. This ensures each bulb has the right amount of soil above it to grow strongly.
By thinking in layers and across seasons, you can transform a simple pot into a powerhouse of continuous colour, making every square inch of your patio work harder for you.
Key takeaways
- Effective gardening is about understanding plant science: manipulating hormones, managing soil chemistry, and providing the right light.
- A continuous bloom cycle relies on strategic succession: layering bulbs for spring, and using a two-wave sowing approach for summer flowers.
- Winter interest comes from structure, not just flowers. Evergreen foliage, colourful stems, and ornamental grasses are essential for filling the gaps.
Year-Round Seasonal Colour: Filling the November and February Gaps
The true test of a year-round container garden is its ability to provide visual interest during the most challenging months: the “bleak gaps” of late autumn and late winter. November and February are often when patios look their barest. The summer annuals are long gone, and the spring bulbs have yet to emerge. Filling these gaps requires a shift in mindset. Instead of relying solely on flowers for colour, the savvy designer turns to the other essential elements of design: texture, form, and persistent foliage.
This is where evergreen and structural plants become the heroes of your patio. These are the “bones” of your container designs, providing a permanent framework around which the seasonal, showier annuals can rotate. A small, slow-growing evergreen shrub like a dwarf boxwood or Euonymus provides a constant green presence. Hardy evergreen ferns, such as Polystichum, offer beautiful texture that looks particularly stunning when dusted with frost. These plants aren’t just placeholders; they are stars in their own right during the winter months.
Colour can also be found in unexpected places. The brilliant red or yellow winter stems of a small Cornus (dogwood) can be as impactful as a flower. The rich plum and deep green leaves of Heucheras (coral bells) persist through much of the winter, offering a splash of colour at ground level. Small ornamental grasses like Carex add movement and a different texture, catching the low winter light beautifully. As the National Trust for Scotland’s gardening team advises, combining these elements provides height and a crucial contrast in texture that elevates a simple pot of winter pansies into a sophisticated composition.
By layering these elements—a structural evergreen, some colourful foliage plants, and a few hardy winter-flowering annuals like pansies or cyclamen—you can create containers that look just as deliberate and beautiful in December as they do in June. The focus shifts from a riot of blooms to a more subtle, textural, and sculptural beauty that is perfectly suited to the quietness of the winter season.
Stop thinking of your patio as a summer-only space. By embracing the beauty of foliage, texture, and form, you can orchestrate a garden that offers delight and interest every single day of the year, transforming your small space into a true year-round oasis.