Achieving high yields from patio fruit trees is not about more space, but more precision.
- Success hinges on selecting the right rootstock (like M27) for your pot size, not just the fruit variety you want to grow.
- Active management through hand-pollination, thinning, and branch bending directly controls the tree’s energy, forcing it to produce fruit rather than just vegetative growth.
Recommendation: Stop guessing and implement a system: match rootstock to your container, actively manage pollination and the tree’s energy budget, and feed on a strategic schedule for predictable results.
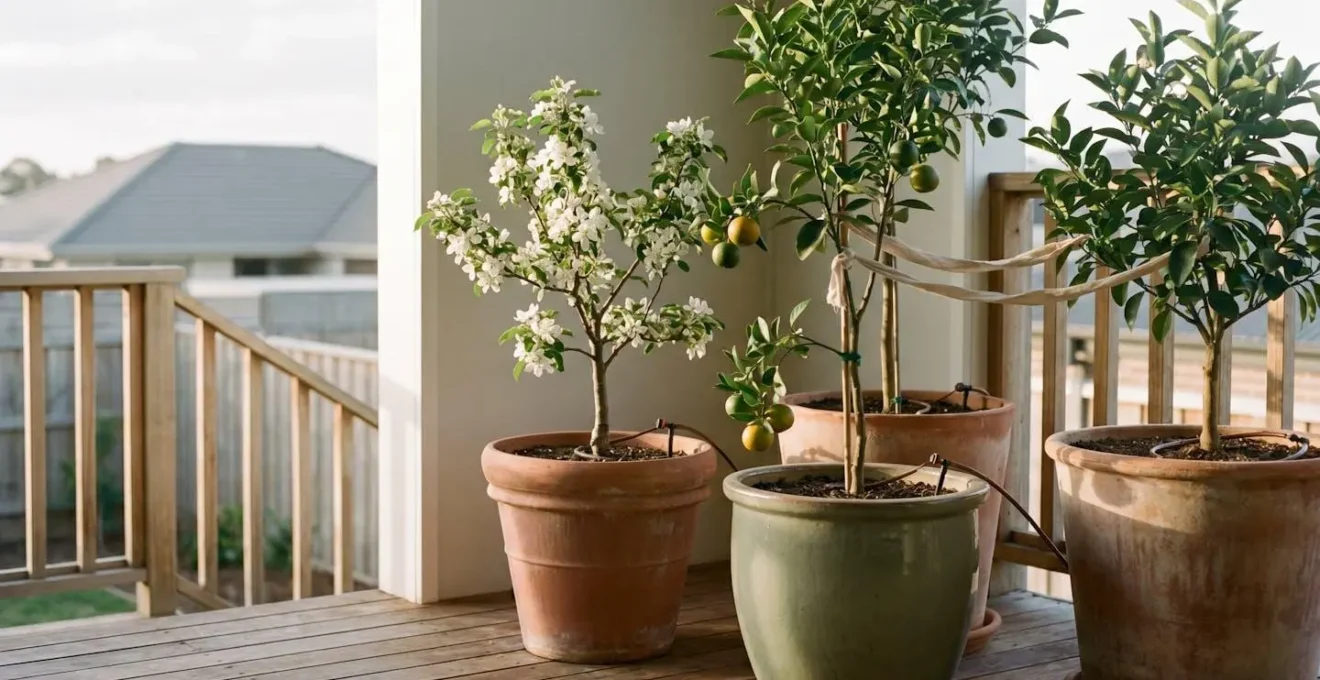
For the urban dweller, the dream of biting into a crisp, homegrown apple often seems at odds with the reality of a small balcony or patio. The common advice is to « just buy a dwarf tree, » but this often leads to frustration: a pot-bound tree that produces little, or a « dwarf » that quickly outgrows its welcome. The cycle of hope and disappointment can make a home orchard feel like an impossible luxury.
The secret to success isn’t finding more space, but applying more precision. Maximizing fruit yield in a container is a closed-loop system where every input—from the pot size to the water schedule—is a calculated decision. It’s about understanding that you’re not just growing a tree; you’re managing a compact, highly productive ecosystem. The key isn’t a ‘green thumb,’ but a strategic approach that balances the tree’s hormonal signals for growth against its capacity to fruit.
This guide moves beyond the generic advice. We will dismantle the « yield vs. space » problem by treating your patio orchard as a system to be optimized. We will explore how to select the right engine for your tree (the rootstock), how to manage its limited energy budget for maximum output, and how to make the precise interventions that turn a decorative plant into a productive harvest source. Forget luck; it’s time to apply a productive and compact strategy.
This article provides a complete system for turning your small space into a productive orchard. Explore the sections below to master each component, from pollination to rootstock selection.
Summary: Planning a Productive Patio Orchard System
- Family Trees or Pairs: How to Ensure Pollination with Only One Pot?
- Pot Size: Can You Get Full-Sized Fruit from a 30L Container?
- The Thinning Mistake: Why Your Tree Only Fruits Every Other Year?
- Festooning: Bending Branches to Increase Fruit Buds in Small Spaces?
- When to Feed: The Critical Window for Fruit Set in Containers?
- What Does M27 Mean? Understanding Extremely Dwarf Rootstocks
- 2L/h or 4L/h: Matching Emitter Flow to Pot Volume?
- M9 or MM106: Which Grafted Rootstock Suits Your Garden Size?
Family Trees or Pairs: How to Ensure Pollination with Only One Pot?
The first hurdle for a single-patio tree is pollination. While some apple and pear varieties are partially self-fertile, relying on this is a gamble that significantly reduces your yield potential. A « family tree, » with multiple varieties grafted onto one trunk, seems like an easy solution, but they often have issues with one variety dominating the others. For maximum control and productivity in a single pot, the most reliable method is manual intervention: hand pollination. This technique turns you into the bee, guaranteeing that pollen gets where it needs to go.
This isn’t a time-consuming chore; it’s a precise, five-minute task performed every few days during the bloom period. By actively transferring pollen, you ensure a high rate of fruit set, which is the first and most critical step towards a heavy harvest. It allows you to grow a single, perfect specimen tree of your favorite variety without needing a second, pollen-compatible tree nearby. The illustration below shows the delicate touch required for this essential task.
As you can see, a small, soft brush is the perfect tool for the job. This targeted approach is far more effective than leaving it to the wind and the few urban insects that might pass by. It’s the first step in actively managing your tree’s reproductive cycle instead of passively hoping for the best.
Your Action Plan: Hand Pollination for Maximum Fruit Set
- Identify the right timing: Begin hand pollination when 10-20% of flowers are freshly open, usually in the early morning when stigmas are most receptive and ready to accept pollen.
- Gather your tools: Use a small, soft artist’s paintbrush or a cotton swab. The goal is to gently collect pollen without damaging the delicate flower structures.
- Collect pollen: Gently brush the anthers (the yellow, dusty parts) of a fully open, mature flower to capture the fine pollen grains on your brush bristles.
- Transfer pollen: Lightly touch the pollen-covered brush to the sticky stigma (the very center part) of other target flowers, repeating the process across multiple blooms on your tree.
- Repeat daily during bloom: To ensure maximum fruit set, it is best to hand-pollinate daily or every 2-3 days throughout the peak bloom period of your container-grown tree.
Pot Size: Can You Get Full-Sized Fruit from a 30L Container?
Yes, you can absolutely get full-sized fruit from a tree in a 30-liter container. This is a critical point: rootstock controls tree size, not fruit size. An M27 dwarf apple tree will produce apples of the exact same size whether it’s in a pot or in the ground. The variable that changes is not the size of the individual fruits, but the total quantity—the overall yield. The pot is a finite resource, a closed system whose volume directly dictates the tree’s energy-producing root mass and, consequently, its total harvest weight.
Thinking in terms of « yield-per-liter » is a more productive mindset than simply buying the biggest pot you can find. A larger container allows for a larger root system, which in turn supports more growth and fruit. In fact, research shows a direct correlation between container size and the productive capacity of the tree. A study confirmed this by showing the maximum shoot biomass of 1012.11g in 45cm containers, which drastically outperformed the 402.78g from smaller 30cm pots. While a 30L pot is the absolute minimum for an M27 rootstock, upsizing to 40L or 50L provides a buffer and translates directly into a more vigorous tree and a heavier crop.
Case Study: M27 Dwarf Apple Yield Comparison by Pot Size
Trees on an M27 rootstock are the quintessential choice for patio containers. In standard pot sizes, they consistently produce about 10-15 pounds of full-sized fruit annually. This represents about 30-40% of the vigor of a standard, ground-grown tree. The key insight is that while the yield is smaller, the fruit quality is identical. An optimal balance is often found in a 20-25 gallon (75-95 liter) container, which allows for maximum production within patio constraints. This demonstrates the trade-off: container growing manages size but at the cost of total volume, a crucial factor in planning your yield expectations.
The Thinning Mistake: Why Your Tree Only Fruits Every Other Year?
A heavy bloom followed by a massive fruit set seems like a victory, but it often leads to a common problem: biennial bearing. This is when a tree produces a huge crop one year and virtually nothing the next. The reason is simple: the tree exhausts its entire energy budget producing and ripening so much fruit that it has no resources left to form fruit buds for the following season. For a container tree, with its limited root system, this boom-and-bust cycle is even more pronounced.
The solution is a counter-intuitive but essential practice: aggressive thinning. This means manually removing a significant percentage of the tiny, newly-formed fruitlets shortly after the petals fall. This is not a loss; it is a strategic reallocation of the tree’s energy. By reducing the number of fruits, you concentrate the tree’s resources into developing fewer, but larger, higher-quality fruits. Most importantly, you ensure the tree has enough energy left over to initiate buds for next year’s crop, breaking the biennial cycle and ensuring a consistent, annual harvest.
The amount to thin depends on the tree’s age and vigor. A young tree needs more energy for establishing its structure, so thinning should be more severe. The goal is to find a balance between this year’s harvest and the long-term health and productivity of the tree.
| Tree Size/Type | Target Thinning % | Final Fruit Spacing | Goal After Natural June Drop |
|---|---|---|---|
| Young/Small Container Trees (M27, first 3 years) | Remove 60-80% of flowers/fruitlets | 6-8 inches between fruits | 1 fruit per cluster maximum |
| Mature Container Trees (4+ years) | Remove 40-60% of flowers/fruitlets | 4-6 inches between fruits | 1-2 fruits per cluster |
| Large In-Ground Trees | Remove 20-40% of flowers/fruitlets | 4-5 inches between fruits | 1-2 fruits per cluster |
Festooning: Bending Branches to Increase Fruit Buds in Small Spaces?
In the compact world of patio orchards, every branch must be productive. A common issue is excessive vertical growth, where branches shoot upwards, full of leaves but few fruit buds. This is because of apical dominance, the tree’s natural tendency to channel energy into upward growth. Festooning is a classic horticultural technique that directly counters this by gently bending and tying down young, flexible branches to a horizontal or arched position. This simple physical act has a profound hormonal effect.
As a specialist from Tree Care Zone notes, this technique manipulates the tree’s internal messaging. By changing the branch’s orientation, you disrupt the flow of growth-promoting hormones (auxins) that encourage vertical shoots. Instead, the tree redirects its energy towards developing fruiting spurs along the length of the branch.
Gentle bending changes the hormone flow, telling the branch to stop reaching for the sky (vegetative growth) and start preparing for babies (fruit buds).
– Tree Care Zone Horticulture Specialist, Container-Friendly Dwarf Fruit Trees for Patios & Pots
This technique is perfectly suited for container growing. It keeps the tree’s structure open and compact, improves air circulation, and, most critically, can significantly increase the number of fruit buds for the following season. It’s a low-effort, high-impact way to turn a vegetative branch into a productive, fruit-bearing part of your tree.
Using soft ties and small weights, a vertical « water sprout » can be transformed over a single season into a branch laden with fruit spurs. This is a prime example of using a physical technique to achieve a specific, productive hormonal response in your tree.
When to Feed: The Critical Window for Fruit Set in Containers?
A container is a closed system with a finite amount of nutrients. Unlike a tree in the ground, a potted fruit tree is entirely dependent on you for its nutrition. Feeding isn’t just about general health; it’s about providing specific nutrients at critical moments to influence the tree’s behavior—specifically, to encourage fruit production over excessive leaf growth. The right feeding strategy can be transformative; studies have shown that proper soil nutrition boosts fruit yield by up to 30% in container-grown trees.
The timing of your feeding is as important as the fertilizer itself. A seasonal approach ensures the tree gets what it needs when it needs it most. Think of it as a series of strategic meals designed to support specific stages of the annual cycle, from blossom development to post-harvest recovery.
- Spring ‘Breakfast’ (March-April): At bud break, apply a balanced, slow-release fertilizer (e.g., 10-10-10). This fuels the initial push of blossoms and leaves, setting the stage for the season.
- Early Summer ‘Power Lunch’ (May-June): During fruit set, switch to a formula slightly higher in phosphorus and potassium (e.g., 5-10-10). This supports the developing fruitlets and helps prevent « June drop, » where the tree sheds excess fruit.
- Mid-Summer ‘Snacks’ (July-August): As fruits are swelling, use a diluted liquid fertilizer every 4-6 weeks. This maintains vigor without forcing a late-season flush of weak, leafy growth that can attract pests.
- Autumn ‘Recovery Meal’ (September-October): This is the most-often missed, yet most critical, feeding. Immediately after harvesting, feed with a balanced or slightly potassium-rich formula. This helps the tree recover and, crucially, form the fruit buds for next year’s crop.
Finally, it’s vital to stop all feeding from late autumn through winter (November-February). This allows the tree to enter a state of natural dormancy, a required rest period before the cycle begins again.
What Does M27 Mean? Understanding Extremely Dwarf Rootstocks
The single most important decision for a patio orchard is not the apple or pear variety (the scion), but the rootstock it’s grafted onto. The rootstock is the unseen engine that determines the tree’s ultimate size, vigor, and suitability for container life. The ‘M’ in names like M27 and M9 stands for Malling, from the East Malling Research Station in the UK where these rootstocks were developed. The number indicates a specific variety with predictable traits.
For true patio-scale growing, the M27 is the undisputed champion. As noted by growers like Frank P Matthews, it is a « very-dwarf apple rootstock, ideal for patio tubs » that produces a « true mini tree » reaching no more than 2 meters. A key advantage for the impatient urban gardener is that it often begins fruiting in its very first year. It’s engineered specifically for maximum productivity in minimum space. Other rootstocks, even those labeled « dwarf » like M9 or M26, are significantly more vigorous and will quickly become unmanageable in a standard patio pot, requiring much larger containers and more aggressive pruning.
Understanding the differences is crucial to avoid the common mistake of buying a tree that is physically incapable of thriving in your intended space. The following table breaks down the most common apple rootstocks and their suitability for container culture.
| Rootstock | Mature Height | Minimum Pot Size | Spacing Required | Staking Requirement | Best Use |
|---|---|---|---|---|---|
| M27 (Extremely Dwarf) | 1.2-1.8m (4-6ft) | 30-40L (8-10 gal) | 1.2-1.5m (4-5ft) | Permanent | Small gardens, containers, fertile soil only |
| M9 (Dwarf) | 1.8-2.4m (6-8ft) | 50-75L (13-20 gal) | 2.4-3m (8-10ft) | Permanent | Small gardens, bush form, cordons |
| M26 (Dwarf) | 2.4-3m (8-10ft) | 75-100L+ (20-26 gal) | 2.4-3.6m (8-12ft) | Permanent | Average soils, container growing possible |
| MM106 (Semi-Dwarf) | 3-4m (10-13ft) | Not recommended for containers | 4.5m (15ft) | Permanent | Grassed orchards, tolerates range of soils |
Key Takeaways
- Your number one decision is rootstock. For true patio containers, M27 is the superior choice for manageable size and high productivity.
- You are the manager of the tree’s energy budget. Use thinning and festooning to direct energy towards fruit, not just growth.
- A strategic, timed feeding schedule is non-negotiable. The post-harvest feeding is the most critical for ensuring next year’s crop.
2L/h or 4L/h: Matching Emitter Flow to Pot Volume?
Watering is the most frequent task in managing a container orchard, and it’s also the easiest to get wrong. The limited soil volume of a pot means it can dry out in hours on a hot day, but overwatering can be just as deadly, leading to root rot. A drip irrigation system on a timer is the ultimate tool for consistency. The key is to match the system’s output to the pot’s needs, which involves selecting the right emitter flow rate.
The choice between a 2L/h (liters per hour) and a 4L/h emitter isn’t arbitrary. For container trees, especially those on sensitive rootstocks like M27 that require constant soil moisture due to their small root systems, a slower delivery is almost always better. A 2L/h emitter is the ‘safe’ and recommended choice. It allows water to slowly and deeply penetrate the entire root ball without creating a waterlogged layer at the bottom of the pot. A 4L/h emitter, by contrast, can deliver water faster than the potting mix can absorb it, leading to runoff and dry pockets within the root zone.
Calculating the correct watering duration is a simple but vital piece of math:
- Calculate Target Water Volume: A good rule of thumb is to apply 25% of the pot’s volume in water. For a 40L pot, this is 10L of water per cycle.
- Calculate Irrigation Duration: Divide the target volume by your emitter’s flow rate. For our example: 10L ÷ 2L/h = 5 hours of drip time.
This calculation gives you a baseline. You will need to adjust the frequency (e.g., daily in summer, every 3 days in fall) based on weather, temperature, and the tree’s growth stage. Always check the soil moisture 2-3 inches below the surface to fine-tune your timer settings.
M9 or MM106: Why the Wrong Grafted Rootstock Guarantees Failure?
The excitement of the garden center can lead to the most common and costly mistake a patio grower can make: choosing a tree based on the fruit variety while ignoring the rootstock. Seeing « dwarf » on the label is not enough. A tree on an M9 rootstock, while technically a dwarf, will still strive to reach 8-10 feet and requires a massive 75L+ container and permanent staking to be even remotely manageable. A tree on an MM106 rootstock is a semi-dwarf, destined for 10-13 feet, and is completely unsuitable for long-term container culture. Planting it in a pot is a guarantee of a stressed, unproductive tree.
This is where the « Good, Better, Best » framework becomes a vital purchasing tool. For the specific goal of maximizing fruit yield in a manageable patio container, the choice is clear. The trade-off is always between ultimate tree size (and yield potential) and its genuine adaptability to a constrained pot environment.
Rootstock Selection Mistake for Container Growing
A common costly mistake for patio growers is purchasing trees on M9 or MM106 rootstock without understanding their vigor requirements. M9, while labeled ‘dwarf,’ reaches 8-10 feet and requires a minimum 50-75L container. MM106, a semi-dwarf, is entirely unsuitable for container culture. For true patio success, M27 remains the optimal choice at 4-6 feet mature height in 30-40L pots. It produces lower yields (10-15 lbs annually) compared to M9’s potential 40-80 lbs, but the trade-off is clear: M27 sacrifices raw quantity for manageable size and true container adaptability.
The hierarchy below clarifies the best choice for the typical urban grower. While M9 in a huge planter might offer a higher theoretical yield, the « Best » choice, M27, offers the highest probability of success, mobility, and a satisfying harvest within the real-world constraints of a balcony or small patio.
| Quality Rating | Rootstock | Container Size Required | Mature Height | Annual Yield Potential | Best For |
|---|---|---|---|---|---|
| GOOD | M9 in very large planter | 100L+ (26+ gal) | 8-10 feet | 40-80 lbs | Spacious patios, permanent installations, maximum yield in containers |
| BETTER | M26 in large container | 75-100L (20-26 gal) | 8-10 feet | 30-60 lbs | Average soils, semi-permanent patio setups, good balance of yield and space |
| BEST | M27 in standard container | 30-50L (8-13 gal) | 4-6 feet | 10-15 lbs | Maximum yield in smallest space, true patio mobility, small gardens, balconies |
Stop wondering if you have enough space. By choosing the right rootstock and managing your tree as a productive system, you can stop guessing and start planning your first harvest today.