The key to perennial survival in wet UK winters isn’t the plant’s hardiness rating, but the health of its underground « energy economy. »
- Foliage left over winter is not waste; it’s a vital energy transfer mechanism that feeds the roots.
- Most root rot comes from poor aeration and crown suffocation, not just excess water.
Recommendation: Shift your focus from buying « tough » plants to implementing strategic soil management and autumn practices that build a resilient root system.
For any serious British gardener, the cycle is painfully familiar. You invest time and money in beautiful hardy perennials, only for a relentlessly wet, soggy winter to leave you with rotted crowns and disappointing gaps in your borders come spring. It feels like a gamble you keep losing. The common advice is to « improve drainage » or « choose robust plants, » but this often only scratches the surface of a much deeper issue.
As a professional plant buyer for a major UK nursery, I can tell you that the secret to longevity isn’t just about what you plant, but how you manage its entire system, particularly what happens below the soil. The real culprit is often a bankrupt « root economy »—a system starved of energy and suffocated by a lack of oxygen. Many well-intentioned autumn tidy-ups and mulching techniques actively work against the plant’s natural survival strategy. The truth is, a plant’s ability to withstand a wet winter is decided months before the first frost.
But what if you could move beyond the platitudes and adopt the principles that commercial growers use to guarantee stock survival? This guide will change your perspective. We won’t just list « tough » plants. Instead, we’ll delve into the crucial mechanics of the root system. We will explore why cutting back foliage too early is a critical mistake, how to mulch for insulation without causing rot, and why your choice between bare-root and pot-grown has profound implications for long-term survival.
This is your guide to turning a risky annual expense into a thriving, long-term garden investment. By understanding the science behind root resilience, you can build borders that don’t just survive the British winter but emerge stronger every year.
Contents: A Buyer’s Guide to Winter-Proofing Perennials
- Why Cutting Back Foliage Too Early Starves the Root System?
- How to Mulch Perennials to Insulate Roots at -5°C?
- The Drainage Mistake That rots Hardy Roots Before Spring
- Bare-Root vs Pot-Grown: Which Establishes a Stronger System?
- How to Stimulate Root Recovery After Waterlogging Damage?
- How to Use Dead Foliage to Insulate Tender Crowns Naturally?
- Resistance Breeding: The Only Real Cure for Clubroot?
- Why Cutting Back Autumnal Dormancy Structure Harms Hibernating Insects?
Why Cutting Back Foliage Too Early Starves the Root System?
The temptation to « tidy up » the garden in autumn by cutting back all the browning foliage is strong. It feels like putting the garden to bed. From a commercial grower’s perspective, this is one of the most damaging things you can do. That dying foliage isn’t waste; it’s the final, crucial phase of the plant’s energy transfer process. Throughout autumn, the plant is systematically drawing down sugars and carbohydrates from its leaves and stems into its root system. This is how it stocks its « bank account » to survive winter and fuel vigorous growth in spring.
Cutting back green or even yellowing stems prematurely is like interrupting a vital supply line. You are robbing the roots of the very energy they need to withstand the stress of cold, wet soil. A well-fed root system is far more resilient to disease and rot. The process of senescence—the plant’s natural, managed decline—is complete only when the foliage is fully brown, dry, and papery. At this point, all valuable energy has been reabsorbed into the perennial’s crown and roots, and the remaining structure can be trimmed, or better yet, left standing.
Recognising when this energy transfer is complete is a key skill. You can check for a few clear signs:
- Stems feel hollow and snap easily, rather than bending.
- Foliage has a crisp, papery texture with no green or soft brown areas left.
- The base of the leaves or stems detaches from the plant’s crown with little to no resistance.
Even in agricultural settings, the plant’s ability to recover from stress is linked to its stored energy. For example, research on winter crop waterlogging demonstrates that plants have a remarkable capacity for recovery, but this is predicated on having the resources to do so. Allowing your perennials to complete their natural cycle is the first and most important step in securing your garden investment.
How to Mulch Perennials to Insulate Roots at -5°C?
Mulching is standard winter advice, but in a wet British climate, the wrong type of mulch can be a death sentence. The goal isn’t just to insulate against cold; it’s to do so without trapping moisture around the plant’s crown. A thick, dense layer of compost or manure might seem like a cosy blanket, but it can become a sodden, airless mass that promotes crown rot—the number one killer of hardy perennials in the UK. The key is to choose a mulch that provides insulation while allowing air to circulate and water to drain away from the vulnerable crown.
From a nursery perspective, we use a two-zone strategy. A « moat » of coarse horticultural grit is placed directly around the crown, creating a dry, breathable barrier that slugs and snails detest. Beyond this protective collar, a more organic, insulating mulch can be used. Materials like bark chips, pine needles, or even shredded bracken are excellent choices because their coarse structure creates air pockets, preventing compaction and suffocation. They insulate the wider root zone without waterlogging the crown.
This close-up shows the ‘gravel collar’ technique in practice. The horticultural grit provides a dry, protective zone directly around the plant’s crown, preventing moisture from sitting against the most vulnerable part of the perennial.
The performance of different mulches varies significantly in our climate. The right choice depends on your soil, your plants, and your specific goals. As this analysis of winter mulching shows, what works for a dry, cold climate is often unsuitable for a wet one.
| Mulch Type | Insulation (1-5) | Waterlogging Risk | Slug Deterrence | Best Use |
|---|---|---|---|---|
| Bark Chips | 4 | Medium | Low | Shrubs, trees (2-3 year lifespan) |
| Horticultural Grit | 2 | Very Low | High | Crown protection collar (2-3 inch moat) |
| Leaf Mould | 5 | Medium-High | Low | Woodland-style borders with good drainage |
| Pine Needles | 3 | Low | Medium | Breathable layer for wet climates |
| Straw/Bracken | 4 | Low | Medium | Temporary winter protection, airy structure |
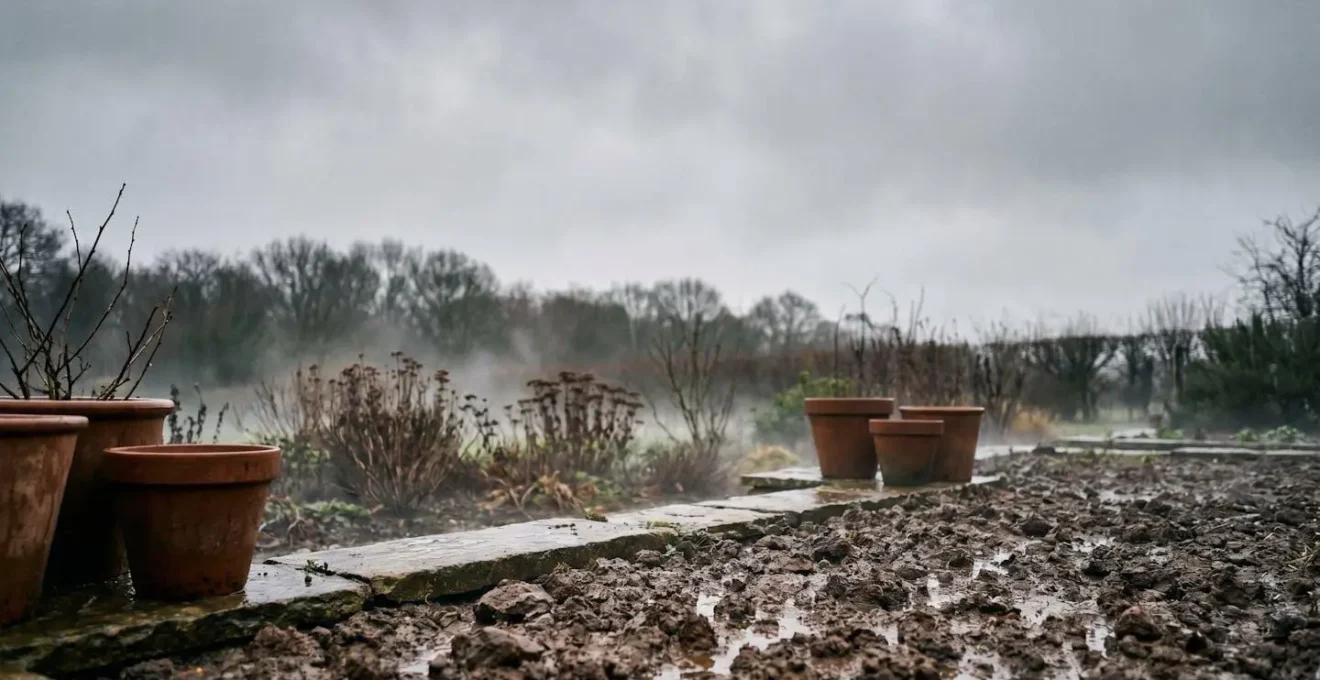
The Drainage Mistake That rots Hardy Roots Before Spring
Every gardener with heavy soil has heard the advice: « improve your drainage. » But this is where one of the most common and disastrous mistakes is made. The old, widely-circulated tip to « add sand to clay soil » is not just ineffective; it can make the problem significantly worse. Clay particles are tiny and plate-like; sand particles are much larger and more angular. When mixed, the sand particles effectively fill the gaps between the clay platelets, creating a substance akin to low-grade concrete. This process, called cementing, destroys what little soil structure existed and makes drainage even poorer.
Adding sand to clay can make soil harder, not better. It is a very common misconception. What you are in effect doing is creating a basic mortar. If you are going to add sand to clay you have to add a lot (at least 50%) for it to have any effect.
– UK Gardening Experts, Glorious Garden UK Clay Soil Drainage Guide
The real solution to poor drainage is not adding a different mineral, but incorporating vast amounts of organic matter. Compost, leaf mould, and well-rotted manure work by binding the tiny clay particles into larger crumbs (a process called flocculation). This creates larger air pockets, or macro-pores, allowing water to drain and, just as importantly, oxygen to reach the roots. A lack of oxygen is what truly kills roots in waterlogged soil. Furthermore, planting with the crown slightly proud of the soil level is essential. According to UK climate-resilient gardening research, many losses on clay come from crowns set too deep, where they sit in cold, wet conditions and inevitably rot.
Before you even begin amending, you need to know what you’re dealing with. A simple percolation test is the best way to assess your soil’s drainage. Dig a hole about 30cm deep, fill it with water, and let it drain completely. Then, fill it again and time how long it takes for the water to disappear. If it takes longer than 12-24 hours, you have a drainage issue that needs to be addressed with organic matter, not sand.
Bare-Root vs Pot-Grown: Which Establishes a Stronger System?
When you purchase a perennial, you’re not just buying a plant; you’re investing in a root system. Your choice at the point of purchase—typically between a container-grown plant and a dormant, bare-root one—has a huge impact on its long-term resilience, especially in challenging wet soils. While a pot-grown plant offers the instant gratification of a visible, leafy specimen, the professional’s choice, particularly for autumn planting, is often the unassuming bare-root perennial. There’s a sound economic and biological reason for this.
A bare-root plant arrives with its entire, undamaged root system, carrying the full energy reserves from its growing season. When planted, its roots make immediate contact with your garden soil, spreading outwards and downwards to establish a wide, natural anchor. Conversely, a pot-grown plant’s roots have been confined. They often circle the inside of the pot, and this « root memory » can hinder their ability to explore the surrounding soil once planted. They can be slower to establish and more vulnerable to environmental stress.
Case Study: The Vigor of Bare-Root Perennials in UK Gardens
UK specialist supplier Peter Nyssen reports that bare-root perennials establish more vigorously into borders than their pot-grown counterparts. Grown in open, peat-free soil, their extensive root systems are primed for performance. Upon planting, they immediately begin to aerate the soil and improve drainage in heavier ground. They arrive with maximum energy reserves, unlike container plants which can be grown in nutritionally depleted environments. This robust start is a key factor in their superior performance and resilience in variable UK weather conditions.
As experts at Jackson’s Nurseries note, the speed of establishment is a primary advantage. A larger surface area of the root system is in direct contact with the soil from day one, leading to quicker water and nutrient uptake. This rapid integration into the garden’s soil ecosystem builds a stronger, more resilient plant far more capable of handling the stresses of a wet winter. It’s a classic case of a better long-term investment over short-term visual appeal.
How to Stimulate Root Recovery After Waterlogging Damage?
Even with the best preparation, a period of exceptional rainfall can leave parts of your garden waterlogged. When you see a prized perennial sitting in a puddle, the instinct is to panic. However, it’s important to act methodically to give it the best chance of survival. The first thing to understand is that the primary damage from waterlogging comes from a lack of oxygen (anoxia), which suffocates the roots and the beneficial microbes in the soil. Your goal is to reintroduce air as quickly and gently as possible.
Fortunately, winter waterlogging is not always a death sentence. As the Royal Horticultural Society explains, in cold winter soils, roots and microorganisms respire very little, so the demand for oxygen is low. This means damage occurs much more slowly than during a summer flood. This gives you a window of opportunity to intervene. Once standing water has drained away, your priority is aeration. Use a garden fork to create deep holes (10-15cm) in the soil around the plant, being careful not to spear the main root ball. This breaks up compaction and allows oxygen to penetrate the root zone.
After aerating, resist the urge to feed the plant with a standard nitrogen-heavy fertiliser. Stressed roots cannot process it, and it can even cause further damage. Instead, apply a seaweed-based bio-stimulant. These contain natural hormones and micronutrients that encourage the growth of new, fine root hairs, which are essential for water and nutrient absorption. This is the plant equivalent of CPR, focusing on restoring the most vital functions first.
Here is an emergency protocol for waterlogged plants:
- Wait for standing water to drain. Do not walk on or work saturated soil.
- Gently aerate the surrounding soil with a garden fork to reintroduce oxygen.
- Temporarily pull back any mulch from the crown to allow the soil surface to dry out.
- Apply a liquid seaweed bio-stimulant to encourage new root hair growth.
- Monitor the plant for signs of stress like yellowing leaves, and be prepared for slower growth in the following season.
How to Use Dead Foliage to Insulate Tender Crowns Naturally?
While we’ve established that cutting back foliage too early starves the roots, leaving it in place offers another direct, physical benefit: natural insulation. The architectural, often hollow, stems of plants like Asters, Echinops, and Rudbeckias create a brilliant protective structure over the plant’s crown. This isn’t a dense, suffocating blanket; it’s an airy, tent-like scaffold. This structure is remarkably effective at deflecting the worst of the winter rain and preventing snow from sitting directly on the crown, which can lead to rot.
The air trapped within this network of stems provides a significant insulating effect, protecting the crown from the harshest frosts. It creates a more stable microclimate at soil level, buffering the plant against the damaging freeze-thaw cycles that can heave less-established plants out of the ground. It’s a free, perfectly designed piece of engineering that works in harmony with the plant’s needs. You can even enhance this effect by gently gathering the stems inwards to form a more deliberate ‘tent’ over the centre of the plant.
This image shows how simple, dried perennial stems can be arranged to create a protective, breathable ‘tent’ that shields the vulnerable crown from winter wet and frost without trapping moisture.
This technique is particularly valuable for perennials with slightly more tender crowns, such as certain varieties of Agapanthus or Penstemon, which are borderline hardy in parts of the UK. By providing this extra layer of natural protection, you can significantly expand the range of plants that will reliably overwinter in your garden. It’s a simple, zero-cost technique that leverages the plant’s own resources to ensure its survival, embodying a smarter, more sustainable approach to gardening.
Key Takeaways
- Root survival depends on an « energy economy »: allow foliage to die back naturally to fill energy stores.
- In wet UK winters, mulch for aeration, not just insulation. Use a grit collar around crowns to prevent rot.
- Choose bare-root plants for autumn planting; they establish faster and build a more resilient root network than pot-grown equivalents.
Resistance Breeding: The Only Real Cure for Clubroot?
For gardeners growing brassicas, wallflowers, or other susceptible plants in damp, acidic soil, clubroot is a dreaded disease. This soil-borne slime mould causes roots to become swollen and distorted, preventing them from absorbing water and nutrients, leading to stunted growth and eventual plant death. In recent years, plant breeders have made great strides in developing « resistant » cultivars, which are often marketed as the definitive solution. From a buyer’s standpoint, it’s crucial to understand what this resistance really means.
Resistance is not Immunity – a resistant plant can still become infected under extreme pressure. It may show few or no symptoms and therefore can act as a carrier, allowing the disease to multiply in the soil.
– Hardy Plant Society UK, Plant Hardiness and Disease Resistance Information
This distinction is critical. A resistant variety is a powerful tool, but it is not a silver bullet. Relying solely on a resistant cultivar without addressing the underlying soil conditions is a risky strategy. The real, long-term « cure » for clubroot and many other soil-borne diseases is not a single plant, but a holistic soil health approach. This means focusing on creating an environment where the pathogen struggles to thrive. Improving drainage is paramount, as the clubroot pathogen’s spores are mobile in water. Raising the soil pH to be slightly alkaline also significantly inhibits the disease.
Building a healthy, active soil microbiome through the regular addition of compost and organic matter creates competition for the pathogen. A diverse ecosystem of beneficial fungi and bacteria can actively suppress disease-causing organisms. Therefore, a resistant cultivar should be seen as one part of a multi-pronged defence strategy, not the entire strategy itself.
Your Action Plan: Holistic Soil Health for Disease Prevention
- Improve Drainage: Continuously add organic matter (compost, leaf mould) to create a well-aerated soil structure, rather than relying only on resistant plants.
- Balance Soil pH: Test your soil. In acidic conditions where clubroot thrives, gradually raise the pH towards neutral or slightly alkaline using garden lime.
- Foster Microbiome: Avoid soil compaction by not walking on wet beds, and feed the soil life with organic mulches.
- Practise Crop Rotation: Avoid planting susceptible species in the same spot year after year to break the disease cycle.
- Monitor and Diversify: Even with resistant varieties, monitor for stress during wet periods and plant a diverse range of species to build overall garden resilience.
Why Cutting Back Autumnal Dormancy Structure Harms Hibernating Insects?
The final, and perhaps most compelling, argument for resisting the urge to « tidy up » in autumn goes beyond the health of a single plant. The standing, hollow stems and dense seed heads of your dormant perennials are not dead space; they are a vital piece of ecosystem engineering. These structures provide the single most important resource for a huge range of beneficial insects looking for a safe place to hibernate: shelter.
Hollow stems of plants like Rudbeckia, Echinops, and fennel become five-star hotels for overwintering ladybugs, lacewings, and solitary bees. Ladybugs and lacewings are voracious aphid predators, and having a healthy population emerge directly within your borders in spring is the best, most effective form of free pest control you could ask for. Dense, tufted grasses and the basal foliage of plants like Heuchera provide shelter for ground beetles, which prey on slugs and other pests. The seed heads of Echinacea and Verbena bonariensis become a crucial winter larder for birds like goldfinches.
This macro photograph reveals a hibernating ladybug nestled safely inside the hollow of a dried perennial stem, a powerful illustration of the vital habitat these structures provide.
By cutting all this back, you are effectively destroying an entire winter habitat. This forces beneficial insects to seek shelter elsewhere, or perish, leading to a boom in pest populations the following spring. As documented by UK specialist growers, this practice turns an aesthetic choice into a strategic pest management decision. Leaving the structure standing creates a self-sustaining system where your garden’s predators are right where you need them, ready to go to work as soon as the aphids appear. It’s the ultimate return on investment—a healthier, more balanced garden with less work and no chemical intervention.
Start securing your garden investment today. By shifting your focus from the foliage to the foundational root economy and the wider garden ecosystem, you can build perennial borders that are not only resilient to our wet British winters but become more robust and vibrant with each passing year.