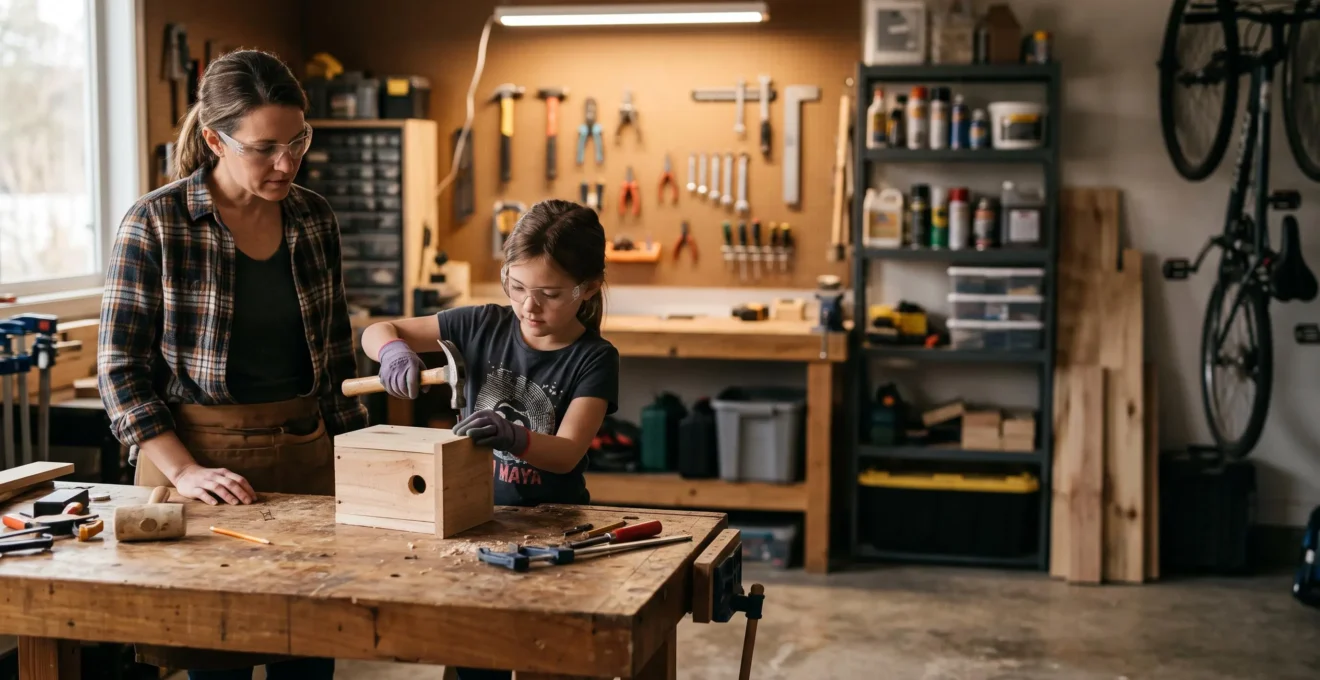
The greatest benefit of a home maker-space isn’t the finished projects, but the resilient engineering mindset your child develops by working through inevitable failures.
- Success is measured by engagement and iteration, not perfection. Failure is treated as valuable data for the next attempt.
- Real, child-sized tools provide “constructive friction,” teaching respect for materials and process in a way toy versions cannot.
Recommendation: Start by focusing on creating a safe space for experimentation and failure, prioritizing the process of problem-solving over the creation of a perfect product.
You hand your child a brand-new, all-inclusive building kit. For an hour, they are captivated. The next day, it sits in a corner, its potential exhausted, the brief flicker of creative fire extinguished. This cycle is familiar to many parents who invest in STEM toys, hoping to ignite a lifelong passion for making and engineering. The common advice is to provide more kits, more organized projects, and perhaps a set of colorful, plastic tools that mimic their real-world counterparts. We try to create a smooth, frustration-free path to a successful outcome.
But what if the friction, the setbacks, and even the “failures” are the most valuable parts of the process? What if the key to fostering genuine engineering skills lies not in avoiding mistakes, but in creating a dedicated environment where mistakes are reframed as crucial data points? This is the core philosophy of a true maker-space. It’s less about the specific tools on the pegboard and more about cultivating a mindset where resilience is the primary product. It’s about teaching a child to see a snapped piece of wood not as a disaster, but as an opportunity to understand tension, grain, and the need for a better design.
This guide moves beyond the superficial “what to buy” and dives into the “why and how” of building that mindset. We’ll explore how to select real tools safely, how to supervise without stifling autonomy, and how to transform even a small corner of your home into a powerful laboratory for innovation and resilience. You’ll learn to architect a space where the most important thing your child builds is their own capacity to solve the next problem, and the one after that.
The following sections break down the essential strategies for turning any corner of your home into a thriving hub of creativity and practical learning. From the psychology of resilience to the logistics of storing works in progress, this is your blueprint for fostering a true maker.
Summary: Your Guide to a Thriving Home Maker-Space
- Why Does Tinkering with Tools Build Resilience to Failure?
- How to Choose Real Tools That Are Safe for Small Hands?
- The Hovering Risk: How to Supervise Sawing Without Taking Over?
- Maker Mindset or Follow Instructions: Which Builds Innovation?
- How to Store “Works in Progress” Without Losing Pieces?
- Homemade Microscope or Store-Bought: Which Is Better for Beginners?
- How to Build an Obstacle Course in a Small Living Room?
- Using STEM Exploration Kits: Turning the Garden into a Laboratory?
Why Does Tinkering with Tools Build Resilience to Failure?
The core value of tinkering isn’t the successful birdhouse; it’s the wobbly, collapsed first attempt and the decision to try again. This process directly cultivates what psychologists call a “growth mindset”—the belief that abilities can be developed through dedication and hard work. When a child works with physical materials, failure is not an abstract concept but a tangible reality: a screw that strips, a cut that goes crooked, a structure that won’t stand. Each of these moments presents a choice: give up, or analyze the problem and adapt. This cycle of trial, error, and iteration is the engine of resilience. It teaches children to view setbacks not as a reflection of their own inadequacy, but as failure as data—impersonal, useful information for the next attempt.
Research confirms that this mindset is not just an adult trait. As mindset pioneer Carol Dweck notes, “young children have an early form of the whole [mindset].” The right environment can either nurture or diminish this innate capacity. A maker-space is an ideal nurturing ground. It’s a low-stakes environment where the goal is learning, not performance. In fact, a large longitudinal study tracking thousands of students found that growth mindset is malleable and can be fostered through targeted experiences. Tinkering provides exactly that: a continuous stream of small, manageable challenges that prove to the child that effort and strategy lead to mastery. It physically demonstrates that they are not “bad at building,” but are simply learning the physics of their materials.
Case Study: Tinkering School’s “Failure-as-Data” Model
Founded by computer scientist Gever Tulley, Tinkering School provides a powerful real-world example. During week-long programs, children build ambitious projects like roller coasters and rope bridges using real tools. According to the school’s philosophy, detailed on platforms like its Wikipedia entry, success isn’t measured by the final product. Instead, it’s measured by the “projectory”—how much a project continues to engage the kids, prompting them to iterate and rebuild after failed attempts. This approach directly embodies the principle of treating failure as a critical part of the design process, building profound resilience and a deep-seated engineering intuition.
Ultimately, by providing a space where trying and failing is the norm, you are giving your child a powerful psychological toolkit. They learn to separate their ego from the outcome and develop the grit that is fundamental not just to engineering, but to navigating life’s inevitable challenges.
How to Choose Real Tools That Are Safe for Small Hands?
The temptation to fill a child’s first toolbox with colorful, plastic look-alikes is strong. They seem safer and are marketed directly to parents. However, these toys often create more frustration than learning. They bend, break, and fail to interact with materials in a predictable way, teaching the child that their effort is futile. The key to fostering real skill is to introduce real tools—appropriately sized but fully functional. This is where the concept of constructive friction comes into play: the slight resistance and challenge of using a genuine tool teaches respect, focus, and the physical properties of the world. A real, child-sized hammer offers predictable feedback; a plastic one does not.
Choosing the right tools isn’t about age, but about developmental readiness and proper scale. Can your child hold and control a tool with a firm grip? Can they follow multi-step safety instructions? Start with simpler tools that build foundational skills. A hand drill, a small Japanese pull saw, or a lightweight hammer are excellent starting points. Look for tools with handles designed for smaller hands, ensuring a secure grip. The goal is to provide a successful, empowering experience. The tool should feel like a natural extension of their hand, not an unwieldy, oversized object they have to fight against.
As this image highlights, the connection between hand and tool is tactile and sensory. The textured grip, the weight, the balance—these are all part of the learning experience. This direct physical feedback is something no toy can replicate. The Montessori approach offers a structured pathway for this introduction, focusing on deliberate, respectful use. Building competence with real tools sends a powerful message of trust and responsibility, showing your child that you believe in their capability to handle real-world tasks.
Safety, of course, is the framework for all of this. It’s not just about the tool itself, but the process. Always require safety glasses. Work on a stable surface. And most importantly, demonstrate proper use slowly and deliberately before ever letting the child take the lead. The tool is only as safe as the procedure used to operate it.
The Hovering Risk: How to Supervise Sawing Without Taking Over?
One of the most challenging tasks for a parent in a maker-space is to supervise a high-stakes activity like sawing without intervening. The instinct to grab the tool and “just fix it” is powerful, driven by a desire for safety and efficiency. However, taking over undermines the entire learning process. This is the moment to practice scaffolded autonomy: providing a robust safety structure so the child can operate independently within it. Your role is not to be the hands, but the observant guide, the second set of eyes, and the calm presence that fosters concentration.
The key is to front-load the safety. This means setting up the workstation and the rules so that the most common risks are engineered out of the process before the child even begins. A proper setup makes good supervision possible. According to the team at Global Bambini, a resource for Montessori learning, the principle is to “Observe and Guide: Watch how the child interacts with the tools and offer gentle guidance without taking over the activity.” Your verbal cues should be invitations to problem-solve, not commands. Instead of “You’re sawing crooked,” try “What do you notice about the line the saw is making?” This puts the power of observation and correction back in their hands.
This image perfectly captures the ideal dynamic: the child is fully engrossed in their work, and the parent is present and attentive but at a distance that communicates trust. This physical space allows for the mental space a child needs to focus. To achieve this, a clear safety protocol is non-negotiable. It acts as the “scaffold” that makes autonomy possible.
Your Action Plan: Workbench Safety Protocol for Supervised Cutting
- Clamp the workpiece: Always secure the wood or material in a vise. It should never be held with a free hand during a cut.
- Hands on the tool: Both of the child’s hands should be on the handle of the saw. Their other hand should be well away from the blade and the workpiece.
- Use a stable workbench: The work surface must be the right height for the child and heavy enough that it cannot slide or tip during the cutting motion.
- Treat the vise as a safety feature: Teach the child that the vise is the “third hand” that holds the work, making the process safe and stable.
By establishing these rules, you shift the focus from your own anxiety to the child’s process. You are no longer just watching for danger; you are watching for learning, ready to offer a thoughtful question rather than a reflexive correction.
Maker Mindset or Follow Instructions: Which Builds Innovation?
Modern toy aisles are filled with kits that promise a specific, perfect outcome: a race car, a castle, a robot. Following these instructions can build confidence and teach a child how to decode diagrams. However, true innovation is born not from following a map, but from drawing your own. This is the core difference between a “kit mindset” and a maker mindset. While the former focuses on replication, the latter focuses on creation, adaptation, and problem-solving with the materials at hand. A child who can only build from a manual has learned a skill; a child who can repurpose those same parts into something entirely new has learned to think like an engineer.
This doesn’t mean kits have no place. They are excellent for introducing new components and mechanisms, building a “vocabulary” of how things work. The trick is to treat the instructions as the first step, not the last. Once the official model is built, the real work begins. The challenge then becomes: what else can this be? As Gever Tulley, founder of Tinkering School, famously advocates, we must “Let children be co-authors in their education.” This means empowering them to deconstruct, modify, and reinvent. The goal is to move from passive consumer of instructions to active creator of possibilities.
How do you bridge this gap? The key is to introduce creative constraints. Instead of saying “build whatever you want”—which can be paralyzing—provide a structured challenge. This transforms a simple kit into a design problem, pushing the child beyond the confines of the instruction booklet and into the realm of genuine innovation. This approach provides a clear path from following to creating.
Your Action Plan: Turning Kit-Building into a Design Challenge
- Build the base model: Start by following the standard kit instructions to build a working vocabulary of its parts and mechanisms.
- Add a time constraint: Challenge your child to plan and build a new variation on the model within a set time, like thirty minutes.
- Introduce a material constraint: Ask them to rebuild the creation using only pieces of one specific color or type.
- Repurpose the function: Once a model is mastered, challenge the child to give the finished build an entirely new purpose. Can the race car become a machine for delivering a snack across the room?
By progressively layering these challenges, you are teaching the fundamental principles of design and engineering. You are showing them that the parts in the box are not a script, but an alphabet they can use to write their own stories.
How to Store “Works in Progress” Without Losing Pieces?
A maker-space is often a place of controlled chaos, but nothing halts creativity faster than a lost critical piece or a “work in progress” that gets accidentally dismantled during cleanup. A functional storage system is not just about tidiness; it’s about respecting the creative process. A project that takes days or weeks to complete is a project trajectory, and protecting its integrity is paramount. Having a dedicated, safe place for unfinished work tells a child that their ongoing effort is valued, even in its incomplete state.
The solution doesn’t need to be expensive or elaborate. It needs to be simple, visible, and accessible. One of the most effective tools is the humble tray or baking sheet. Assigning a project to its own tray creates a self-contained, portable workstation. At the end of a session, the entire project—the main assembly, loose parts, and required tools—can be lifted and stored on a designated “in-progress” shelf. This keeps everything together and signals that the work is active and important. For smaller projects with many tiny pieces (like electronics or LEGO mechanisms), compartmentalized boxes, like those used for fishing tackle or beads, are invaluable.
A good organization system is one of the five essentials for any home maker-space. According to a guide on Instructables for creating a kid’s maker-space, a functional setup requires more than just tools. A successful space needs:
- A dedicated area to build without constant disruption.
- The right tools matched to the child’s skill level.
- Accessible materials ready for use.
- A simple organization system so works-in-progress are never lost.
- Nearby sources of inspiration (books, interesting objects) to spark ideas.
This framework makes it clear that storage is a foundational pillar, not an afterthought. It supports the long-term engagement necessary for complex projects and prevents the frustration that can derail a young maker’s enthusiasm.
Ultimately, your storage solution should be as easy for your child to use as it is for you. Labeling bins with pictures instead of words, using clear containers, and keeping everything at an accessible height empowers them to manage their own space, reinforcing the sense of ownership and responsibility that is at the heart of the maker movement.
Homemade Microscope or Store-Bought: Which Is Better for Beginners?
The question of whether to build or buy a tool like a microscope gets to the heart of the maker philosophy. A high-powered, store-bought microscope offers instant gratification and breathtaking views of the microscopic world. It delivers a perfect, polished experience. A homemade microscope, perhaps fashioned from a drop of water, a laser pointer lens, or a simple kit, will be crude by comparison. It will be finicky, its image may be blurry, and it will require patience to operate. So which is better? The answer depends on your goal: do you want to show your child a result, or teach them a principle?
The store-bought microscope excels at revealing the “what.” The homemade version excels at revealing the “how.” By struggling to align the lenses, focus the light, and prepare a slide, a child isn’t just seeing an onion cell; they are viscerally understanding the physics of light and magnification. They are engaging in the process of scientific discovery from the ground up. This hands-on struggle embodies the core idea expressed by educational pioneer Maria Montessori, who believed, “The greatest gifts we can give our children are the roots of responsibility and the wings of independence.” Building your own tool is an act of independence. It demystifies the technology and proves that complex instruments are simply assemblies of understandable parts.
For a true beginner, the ideal path may be a combination of both. Start with a homemade version to spark curiosity about the mechanics. Let them experience the triumph of getting even a blurry image to appear. This initial constructive friction builds an appreciation for the technology. Then, introducing a store-bought microscope becomes a reward and a powerful upgrade, not just a passive experience. The child will now use the advanced tool with a deeper understanding of the principles behind its magic. They will have earned the view.
Ultimately, the “best” tool is the one that sparks the most questions. The homemade microscope prompts questions about optics and light, while the store-bought one prompts questions about biology. By using both, you create a rich learning ecosystem that addresses both the “how” of the tool and the “what” of the world it reveals.
How to Build an Obstacle Course in a Small Living Room?
A maker-space isn’t limited to a workbench. The entire home can become a laboratory for engineering, and few projects demonstrate this better than building an indoor obstacle course. This activity transforms the living room from a passive space into an active design challenge. It forces a child to think like a structural engineer, assessing the properties of everyday objects and figuring out how to combine them to create a safe and engaging path. It’s a masterclass in creative problem-solving, resourcefulness, and spatial reasoning.
The beauty of this project lies in its accessibility. You don’t need specialized materials; you need a new way of seeing your existing furniture. That sofa cushion isn’t just for sitting; it’s a soft landing pad. The coffee table isn’t just for magazines; it’s a rigid balance beam. A line of masking tape on the floor becomes a tightrope requiring precision and focus. According to NAEYC, a leading resource for early childhood education, a home maker-space thrives on repurposing. By analyzing household materials for their structural properties, children engage in an intuitive form of material science.
This image showcases the potential of a small space. It’s not about the quantity of “stuff,” but the quality of the thinking. To get started, encourage your child to inventory their materials and brainstorm their functions:
- Cardboard boxes and tubes: Lightweight and versatile, perfect for tunnels and towers.
- Pillows and cushions: Excellent for creating uneven terrain and safe “crash zones.”
- Chairs and tables: Serve as strong anchor points for bridges or “lava” avoidance.
- Duct tape and string: The “glue” that holds the course together, teaching about tension and adhesion.
- Old tech items: An old keyboard can become a tactile stepping stone with a unique challenge.
The key is to let the child lead the design process. Your role is to act as the safety inspector, asking clarifying questions like, “What’s your plan for making that stable?” or “How will you test if this is strong enough to hold you?”
Building an obstacle course is more than just a fun way to burn off energy. It’s a dynamic, large-scale physics experiment that proves that engineering isn’t something confined to a lab—it’s a way of thinking that can transform the world around you.
Key Takeaways
- The goal of a maker-space is to cultivate a “maker mindset” focused on resilience and problem-solving, not just to complete projects.
- Failure should be treated as a valuable source of data that informs the next iteration, building a child’s grit and analytical skills.
- Real, child-sized tools provide necessary “constructive friction,” teaching focus and respect for materials in a way that toy tools cannot.
Using STEM Exploration Kits: Turning the Garden into a Laboratory?
STEM exploration kits—from ant farms to crystal-growing sets and volcano models—are often a child’s first formal introduction to science. They offer a structured, predictable path to a “wow” moment. While valuable, their prescriptive nature can sometimes run counter to the open-ended discovery that defines the maker mindset. The real challenge, and opportunity, is to use these kits not as the end of the experiment, but as the beginning. The goal is to break free from the box and turn the wider environment, like your own garden, into a true laboratory.
Consider a simple soil testing kit. The instructions guide you to test the pH of a provided soil sample. A kit-based approach ends there. A maker-based approach asks, “What’s next?” This is where the garden becomes the lab. Now, the kit is just a tool to answer bigger, self-directed questions. How does the pH differ near the tomato plants versus under the pine tree? What happens to the soil’s composition after a heavy rain? Can we change the pH by adding crushed eggshells or coffee grounds and measure the difference over a week? Suddenly, a simple kit has become the catalyst for a longitudinal study.
This method transforms the child from a passive follower of instructions into an active scientist designing their own experiments. It’s the physical embodiment of scaffolded autonomy, where the kit provides the initial tools and vocabulary, but the child provides the curiosity and direction. You can apply this to any kit. A bug-viewing box from a kit is useful, but a homemade “pooter” (a simple insect aspirator) used to gently collect and observe insects in their natural habitat teaches more about ecology and scientific methodology. The garden is a complex ecosystem, far more interesting than any pre-packaged environment, offering endless variables to explore.
To truly foster an engineering and scientific mindset, encourage your child to see every kit not as a complete product, but as a set of tools to be applied to the world. The next time you finish a kit, ask the simple question that drives all innovation: “Now, what else can we do with this?”