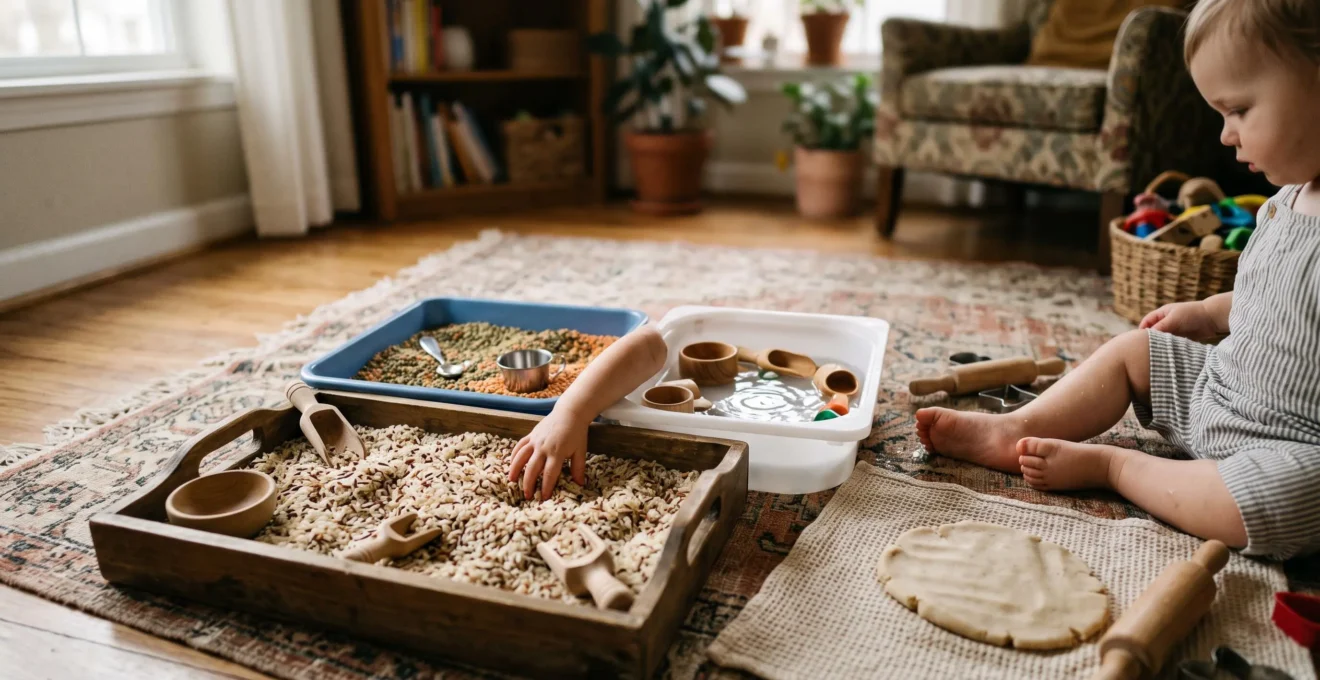
Creating a brain-boosting sensory station doesn’t require expensive kits, just intentional choices with everyday items.
- Focus on “taste-safe” bases like oats or cooled pasta for babies and toddlers to ensure safe exploration.
- Choose materials like homemade playdough or kinetic sand for their specific tactile feedback—one strengthens hand muscles, the other calms the nervous system.
Recommendation: Start with one container, a simple base like water or dry cereal, and two scoops to prevent sensory overwhelm for both you and your child.
As a parent, you see the brightly coloured, perfectly curated sensory play kits online and feel a familiar pang: a desire to give your child the very best, followed by a quick glance at the price tag. The good news is that the most profound developmental benefits of sensory play have little to do with expensive toys and everything to do with texture, exploration, and discovery. You don’t need to spend a fortune or sacrifice your living room to the god of mess. The secret lies in shifting your mindset from a consumer to a creator, or what we might call a “sensory architect.”
Many guides will give you a simple list of materials: rice, pasta, water beads. But they often miss the most crucial part—the *why*. Why does squishing playdough build the foundations for writing? Why does pouring water from one cup to another improve mathematical thinking? This guide moves beyond simple recipes. We will explore the science behind the fun, helping you make intentional choices that target specific skills. The goal is to empower you to build a powerful, engaging, and genuinely beneficial sensory play station for under £20, using items you likely already have. It’s about creating moments of deep learning, not just moments of colourful chaos.
In the following sections, we will delve into the core principles of effective sensory play. We’ll start by understanding how messy play physically builds your toddler’s brain, then address the essential topic of safety for babies who explore with their mouths. We’ll compare classic materials to help you choose wisely, tackle the common pitfall of overstimulation, and finally, provide a foolproof plan for a splash zone you can clean in minutes. Let’s begin this creative journey together.
Summary: Your Guide to Budget-Friendly Sensory Architecture
- Why Does Messy Play Boost Brain Connections in Toddlers?
- How to Make Taste-Safe Sensory Bins for Babies Who Put Everything in Their Mouths?
- Kinetic Sand or Homemade Playdough: Which Offers Better Tactile Feedback?
- The Overstimulation Trap: When Too Much Sensory Input Causes Tears
- How to Set Up a Splash Zone That Takes 5 Minutes to Clean?
- Jigsaw Puzzles or Building Blocks: Which Develops Better Mental Rotation?
- Why Does Creative Art Increase Neural Plasticity in Children?
- How to Improve Spatial Reasoning in Preschoolers Without Screens?
Why Does Messy Play Boost Brain Connections in Toddlers?
When a toddler plunges their hands into a bowl of cool, slippery jelly or squeezes a handful of grainy sand, it’s far more than just messy fun. It’s a full-blown neurological event. Each new texture, temperature, and sound sends a cascade of information to the brain, forging and strengthening vital neural pathways. This process, known as sensory integration, is the foundation upon which more complex learning is built. The brain learns to process and organise multiple sensory inputs simultaneously, a skill essential for everything from learning to read to riding a bike.
Think of it as constructing a library of experiences. The more “books” (sensory experiences) a child has, the better their brain can understand and navigate the world. This hands-on exploration directly supports language development as children learn new words to describe what they feel (“squishy,” “gritty,” “cold”). It also enhances problem-solving skills as they figure out how to scoop, pour, and mould materials. This isn’t just theory; it’s a measurable outcome.
Case Study: The Sunflower Early Learning Center’s Sensory Curriculum
To understand the real-world impact, consider the findings from an early learning centre that introduced a structured sensory curriculum. After six months of engaging with sensory bins, art stations, and nature walks, 100 children aged 3-5 showed a remarkable 20% improvement in problem-solving skills, a 25% increase in new vocabulary, and a 30% jump in cooperative play. This demonstrates how intentional, messy play translates directly into measurable cognitive and social gains, proving that the mess is truly meaningful.
Furthermore, sensory play is uniquely adaptable. As Dr. Krystal Starke, a Child Testing Researcher, notes for Forbes, “Sensory play is adaptable and accommodating, making it beneficial for sensory-sensitive and sensory-seeking children.” It allows each child to engage at their own comfort level, building confidence and a positive relationship with learning. The simple act of messy play is, in fact, one of the most powerful forms of early brain-building you can offer.
How to Make Taste-Safe Sensory Bins for Babies Who Put Everything in Their Mouths?
For babies and young toddlers, the world is a buffet. Every object’s primary purpose, from their perspective, is to be tasted. This oral exploration is a normal and crucial developmental stage, but it can make parents hesitant about sensory play. The solution is beautifully simple: create sensory bins where everything is edible. A “taste-safe” bin removes the worry, allowing your little one to explore freely with all their senses, including taste, without risk.
The key principle of sensory scaffolding begins here. You start with textures and tastes that are already familiar and safe. This isn’t about preparing a meal; it’s about providing a sensory experience. You only need a small amount of material in a shallow tray or baking dish. The focus should be on single-ingredient bases that are easy to manage and clean. Think about soft, mushy textures or dry, crumbly ones. Items like yogurt, applesauce, or even water with a few slices of lemon can provide a wonderful first sensory experience.
As your child grows, you can introduce more complex textures. The goal is to build their sensory library gradually and safely. Here are some simple, age-appropriate ideas for taste-safe materials:
- Babies (6-12 months): Stick with very soft, familiar textures. Only use foods you have already introduced into their diet. Good options include plain yogurt, mashed sweet potato, pureed fruits, cooked and cooled oatmeal, or even a shallow tray of water.
- Young Toddlers (1-2 years): You can now introduce basic scooping and pouring activities. Dry bases like Cheerios, Rice Krispies, or other large, puffed cereals are perfect. Cooked and cooled spaghetti or pasta shapes also offer a wonderfully slippery and engaging texture.
- Older Toddlers (2-3 years): At this stage, they are less likely to eat large quantities but may still mouth objects. You can use dry materials like uncooked pasta, beans, or lentils for more refined scooping, pouring, and sorting, always under close supervision.
Remember, the golden rule is to only use foods you feel comfortable feeding your child. Avoid potential allergens you haven’t introduced yet and always supervise play to ensure they are exploring safely. This approach transforms a moment of potential anxiety into one of pure, worry-free discovery.
Kinetic Sand or Homemade Playdough: Which Offers Better Tactile Feedback?
As you build your sensory toolkit, two classic materials emerge: kinetic sand and homemade playdough. Both are fantastic, budget-friendly options, but they offer vastly different sensory experiences and developmental benefits. Understanding their unique properties helps you become a true “sensory architect,” choosing the right material for the right purpose. The key difference lies in the concept of the tactile feedback loop—how the material responds to a child’s actions and what their brain learns from that response.
Homemade playdough, made from simple kitchen staples like flour, salt, and water, offers high resistance. It requires active pushing, pulling, squeezing, and rolling. This intense work is brilliant for strengthening the small muscles in the hands and fingers, a crucial pre-requisite for developing a proper pencil grip and writing skills. The feedback is one of force and effort; the more you work it, the more it changes. It’s an active, muscle-building material.
Kinetic sand, on the other hand, is a much more passive and calming material. It feels silky, flows like a thick liquid, but can be packed and moulded. Its unique property is that it sticks to itself but not to hands, making for a much cleaner experience. The tactile feedback is gentle and predictable. Squeezing it provides satisfying proprioceptive input (the sense of body position and effort), which can be incredibly soothing for an anxious or overstimulated child. It’s often used in therapeutic settings for this very reason.
Neither is “better”—they simply serve different functions. Playdough is for strengthening and active creation, while kinetic sand is for calming, fine motor refinement, and mess-free exploration. Here is a direct comparison based on an analysis of their sensory benefits:
| Criteria | Kinetic Sand | Homemade Playdough |
|---|---|---|
| Tactile Feedback | Silky, fluid, self-cohesive texture that shifts and moves | Higher resistance, requires active kneading and pressing |
| Clean-up | Sticks to itself, not to surfaces or clothing, easier clean-up | Can leave residue and stick to surfaces, floors, and fabric |
| Best Use | Calming, proprioceptive input, fine motor refinement | Strengthening hand muscles for pre-writing skills |
| Longevity | Does not dry out over time | Dries out unless stored airtight |
The Overstimulation Trap: When Too Much Sensory Input Causes Tears
We’ve all been there. You set up a beautiful, engaging activity, and within minutes, your happy child dissolves into tears or frustration. This is the overstimulation trap: the fine line between beneficial sensory input and overwhelming sensory overload. For a small child, too many new textures, colours, and sounds at once can be as distressing as being in a loud, crowded room. Learning to recognise the signs and manage the environment is key to making sensory play a positive experience.
The signs of overload can be subtle. A child might suddenly become rigid, avert their gaze, refuse to touch the materials, or start throwing things. This isn’t “bad behaviour”; it’s a distress signal. Their nervous system is overwhelmed and needs a break. The most effective way to prevent this is by empowering the child with choice and control. As research highlighted by the St. Andrews International School’s Early Years team suggests, “When children can choose their level of sensory engagement… they then develop the self-regulation skills that will serve them throughout life.”
In practice, this means starting small and simple. Instead of a giant tray with ten different items, begin with one material and one or two tools (like a scoop and a cup). This approach, known as sensory scaffolding, allows the child to master one sensation before moving to the next. Let them lead. If they just want to watch for a while, that’s okay. Observation is a valid form of participation.
Here are some practical steps to prevent and manage overstimulation:
- Start with familiar textures: Begin with materials your child knows and enjoys before introducing new ones.
- Allow observation before participation: Never force a child to touch something. Let them watch you play with it first to see that it’s safe and predictable.
- Respect boundaries: Gently encourage exploration, but if a child says “no” or pulls their hand away, respect it.
- Remember that ‘no’ doesn’t mean ‘never’: It might just mean ‘not today’. Try again another day when they are well-rested and calm.
How to Set Up a Splash Zone That Takes 5 Minutes to Clean?
The number one barrier to embracing messy play is often the parent’s dread of the cleanup. The vision of rice scattered across the floor or playdough ground into the carpet is enough to make anyone put the lid back on the container. However, with a bit of forethought, you can create a contained “splash zone” and a clean-up ritual that makes the entire process manageable and stress-free. The secret is 90% preparation, 10% execution.
First, choose your location wisely. A kitchen or bathroom with a hard floor is ideal. If you’re playing outside, the lawn is perfect. If a carpeted area is your only option, an old shower curtain or a large, inexpensive tarpaulin from a hardware store (well under £10) is your best friend. This creates a clear, wipeable boundary for the play area. A large, shallow storage container (like one that slides under a bed) makes an excellent and affordable alternative to a dedicated “tuff tray.”
The next step is to prepare your clean-up station *before* you start. Have a towel, a bowl of warm water, and some wipes right next to the play area. This immediate access prevents a messy child from running through the house to get to a sink. Involving your child in the clean-up ritual is also a fantastic learning opportunity. Give them a small cloth or a dustpan and brush and make it part of the game. “Now it’s time to put the sand back to sleep!”
Dressing for success is also crucial. An old, oversized t-shirt works perfectly as a smock. For water play, having your child in just their nappy can be the easiest option. By containing the area, preparing your tools, and making cleanup part of the routine, you remove the anxiety and free yourself up to enjoy the moment with your child.
Your 5-Minute Mess-Proofing Plan
- Designate the Zone: Choose an easy-to-clean floor space (kitchen, bathroom) or lay down a waterproof barrier (old shower curtain, tarpaulin).
- Contain the Materials: Use a large, shallow plastic bin, a baking tray with a lip, or even the bathtub to keep materials in one place.
- Prepare a Clean-Up Kit: Before play begins, place a towel, a small bowl of water, and wipes within arm’s reach of the play zone.
- Dress for the Mess: Use an old t-shirt as a smock or strip down to a nappy for water-based activities.
- Model the Ritual: When play is over, involve your child in the clean-up process. Make it a calm, predictable end to the activity.
Jigsaw Puzzles or Building Blocks: Which Develops Better Mental Rotation?
When it comes to building spatial skills, jigsaw puzzles and building blocks are two non-screen powerhouses. Both are excellent for developing mental rotation—the ability to imagine and manipulate objects in your mind—but they do so in different ways. Understanding their unique strengths allows you to support your child’s cognitive development more intentionally.
Building blocks, whether they are simple wooden cubes or interlocking plastic bricks, are champions of three-dimensional, constructive reasoning. When a child builds a tower, they are experimenting with gravity, balance, and stability. They learn to think about an object from all sides: front, back, top, and bottom. This free-form creation encourages them to translate a mental image into a physical structure, solving problems as they go. If they want to build a bridge, they have to mentally rotate the blocks to figure out how to span the gap. This is active, generative spatial thinking.
Jigsaw puzzles, in contrast, excel at two-dimensional pattern recognition and part-to-whole analysis. A child doing a puzzle learns to analyse a shape, hold it in their memory, and mentally rotate it to see if it matches a space in the puzzle. They are not creating a new structure but rather deconstructing and reconstructing a pre-existing image. This strengthens their ability to see how individual pieces fit together to form a larger picture, a critical skill for both reading and mathematics. The mental rotation here is more about matching and fitting than it is about building.
So, which is better? Neither. They are complementary. Blocks teach a child how to build a 3D world from their imagination. Puzzles teach them how to understand and reassemble the 2D world presented to them. For holistic development, a healthy diet of both is ideal. Start with chunky wooden puzzles and large blocks for toddlers, and gradually move to more complex designs as their skills grow.
Key Takeaways
- The goal of budget sensory play is not to replicate expensive toys, but to provide intentional, brain-building experiences with simple materials.
- Always prioritise safety by using “taste-safe” edible bases for babies and toddlers who explore with their mouths.
- Prevent meltdowns by starting with simple setups and allowing your child to lead the play, respecting their boundaries to avoid sensory overload.
Why Does Creative Art Increase Neural Plasticity in Children?
Creative art, in its purest form, is sensory play with an expressive outcome. When a child mixes blue and yellow paint to discover green, or feels the friction of a crayon on rough cardboard, they are engaging in a powerful process that enhances neural plasticity. This is the brain’s incredible ability to reorganise itself by forming new neural connections throughout life. Art is like a workout for the brain’s flexibility.
The magic happens through the integration of multiple senses. As a research team from Frontiers in Education explains, “This integration of sensory inputs is not just a passive amalgamation; it’s a dynamic process that plays a pivotal role in shaping our perceptions, memories, and learning experiences.” When a child paints with their fingers, they are simultaneously processing the tactile sensation of the paint, the visual input of the colours, and the proprioceptive feedback from their hand movements. This complex sensory dance forces the brain to build and reinforce connections between different regions.
Crucially, this doesn’t require a fully stocked art studio. The most impactful creative experiences are often the simplest. A large piece of cardboard (free from a local shop), a few pots of paint, and some unconventional tools like sticks, leaves, or old bottle caps can be far more engaging than a colouring book. The key is to focus on the process, not the product. The goal isn’t to create a masterpiece for the fridge, but to allow the child the freedom to explore cause and effect, to experiment without fear of making a “mistake.”
This freedom to experiment is what truly fuels neural plasticity. It teaches children that there are multiple solutions to a problem and encourages divergent thinking. By providing a simple, open-ended art invitation, you are giving your child’s brain the perfect environment to grow, adapt, and build the creative problem-solving skills they will need for a lifetime.
How to Improve Spatial Reasoning in Preschoolers Without Screens?
In a world saturated with digital screens, fostering a child’s spatial reasoning through hands-on, physical experiences is more important than ever. Spatial reasoning—the ability to think about objects in three dimensions and draw conclusions with limited information—is a cornerstone of future success in STEM fields. Thankfully, the best tools for building this skill are timeless, simple, and screen-free. At its heart, all sensory play is an exercise in spatial awareness.
As research confirms, sensory play is an active process that involves a wide array of senses to support the development of cognitive abilities, as noted in a study published in the Journal of Health Technology Assessment in Midwifery. It’s about understanding relationships: inside/outside, on top/underneath, full/empty. You can easily turn your home into a rich environment for this learning. Building a fort with blankets and chairs is a masterclass in structural engineering and spatial planning. Creating an obstacle course with pillows to crawl over and tables to go under teaches positional language and body awareness in a deeply physical way.
Water play is another superstar. Providing a few different-sized containers, funnels, and spoons allows a child to explore concepts of volume and capacity in the most intuitive way possible. They learn that the water from a short, wide cup fills a tall, skinny cup completely. This is a hands-on physics lesson! Even simple tasks like helping to set the table—placing the fork on the left, the knife on the right—reinforce spatial relationships. The key is to narrate these experiences, giving your child the vocabulary to describe what they are doing and seeing.
By transforming your perspective, you begin to see opportunities for building spatial reasoning everywhere. It’s not about dedicated lessons, but about integrating these concepts into everyday play and chores. From sorting laundry into different piles to arranging groceries in the cupboard, these real-world tasks provide the rich, tangible experiences that build a strong and flexible spatial mind, no apps required.
Now that you are equipped with the “why” and the “how,” the next step is to begin your journey as a sensory architect. Start small, stay curious, and embrace the powerful learning that happens through play.