The most effective way to eliminate powdery mildew is not through chemical sprays, but by re-engineering your garden’s microclimate to disrupt the conditions fungus needs to survive.
- Stagnant, humid air is the primary cause of fungal outbreaks, especially in enclosed gardens.
- Strategic pruning, intelligent spacing, and permeable barriers create « airflow corridors » that keep foliage dry.
Recommendation: Stop treating the disease and start sculpting the wind. By actively managing airflow, you create a garden that is naturally resistant to powdery mildew.
For rose enthusiasts, particularly those with beautiful but enclosed walled gardens, the fight against powdery mildew can feel like a losing battle. Each season, we follow the conventional wisdom: we spray fungicides, we water at the base of the plant, and we dutifully remove spotted leaves. Yet, the persistent white dust returns, a sign that we are only treating the symptoms, not the root cause. This reactive approach consumes time, money, and can introduce unwanted chemicals into our personal sanctuaries. But what if the problem isn’t the plant, but the air itself? What if the key to a healthy rose garden lies not in a spray bottle, but in fluid dynamics?
The true enemy of the rose in a walled garden is air stagnation. This article reframes the challenge entirely. Instead of viewing your garden as a collection of plants, we will approach it as a microclimate engineer. You will learn to see the invisible currents of air, identify the ‘dead zones’ where humidity pools, and discover how to sculpt the environment to create a constant, gentle breeze that is the ultimate, natural fungicide. We will explore how to prune for flow, how your fences can work for or against you, and why the simple act of spacing becomes a powerful tool in disease prevention.
Summary: How to Engineer Airflow to Prevent Powdery Mildew
- How to Thin Fruit Spurs to Let Light and Air Reach the Centre?
- Solid Fences vs Trellis: Which Causes More Air Stagnation?
- The Corner Trap: Why Plants in 90° Corners Get Sick First?
- How to Measure Leaf Wetness Duration to Predict Disease?
- Weeding for Airflow: Removing Ground Cover to Save the Canopy
- The Spacing Mistake That Creates a ‘Fungal Incubator’ in Your Border
- The Spacing Mistake That Causes Mildew in Herbaceous Borders
- How to Prevent Foliar Diseases in Damp UK Gardens Without Fungicides?
How to Thin Fruit Spurs to Let Light and Air Reach the Centre?
While the title mentions fruit spurs, the principle of internal thinning is the first and most crucial step in engineering airflow for roses. A dense, tangled rose bush is a microclimate of its own—one of stagnant, humid air perfect for fungal growth. The goal of structural pruning is not just to shape the plant, but to open its core, transforming it from a dense mass into an open, vase-like structure that air can move through, not just around. This proactive approach significantly reduces disease pressure before the season even begins, as plant health care research shows proper air circulation can prevent many common issues.
The process starts by identifying and removing any canes that grow inward toward the center of the plant. You should also target canes that cross or rub against each other, as these create pockets of trapped air and potential wound sites for infection. The aim is to create clear channels from the outside of the plant to its core, allowing wind and light to penetrate deeply. This not only dries leaves more quickly but also ensures that even the innermost foliage contributes to the plant’s health rather than harbouring disease. Think of it as de-cluttering a room to improve its energy flow; you are doing the same for your rose’s internal architecture.
Action Plan: Pruning for Disease-Resistant Rose Architecture
- Identify Targets: Before cutting, identify all canes growing inward, crossing other canes, or appearing weak, damaged, or dead. These are your primary targets for removal to open the plant’s center.
- Execute Clean Cuts: Make clean, 45-degree cuts about a quarter-inch above an outward-facing bud. This angle prevents water from sitting on the cut surface and directs new growth outwards, away from the plant’s center.
- Remove Interior Laterals: Take out entire lateral canes that originate from the main stems and grow into the interior. This is the single most effective step to promote good air circulation through the center of the plant.
- Establish a Vase Shape: Step back and assess the overall structure. The ideal form is a vase or a goblet, with an open center. Remove any remaining growth that violates this open-air principle.
- Perform In-Season Snips: Throughout the growing season, perform quick maintenance snips to remove any new shoots that start growing back into the center, maintaining the open structure you’ve created.
By transforming your rose from a dense block into an open framework, you have taken the first step as a microclimate engineer, fundamentally altering the environment where mildew might otherwise thrive.
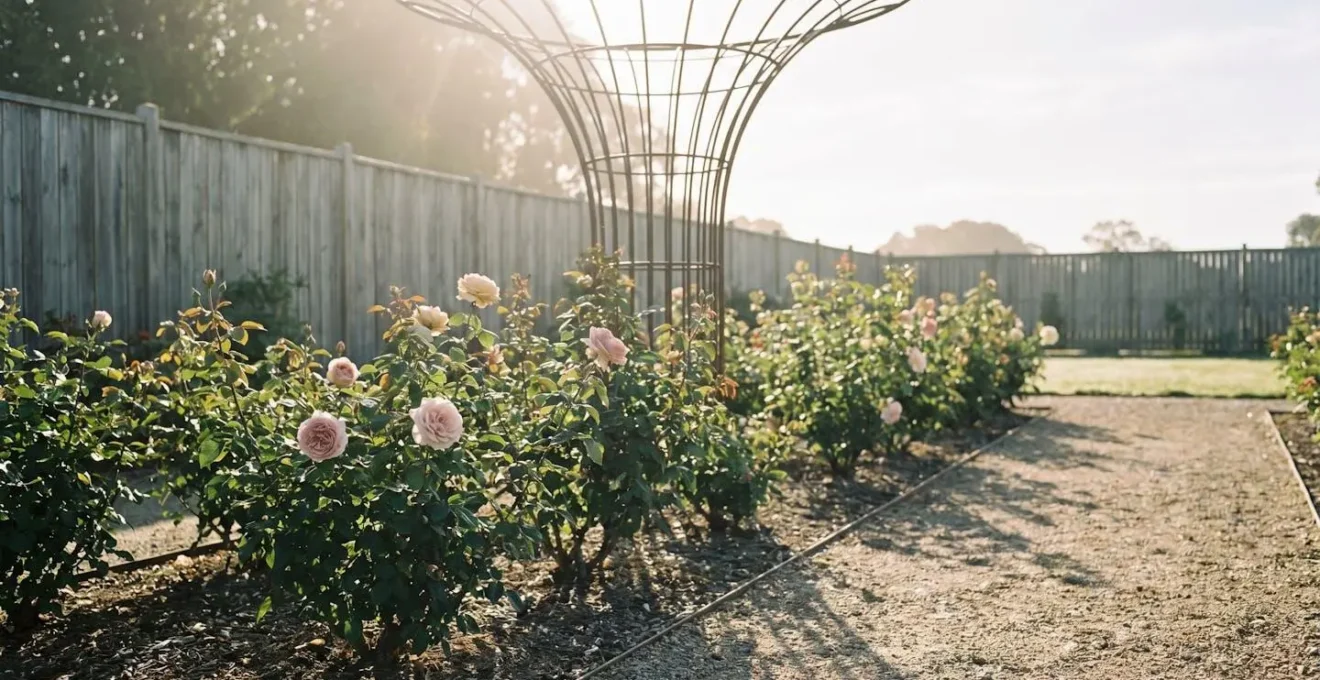
Solid Fences vs Trellis: Which Causes More Air Stagnation?
The boundaries of your garden have a profound impact on its microclimate. For owners of walled or fenced gardens, these barriers are often the primary cause of air stagnation. A solid fence acts like a dam, completely blocking airflow and creating a large « wind shadow » on its leeward side. In this zone of stillness, humidity rises from the soil and dew lingers on leaves for hours, creating a perfect breeding ground for powdery mildew. Furthermore, the wind that is blocked must go somewhere, often creating turbulent eddies and powerful gusts at the corners and top of the fence, which can stress plants.
In contrast, a permeable barrier like a trellis or slatted fence acts more like a filter than a dam. It doesn’t stop the wind but rather slows it down, breaking a harsh gust into a gentle, consistent breeze. This is the ideal for plant health. The pierced nature of a trellis allows air to pass through, preventing the formation of stagnant dead zones while also protecting plants from wind damage. By replacing even a single panel of solid fencing with a trellis, especially one facing the prevailing wind, you can introduce a vital current of air into your garden, effectively ventilating the entire space.
Field Study: The Dynamics of Solid vs. Permeable Barriers
A practical field study highlighted the dramatic difference in airflow behind barriers. Solid 2-meter fences were observed to act like sails, catching the full force of the wind. This created a large zone of near-complete stillness directly behind the fence, but also generated powerful, turbulent eddies at the edges. Conversely, a trellis of the same height allowed air to filter through. This action reduced the overall wind speed significantly, creating a calm, sheltered microclimate without the pockets of total stagnation that trap humidity and fungal spores. The trellis effectively « breathed » with the environment, preventing the buildup of disease-favouring conditions.
As the illustration and case study demonstrate, the choice of boundary is a powerful engineering decision. A trellis isn’t just a decorative support for climbers; it’s an active tool for managing your garden’s ventilation system, promoting health from the perimeter inward. This is a fundamental shift from seeing a fence as a simple divider to viewing it as an airflow regulator.
By strategically choosing permeable boundaries, you are no longer just fencing in your property; you are designing a healthier, more resilient environment for your roses.
The Corner Trap: Why Plants in 90° Corners Get Sick First?
In the science of fluid dynamics, sharp 90-degree corners are notorious for creating problems. This is as true for the airflow in your garden as it is for water in pipes. When wind hits a corner formed by two solid walls or fences, it can’t turn smoothly. Instead, it creates a chaotic, swirling vortex. This vortex can trap air, or paradoxically, create a zone of such turbulent buffeting that plants are constantly stressed. More often, it results in a pocket of near-total stillness—a « dead zone » where air simply doesn’t move. This is the corner trap.
Plants placed in these 90-degree corners are often the first to show signs of powdery mildew, black spot, and other fungal diseases. The air in the corner becomes saturated with humidity, dew remains on the leaves long after the sun has risen, and fungal spores, finding their ideal environment, germinate and spread. The gardener, seeing a sick plant, might blame the plant itself or a lack of sunlight, without realizing they have placed it in an invisible pocket of stagnant, disease-promoting air. Breaking this corner trap is a key move for the garden microclimate engineer.
The solution is to « soften » these corners and disrupt the vortex effect. This doesn’t necessarily require rebuilding your fence. Strategic placement of objects or choosing different materials can completely change the airflow dynamics. Here are several design solutions to break up trapped air zones in corners:
- Replace Solid Panels: Swap out the solid panels that meet at the corner with semi-open trellis sections. This allows air to bleed through, breaking up the vortex and allowing for gentle circulation.
- Use Rounded Forms: Place a large, rounded container, a curved bench, or even a sculpture in the corner. The curved surface helps guide the air smoothly around the bend instead of letting it stall and swirl.
- Install Curved Trellis: For a more integrated solution, install a curved trellis section that bridges the 90-degree angle. This creates a visually pleasing and aerodynamically efficient transition.
- Plant a « Baffle »: Position a tough, wind-tolerant plant like a hardy shrub just before the corner. It will act as a baffle, absorbing the wind’s force and breaking up the airflow before it can get trapped.
By thinking about airflow and disrupting these natural dead zones, you transform problem spots into healthy growing spaces, proving again that design is a more powerful tool than fungicide.
How to Measure Leaf Wetness Duration to Predict Disease?
The presence of water is the final key that unlocks fungal infection. A powdery mildew spore can land on a dry leaf and do nothing. But when that leaf is coated in a thin film of water from dew, rain, or irrigation, the spore is activated. It is not the presence of water, but its duration that is the critical factor. This period is known as Leaf Wetness Duration (LWD), and it is the ticking clock for disease. As disease epidemiology research confirms, most pathogens require that liquid water persists for several hours on plant surfaces before they can successfully infect the plant.
While professional growers use expensive electronic sensors to measure LWD, any home gardener can become an expert observer. The process is simple: you are measuring time. When do the leaves get wet, and, more importantly, when do they get dry? Start observing your garden in the early morning. Are the leaves still beaded with dew at 10 a.m.? That’s a long LWD and a high-risk period. After a rain shower, how long does it take for the foliage in the densest part of your rose bush to dry out compared to the outer leaves? This visual « measurement » gives you invaluable data about where your airflow problems are.
Your goal as a microclimate engineer is to do everything possible to shorten the LWD. All the strategies we’ve discussed—pruning for an open canopy, using permeable fences, breaking corner traps, and proper spacing—are fundamentally aimed at this one goal. They work by allowing air and sunlight to reach the leaves more quickly, evaporating moisture before the fungal clock runs out. Watering in the early morning, so the sun has the whole day to dry the leaves, is a classic LWD management technique. Reducing LWD is the ultimate preventative medicine for your garden.
By shifting your focus from the white powder on the leaf to the invisible film of water that allows it to grow, you move from being a reactive gardener to a proactive disease strategist.
Weeding for Airflow: Removing Ground Cover to Save the Canopy
Airflow management isn’t just about what happens at the canopy level; it’s a ground-up operation. The soil itself is a massive reservoir of moisture. Through evaporation and transpiration from low-growing weeds, this moisture is constantly being released into the air at ground level. In a still garden, this creates a layer of high humidity that can be trapped under the canopy of your roses. At night, as the air cools, this humid layer rises and condenses on the cooler leaves above, effectively bathing them in moisture for hours.
A dense mat of weeds or ground cover exacerbates this problem dramatically. As experts from Portland Nursery note, this mat acts like a ‘wet blanket’ over the soil, trapping ground-level humidity. This creates a « humidity bridge, » a continuous path for moisture to travel from the soil directly into the most vulnerable, dense parts of your rose’s canopy. Clearing this ground cover is not just about aesthetics or nutrient competition; it’s a critical step in severing this bridge and improving ground-level airflow.
A mat of dense weeds acts like a ‘wet blanket’ over the soil, trapping humidity at ground level which then rises into the plant’s canopy at night.
– Portland Nursery, Rose Disease Control Guide
The solution is the « Bare Earth Donut » technique. This involves creating and maintaining a clear radius of bare soil around the base of each rose. This simple gap acts as a firebreak for humidity. It allows air to circulate directly over the soil surface, whisking away evaporating moisture before it can be drawn up into the canopy. Applying a thin, permeable layer of mulch like bark chips can help suppress weed regrowth without recreating the « wet blanket » effect of dense foliage. This technique ensures the air your rose breathes from below is as dry and fresh as the air circulating from above.
By managing the ground beneath your plants with the same care as the plants themselves, you control the very source of the humidity that fuels fungal disease.
The Spacing Mistake That Creates a ‘Fungal Incubator’ in Your Border
One of the most common mistakes in garden design is planting for the « now » instead of the « future. » We place small, young plants close together to achieve an instant full look, ignoring their mature size. When these plants grow and their leaves begin to touch, we unknowingly create a « fungal incubator. » The overlapping foliage blocks all air movement between the plants, trapping humidity and creating a continuous canopy where diseases can spread like wildfire. A single infected leaf can now easily pass spores to its neighbour, and a minor issue quickly becomes a border-wide epidemic.
Proper spacing is perhaps the single most effective, yet most violated, principle of disease prevention. Professional nursery guidelines often recommend that roses should be planted at least 3 feet away from other plants to ensure adequate air circulation. This may seem excessive when you’re planting a small specimen, but it’s an investment in the long-term health of your garden. This space isn’t empty; it’s an « air corridor, » an invisible but essential buffer that keeps each plant’s microclimate separate and healthy. It ensures that even after a heavy rain, the wind can move freely between plants, drying them out quickly and preventing the spread of disease from one to another.
To avoid this mistake, you must plan for the mature size of your plants. Before digging a single hole, research the final width of each variety. Use stakes or draw lines on the soil to mark out the full diameter each plant will eventually occupy. A good rule of thumb for spacing two different plants is to add half the mature width of Plant A to half the mature width of Plant B. This gives you the minimum distance they should be planted from center to center. By designing intentional breezeways and pathways through your borders, you are not just creating access for yourself, but engineering a network of airflow corridors that will serve as your primary defense against fungal disease.
This disciplined approach to spacing transforms your garden border from a potential fungal incubator into a community of healthy, well-ventilated individuals.
The Spacing Mistake That Causes Mildew in Herbaceous Borders
The previous section focused on the horizontal plane—the « x » and « y » axes of your garden bed. However, the microclimate engineer must also consider the third dimension: the vertical « z » axis. A common mistake in herbaceous borders is creating a dense, uniform wall of foliage at a single height. When plants of similar mature heights are packed together, they form a solid hedge-like mass. Air may flow over the top of this mass, but it cannot penetrate down into the foliage, leading to the same problems of stagnation and humidity we’ve seen elsewhere.
The key to vertical airflow is tiered planting, creating what some designers call a « stadium seating » arrangement. This involves placing taller plants at the back of the border, medium-sized plants in the middle, and low-growing plants at the front. This seems like simple, traditional design advice, but its impact on airflow is profound. This staggered arrangement allows air to flow not just between plants horizontally, but also down and over the tops of the smaller plants, ventilating the entire depth of the border from top to bottom. Each plant gets its share of the breeze.
Plant Spacing and Vertical Airflow Dynamics
A comparative study on disease transmission demonstrated that proper spacing is about more than just horizontal distance. Borders where plants were arranged in tiered, « stadium seating » configurations showed dramatically lower incidence of fungal diseases like powdery mildew. The structure allowed air to flow down into the border and circulate around the base of the taller plants, preventing the moisture build-up that occurred in borders planted as a uniform-height hedge. When leaves did get wet in humid weather, this multi-level airflow ensured they dried out significantly faster, breaking the disease cycle before it could start. The research showed that thinking in three dimensions is critical for creating a disease-resistant planting scheme.
This principle also applies to pruning within a single plant. Thinning out upper branches allows more air and light to reach the lower foliage, preventing the common situation where the bottom half of a shrub is perpetually damp and diseased. By combining smart horizontal spacing with thoughtful vertical layering, you create a complex, multi-level ventilation system that is incredibly effective at preventing disease.
Your garden is not a flat drawing; it is a living, three-dimensional space. Designing your planting with height in mind is a sophisticated strategy for ensuring its long-term health and resilience.
Key Takeaways
- Fungal disease prevention is an engineering problem solved by managing airflow, not a chemical problem solved by sprays.
- Stagnation is the enemy. Identify and eliminate « dead zones » in corners, behind solid fences, and within dense foliage.
- Create « airflow corridors » through strategic pruning, permeable barriers, and proper spacing that accounts for plants’ mature size in all three dimensions.
How to Prevent Foliar Diseases in Damp UK Gardens Without Fungicides?
For gardeners in perpetually damp climates like much of the UK, the fight against foliar diseases can seem hopeless. When the air itself is often humid, how can one possibly keep leaves dry? The answer lies in synthesizing all the microclimate engineering principles we’ve discussed into a holistic, resilient system. It requires accepting the ambient conditions and focusing intensely on what you can control: airflow, water application, and plant selection. A fungicide-free approach in a damp climate is not only possible, but it also creates a more robust and self-sustaining garden ecosystem.
First, double down on structure. The « Bare Earth Donut, » open-center pruning, and « stadium seating » spacing are non-negotiable. In a damp climate, you must maximize every opportunity for air to move. Second, you must become a master of water application. This leads to a fascinating and counter-intuitive piece of advice from the highest authority in UK gardening:
Overhead watering in mid-morning in dry weather can reduce powdery mildew.
– Royal Horticultural Society, Rose Powdery Mildew: Symptoms & Control
Why would the RHS recommend wetting the leaves? Because powdery mildew, uniquely among fungi, can thrive in high humidity even without a film of liquid water. A quick, sharp wash-off in the morning can physically dislodge spores, and if done early on a dry, sunny day, the leaves dry quickly, minimizing the Leaf Wetness Duration for other fungi. This is an advanced technique, a calculated risk that demonstrates a true understanding of the enemy. Finally, the most powerful tool is selection. Choose rose varieties that have been bred and tested for disease resistance in your exact conditions. Planting a naturally resistant variety like a Rosa rugosa or a proven performer like ‘Dublin Bay’ is the ultimate engineering solution—it’s designing the problem out of the system from the very start.
By combining robust structure, intelligent watering, and smart plant selection, you can create a thriving rose garden that weathers the dampest of seasons, not just surviving, but flourishing without a drop of chemical fungicide.