Merely meeting permeable paving regulations is insufficient; you must engineer a complete water management system to prevent costly, long-term structural failure.
- The sub-base, not the surface paver, is the most critical component for SUDS compliance and driveway longevity.
- Incorrect jointing compound is the primary cause of frost heave, leading to catastrophic surface blow-outs in winter.
- Runoff from roofs and hardscapes must be calculated and managed via integrated solutions like correctly sized rain gardens to prevent property damage.
Recommendation: Approach any hardscaping project not as a cosmetic update, but as a technical engineering challenge focused on water flow, load-bearing capacity, and lifecycle performance.
For UK homeowners, the prospect of a new driveway or patio is often focused on aesthetics and adding value. However, the reality is governed by a framework of environmental law designed to combat increasing flood risk. The legislation, broadly known as Sustainable Urban Drainage Systems (SUDS), is not merely a bureaucratic hurdle to be overcome. It dictates that any new or replacement driveway or front garden hardstanding over five square metres must be permeable or have provisions to direct runoff to a permeable area. Many homeowners believe that simply choosing a « permeable » paver is enough to satisfy their legal obligations.
This assumption is a critical and potentially very expensive mistake. From a civil engineering perspective, compliance is the absolute minimum standard. The real goal is to construct a resilient, functional system that manages water effectively for its entire lifecycle, preventing both legal issues and catastrophic structural failures. A poorly installed « permeable » driveway is arguably more problematic than a well-drained impermeable one, as it can mask underlying water saturation issues that compromise the integrity of the sub-base and even nearby building foundations.
This guide deconstructs the common failure points and provides the technical specifications necessary to move beyond simple compliance. We will analyse the entire system, from the critical sub-base layers and the science of frost-resistant jointing to the integration of features like decking and rain gardens. This is not about choosing colours; this is about understanding the engineering principles that ensure your investment is both legally sound and built to withstand the unique challenges of the British climate.
This article provides a technical breakdown of the key engineering and legal considerations for residential hardscaping in the United Kingdom. Below is a summary of the critical areas we will analyse to ensure your project’s success and longevity.
Summary: Hardscape Compliance with UK Drainage Law
- Why Your New Driveway Needs to Be Permeable by Law?
- How to Lay Paving on Sand to Prevent Sinking and Cracking?
- Composite or Timber: Which is Less Slippery in Wet British Winters?
- The Pointing Mistake That Blows Out in the First Frost
- How to Wire Outdoor Lighting into Hardscapes Without Shorting?
- Do You Need Planning Permission for Decking in a Conservation Area?
- How Big Should Your Rain Garden Be to Handle Roof Runoff?
- How to Build Rain Gardens to Handle British Storm Surges?
Why Your New Driveway Needs to Be Permeable by Law?
The legal requirement for permeable surfaces on front gardens is a direct response to increased surface water runoff exacerbating flood events across the UK. With urban areas becoming more densely paved, rainwater is channelled directly into over-burdened sewer systems instead of soaking into the ground. The legislation (part of Schedule 2, Part 1, Class F of The Town and Country Planning (General Permitted Development) (England) Order 2015) aims to mitigate this by mandating on-site water management for residential properties. Ignoring this legislation is not a minor oversight; it initiates a formal and potentially costly enforcement procedure from your local authority.
From a legal standpoint, the enforcement process for non-compliance follows a predictable sequence. The discovery of a non-compliant impermeable driveway, often through aerial imagery, planning applications for other works, or neighbour complaints, triggers an investigation. If found to be in breach, the council will issue an enforcement notice. At this point, the homeowner is left with two undesirable options: apply for retrospective planning permission, which is by no means guaranteed and incurs fees, or be forced to remove the entire hardscape at their own expense. This can also create significant legal complications and delays when selling the property, as conveyancing solicitors will identify the lack of planning compliance.
Your Action Plan: Understanding the Enforcement Process
- Local Council discovers non-compliant impermeable driveway exceeding 5m² without planning permission.
- Council issues an enforcement notice requiring you to take corrective action.
- If you wish to keep the impermeable surface, you must apply for retrospective planning permission (typical fee: £150-£206).
- If retrospective permission is refused or not sought, you may be forced to remove the driveway at your own cost.
- When selling your home, lack of proper planning permission can cause costly delays and legal complications.
Therefore, treating the regulations as a core project requirement from the outset is the only financially and legally prudent approach. This is not red tape; it is fundamental risk management.
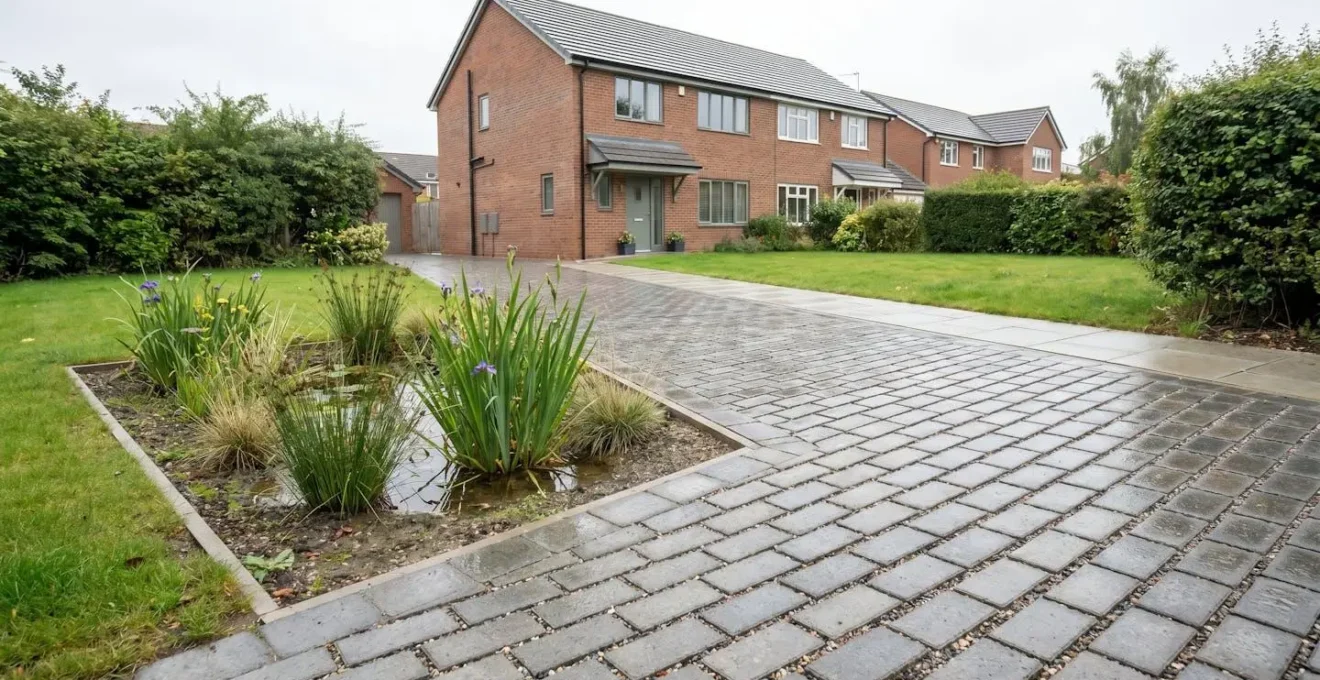
How to Lay Paving on Sand to Prevent Sinking and Cracking?
The term « laying paving on sand » is a dangerous oversimplification that leads to systemic failure. The visible paving slab is merely the surface finish; the structural integrity and permeability of a driveway are dictated entirely by the engineered sub-base beneath it. A correctly specified sub-base performs two functions: it bears the load of vehicles without shifting and allows water to percolate through to the substrate. Failure to construct this correctly will result in sinking, cracking, and a complete loss of permeability, rendering the system non-compliant.
The industry standard for a SUDS-compliant permeable sub-base is MOT Type 3 aggregate (under SHW clause 805). Unlike the more common MOT Type 1, Type 3 has a reduced amount of fine particles. This creates larger voids within the compacted aggregate, allowing water to drain freely. This aggregate must be laid to a minimum depth of 150mm for standard domestic car traffic and be fully contained by a geotextile membrane to prevent it from mixing with the underlying soil (substrate) and losing its drainage capacity. The « sand » layer, correctly termed the laying course, should be a clean, crushed stone or grit (2-6mm), not fine building sand which would clog the system instantly.
As the visual shows, the entire system is a sequence of carefully selected materials. Each layer has a specific function, and omitting or substituting any part compromises the whole. This meticulous construction is why a professionally installed permeable driveway is not a weekend DIY project. The process requires specialist knowledge of materials and compaction techniques.
Checklist: UK SuDS-Compliant Driveway Sub-Base Specification
- Layer 1 (Bottom): Permeable geotextile membrane between substrate and sub-base to prevent sinking and keep sub-base clean.
- Layer 2: Permeable sub-base material – MOT Type 3 SHW clause 805 (reduced fines aggregate) at a minimum 150mm depth for car traffic, compacted in layers.
- Layer 3: Permeable laying course material – 2-6mm clean crushed stone or grit.
- Layer 4: Permeable block paving or slabs.
- Layer 5 (Top): Permeable jointing aggregate – 3-5mm to fill joints and allow water drainage.
Ultimately, the longevity of your hardscape is determined not by the paver on top, but by the quality and correct specification of the unseen layers below.
Composite or Timber: Which is Less Slippery in Wet British Winters?
The selection of decking material, particularly in the persistently damp UK climate, extends beyond aesthetics to a critical matter of safety and lifecycle performance. While traditional timber decking is often favoured for its natural appearance, its properties change dramatically when wet and over time. Composite decking, an engineered product, offers a more consistent and predictable level of slip resistance throughout its lifespan. The difference is measurable and legally significant, assessed using the Pendulum Test Value (PTV), where a higher score indicates better slip resistance.
Freshly installed and treated timber can provide moderate slip resistance. However, wood is a porous, organic material. It absorbs moisture, which fosters the growth of algae and mould, creating a notoriously slippery biofilm. Weathering also smooths the surface texture, further reducing grip. To maintain safety, timber requires aggressive annual maintenance, including power-washing and chemical treatments, which themselves degrade the material over time. Premium composite decking, conversely, has a non-porous polymer cap. This prevents water absorption, significantly inhibiting algae growth. The surface texture, whether an embossed wood grain or a brushed finish, is designed for grip and remains stable over years of exposure.
As the Buildington Analysis Team notes in their report, « Assessing the Non-Slip Performance of Composite Decking in British Climate »:
A timber deck’s slip resistance is at its peak on the day of installation; from that point on, it is in a state of constant degradation.
– Buildington Analysis Team, Assessing the Non-Slip Performance of Composite Decking in British Climate
The following data illustrates the clear performance gap between the materials under wet conditions, which is crucial for making an informed, safety-conscious decision.
| Material Type | Wet PTV Score (Pendulum Test Value) | HSE Risk Classification | Performance Over Time | Maintenance for Slip Safety |
|---|---|---|---|---|
| Premium Composite Decking (wood-grain embossed) | 40-50 | Low Slip Risk | Stable – material does not absorb moisture, preventing algae growth | 80% less deep-cleaning required vs timber |
| Standard Composite Decking (grooved) | 36-45 | Low to Medium Risk | Consistent – polymer cap reduces water absorption | Simple sweep and soapy water rinse |
| Weathered Softwood Timber | Below 25 | High Slip Risk | Degrading – becomes smoother and moisture-retentive over time | Aggressive power-washing and chemical treatments required each spring |
| Hardwood Timber (treated) | 25-35 | Medium Risk | Variable – dependent on treatment maintenance | Annual oiling/staining essential |
From an engineering and risk-assessment standpoint, specifying premium composite decking is a clear decision in favour of long-term, low-maintenance safety in the UK’s wet environment.
The Pointing Mistake That Blows Out in the First Frost
The most common and catastrophic failure point in UK patios and paving is not the stone itself, but the material used to fill the joints—the pointing. Traditional sand and cement mortar is a fatal mistake for any modern paving system, especially a permeable one. It is rigid, impermeable, and brittle. When water inevitably finds its way into microscopic cracks, it becomes trapped. During a frost, this trapped water freezes, expands with immense force (a process known as frost heave or cryosuction), and shatters the mortar, often dislodging the paving slabs themselves. The result is a system that has failed completely, requiring expensive and extensive repairs.
The engineered solution is to use a modern, permeable jointing compound specifically designed to withstand UK freeze-thaw cycles. These compounds are fundamentally different from mortar. They are formulated to be water-permeable, allowing rainwater to drain through the joints and into the permeable sub-base below, which is the entire point of a SUDS-compliant system. Furthermore, they possess a degree of flexibility that allows them to expand and contract with temperature fluctuations without cracking or losing their bond. This prevents the initial ingress of water that leads to frost heave. Proper application is critical: these compounds must be applied in dry conditions and on surfaces with a temperature above 5°C to cure correctly.
Checklist: Specifying Permeable Jointing Compound for UK Conditions
- Requirement 1: Water-permeable formulation – allows water to drain through rather than trap it, preventing frost heave.
- Requirement 2: Strong but flexible composition – expands and contracts without cracking through freeze-thaw cycles.
- Requirement 3: No shrinking properties – stays intact even after repeated temperature fluctuations.
- Application guideline: Apply only in dry conditions with surface temperature above 5°C.
- Maintenance: Regular debris brushing to prevent organic material blocking permeability.
Choosing the correct jointing material is not an upgrade; it is an essential specification to prevent the predictable and destructive effects of British winter weather on your hardscaping investment.
How to Wire Outdoor Lighting into Hardscapes Without Shorting?
Integrating outdoor lighting into a hardscape requires meticulous planning to prevent the dual risks of electrical shorts and future access nightmares. The key principle is to treat the electrical system as an integral part of the hardscape’s foundation, not an afterthought. All wiring must be specified and installed *before* the final sub-base and paving layers are laid. Attempting to retrofit wiring into a completed permeable driveway is impractical, costly, and risks compromising the entire engineered structure.
For safety and durability, all buried cabling must be fit for purpose. The UK standard for direct burial is Steel Wire Armoured (SWA) cable. Its metallic sheath provides robust protection against accidental damage from spades or ground settlement. All connections and transformers must be housed in appropriate waterproof enclosures with a minimum rating of IP67, signifying they are protected from dust ingress and temporary immersion in water. For in-ground uplighters installed within the paving itself, an IP68 rating is essential, as these fittings may be permanently submerged in a saturated permeable sub-base during heavy rain.
A further engineering consideration is the use of low-voltage (12V) lighting systems. These systems use a transformer to step down the mains 230V supply, significantly reducing the risk of severe electric shock. They are inherently safer for garden environments, especially where children or pets are present. The most robust installation method involves running SWA cable from the house to a waterproof outdoor junction box, where the transformer is housed. From there, dedicated low-voltage outdoor cable can be run in flexible conduit to the individual light fittings. This conduit should be laid within the sub-base layer, with its position carefully mapped and photographed before the final paving is installed to aid any future maintenance.
Failure to adhere to these electrical specifications not only creates a significant safety hazard but also guarantees system failure when the wiring inevitably shorts out due to water ingress or physical damage.
Do You Need Planning Permission for Decking in a Conservation Area?
The rules governing permitted development—work you can do without applying for planning permission—are significantly more restrictive in what are termed ‘designated areas’. Homeowners in these locations must exercise extreme caution before undertaking any hardscaping project, including building a deck. These designated areas include Conservation Areas, National Parks, Areas of Outstanding Natural Beauty (AONB), World Heritage Sites, and the Norfolk or Suffolk Broads. If your property falls within one of these zones, you cannot assume that standard permitted development rights apply.
In a Conservation Area, the local authority’s primary goal is to preserve or enhance the special architectural or historic character of the zone. A modern composite deck, for example, could be deemed out of character. Therefore, work that would not require permission elsewhere, such as decking that is not more than 30cm above the ground, may well require a full planning application in a Conservation Area. The application fee itself is relatively minor, typically around £150 according to Royal Horticultural Society guidance, but the critical point is that permission may be refused. Proceeding without checking and being served an enforcement notice to remove the structure is a significant financial risk. The only correct procedure is to contact your local council’s planning department before committing to any design or materials.
Checklist: Verifying Planning Requirements for Your Property
- Step 1: Identify if you live in a ‘designated area’ – Conservation Area, World Heritage Site, National Park, Area of Outstanding Natural Beauty, or Norfolk/Suffolk Broads.
- Step 2: Understand that in designated areas, permitted development rights are more restricted than in standard residential zones.
- Step 3: Check with your local council’s planning department before starting any decking or paving work, regardless of its size.
- Step 4: Be aware that for conservation areas specifically, you may need to apply for planning permission for work that does not need an application elsewhere.
- Step 5: Visit the government’s Planning Portal and select your region (England, Wales, Scotland, Northern Ireland) for specific local requirements.
In short, when in a designated area, the default assumption must always be that planning permission is required until the local authority explicitly confirms otherwise in writing.
How Big Should Your Rain Garden Be to Handle Roof Runoff?
A rain garden is not a decorative pond; it is a shallow, engineered depression designed to capture, temporarily hold, and filter runoff from impervious surfaces like roofs and driveways. Its size is therefore not an aesthetic choice but a technical calculation based on the amount of water it needs to manage. An undersized rain garden will be overwhelmed in a storm, failing to prevent runoff and erosion. An oversized one may not drain quickly enough, creating a boggy, potentially hazardous area. The goal is to create a basin that can hold the runoff from a typical storm and allow it to infiltrate the ground within 24-48 hours.
As a rule of thumb for initial planning, the surface area of the rain garden should be approximately 20% of the impervious area it is draining. For example, to handle the runoff from a 50m² roof section, you would need a rain garden of about 10m². The depth is also critical; a rain garden should be a shallow basin, typically only 15-20cm deep, to ensure it drains quickly and does not pose a safety risk. Deeper excavation is required to amend the soil for optimal drainage, but the surface depression itself remains shallow. This shallow design is a key safety feature, ensuring that even when full, the garden is little more than a large puddle.
Crucially, the location of the rain garden is governed by building regulations. To prevent water from saturating the ground near your home’s foundations and causing damp or structural issues, any soakaway feature, including a rain garden, must be sited at least 5 metres from any building foundation. This is a non-negotiable legal and structural safety requirement. The rain garden acts as the final component in your property’s SUDS, taking the water directed from permeable paving or roof downpipes and returning it safely to the ground.
Properly sizing and locating your rain garden transforms it from a simple planting feature into a critical piece of your home’s flood resilience infrastructure.
Key Takeaways
- The structural integrity and compliance of a permeable driveway are determined by the engineered sub-base (e.g., MOT Type 3), not the surface paver.
- Using impermeable mortar for pointing is the single most common cause of paving failure in the UK, with frost heave leading to catastrophic damage. A flexible, permeable jointing compound is mandatory.
- A hardscape is not a standalone feature but part of an integrated water management system that must safely handle runoff from the entire property, often requiring features like correctly sized rain gardens.
How to Build Rain Gardens to Handle British Storm Surges?
The increasing intensity of rainfall in the UK demands more robust residential water management solutions. Analysis of recent weather events shows a clear trend; according to recent UK storm event analysis, some recent winter months have seen significantly higher rainfall than historical averages, placing unprecedented stress on drainage systems. A well-constructed rain garden is a highly effective way to manage these storm surges at a property level, but its success is entirely dependent on its internal structure, especially in areas with heavy clay soil which is common across Britain.
A rain garden in clay soil cannot be a simple hole filled with topsoil; it will turn into a stagnant pond. It must be engineered with distinct layers to facilitate drainage and infiltration. The process involves excavating a basin and replacing the dense native clay with a structured profile of more porous materials. The top layer provides the growing medium for carefully selected native, moisture-tolerant plants. Below this, a sand layer acts as a transition, preventing the topsoil from washing down and clogging the gravel base. The gravel layer at the bottom serves as the primary reservoir, storing the initial surge of water and allowing it to percolate slowly into the surrounding substrate. For sites with particularly poor drainage, a perforated pipe can be installed at the base to carry excess water to another drainage point.
Checklist: Layered Construction for Rain Gardens in UK Clay Soils
- Layer 1 (Top, 20-30cm): Topsoil/compost mix enriched with organic matter to support native plant growth.
- Layer 2 (Middle, 15-20cm): Sand layer to improve drainage in heavy clay conditions.
- Layer 3 (Base, 20-30cm): Gravel base for water storage and gradual infiltration.
- Optional enhancement: For very poor-draining sites, install a perforated drainage pipe at the base of the gravel layer.
- Overflow provision: Design a clearly visible overflow path or channel to direct excess water safely away from the house during intense storm surges.
Ultimately, constructing a hardscape that complies with UK regulations is not about ticking boxes, but about adopting a holistic, engineering-led approach. By treating your driveway, decking, and garden as a single integrated water management system, you not only satisfy legal requirements but also create a durable, safe, and resilient asset that protects your property from the increasing challenges of the British climate. The next logical step is to commission a formal site survey to assess your specific ground conditions and calculate the precise requirements for your property.