In summary:
- Stop fighting the narrow shape of your garden; instead, use optical illusions to change how you perceive it.
- Diagonal lines, staggered focal points, and blurred boundaries are your most powerful tools to create a sense of width and depth.
- The biggest mistake is visual clutter. A few bold, well-scaled items create more space than dozens of small ones.
- Successful narrow garden design is less about landscaping and more about applied psychology for outdoor spaces.
The classic Victorian terraced house garden often feels more like a bowling alley than a tranquil retreat. It’s a long, narrow strip, hemmed in by fences, where any attempt at planting or furnishing seems to only emphasize the cramped dimensions. The common advice—paint the fences white, create some zones—often falls short because it addresses the symptoms, not the root cause. The issue isn’t just a lack of physical space; it’s a problem of perception. Your eye is drawn down a straight, featureless corridor to the back fence, and the brain instantly registers « long and thin. »
But what if the solution wasn’t about fighting these dimensions, but about hacking them? What if you could use the principles of optical illusion and forced perspective to trick the eye into seeing width, depth, and movement? This guide moves beyond generic tips and into the realm of spatial psychology for the garden. It’s about understanding how the brain perceives space and using that knowledge to reshape your outdoor reality. We’re not just adding plants; we’re curating an experience and manipulating sightlines.
This article will deconstruct the clever, optical-based strategies that professional designers use to transform narrow plots. We will explore how to bend sightlines, create false depth, manage scale, and soften the hard edges that make your garden feel like a container. Prepare to stop seeing your garden as a problem to be solved and start seeing it as a canvas for compelling illusion.
To navigate these spatial strategies, we’ve broken down the core principles into a clear, structured guide. The following summary outlines the key optical tricks and design secrets we’ll be exploring to help you reclaim your narrow outdoor space.
Summary: A Guide to Optical Flow and Spatial Illusion
- Why Diagonal Paths Make Narrow Gardens Look 30% Wider?
- How to Create ‘Rooms’ Without Making the Garden Feel Claustrophobic?
- Focal Points: Where to Place Them to Draw the Eye to the End?
- The Path Width Mistake That Ruins Flow When Plants Grow
- Vertical Gardening: How to Green Walls Without Losing Floor Space?
- Why Trailing Plants Make Small Concrete Spaces Feel Larger?
- The Scale Error DIYers Make That Shrinks the Garden Visually
- Softscape Vegetation to Soften Harsh Concrete Lines in Modern Builds
Why Diagonal Paths Make Narrow Gardens Look 30% Wider?
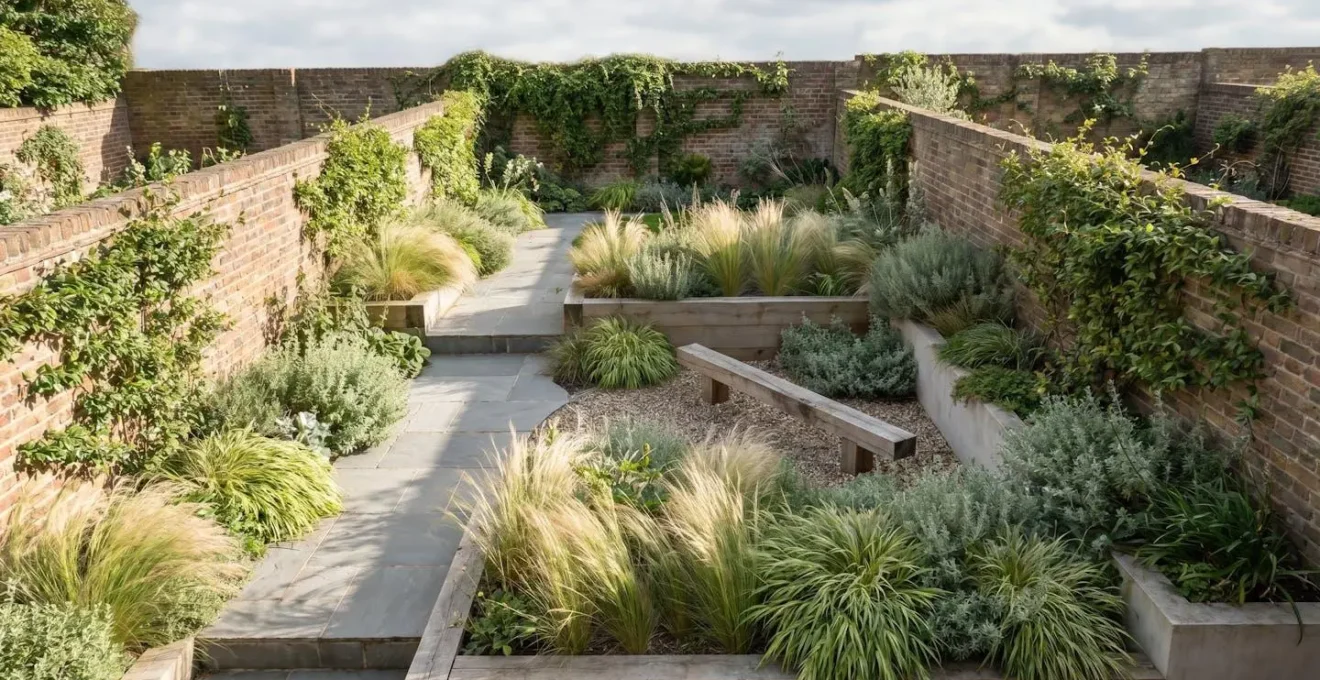
The single straight path is the cardinal sin of narrow garden design. It creates a powerful visual runway that rockets the eye directly to the back fence, emphasizing the garden’s length and lack of width. The solution is a powerful piece of perceptual hacking: the diagonal line. A diagonal path or paving pattern forces the eye to move from side to side as it travels the length of the garden. This lateral eye movement is the key; it physically makes the journey longer and tricks the brain into interpreting the space as wider than it is.
This isn’t just a vague feeling; it’s a deliberate technique. Landscape designer Karen Chapman famously demonstrated this by turning a tiny backyard’s paver patios 45 degrees to the house, which immediately created the illusion of greater depth. The space didn’t change, but the perception of it did. In fact, some landscape architects recommend that 30°, 45°, or 60° diagonal layouts are one of the most effective tools for opening up sightlines in constrained plots. By laying pavers in a zigzag or herringbone pattern, you create a kinetic illusion of movement and width.
As this image demonstrates, the diagonal lines create a dynamic rhythm. The eye doesn’t just shoot forward; it’s encouraged to scan across the space, taking in more of the garden’s width. This forced perspective is a simple yet profoundly effective way to counteract the « bowling alley » effect and make your garden feel more generous and engaging.
Ultimately, by refusing to align with the garden’s narrow axis, you fundamentally change the conversation your space is having with the viewer’s brain.
How to Create ‘Rooms’ Without Making the Garden Feel Claustrophobic?
The concept of « garden rooms » is a popular one, but in a narrow space, the execution is critical. Solid barriers like tall hedges or trellises can quickly turn « zoning » into « imprisonment, » making the garden feel even more claustrophobic. The secret lies in creating permeable divisions—barriers that suggest separation without completely obstructing the view. This creates intrigue and a sense of discovery, as the full extent of the garden isn’t revealed all at once.
A brilliant example is a South London family garden designed by Jack Wallington. As highlighted in a case study by Gardens Illustrated, he transformed a single-view plot into a series of functional zones using irregular shapes, a sunken terrace, and a wooden screen that acted as a « frame » rather than a solid wall. This approach defined a barbecue area and vegetable beds without building walls, creating multiple destinations within the narrow space.
You can achieve this effect with simpler tools. Think about defining zones with a change in ground texture—moving from paving slabs to a patch of gravel or a small deck. Use low-slung box hedges with « windows » cut into them, or group large containers to suggest the corner of a room. These techniques provide psychological separation while maintaining sightlines, which is especially crucial for families needing to supervise children at play. The goal is to obscure, not block, creating a slow reveal that makes the garden feel larger and more mysterious.
By using these permeable dividers, you interrupt the single, long view, replacing it with a series of smaller, more interesting vignettes that invite exploration.
Focal Points: Where to Place Them to Draw the Eye to the End?
The title’s question contains a common misconception. In a narrow garden, the very last thing you want to do is place a single, compelling focal point at the far end. This acts like a target, encouraging the eye to race down the length of the garden and confirming its narrowness. A far more clever strategy is to use a series of staggered focal points to lead the eye on a zigzag journey, reinforcing the diagonal illusion we discussed earlier. This technique of forced perspective slows down the visual journey and makes it more engaging.
A series of focal points in a view allows your eye to travel around a garden from one to the next, holding your interest.
– Open University Garden Design Course, OLCreate Garden Design Techniques: Focal Point
Instead of one big sculpture at the end, imagine this: a brightly coloured pot on the left-hand side, a third of the way down. Further on, on the right, a distinctive specimen plant with interesting foliage. Finally, near the back but not quite at the end, a small bench on the left. Your eye is now forced to hop from point to point, scanning the width of the garden. Each focal point becomes a temporary destination, a pause in the journey. Professional designers often use this technique on winding paths, placing features at each turn to create an immersive experience.
The focal points themselves don’t have to be grand. A bird bath, a small water feature, a beautifully shaped shrub, or even a striking piece of outdoor art can work. The key is their strategic placement—offset from the central axis—to break up the linear view and create that all-important kinetic illusion of movement and width.
This approach transforms the garden from a simple corridor into a curated gallery, where each piece holds your attention before passing you on to the next.
The Path Width Mistake That Ruins Flow When Plants Grow
One of the most common and frustrating DIY mistakes is underestimating the space that plants will occupy at maturity. A path that seems perfectly generous on day one can become an impassable thicket within two seasons as border plants spill over the edges. This doesn’t just impede physical flow; it creates a sense of visual clutter and chaos that makes the entire garden feel cramped and poorly maintained. Planning for mature plant overhang is not a detail; it’s fundamental to long-term success.
While secondary paths can be narrower, for a primary walkway that needs to feel comfortable and functional, garden design experts recommend a minimum width of 4 feet (120cm). This allows two people to walk side-by-side or provides easy access for a pushchair or wheelchair. However, this measurement is for the *cleared space*, not just the paving. If you are planting borders, you must add an allowance for growth.
A good rule of thumb is to add an extra 4-12 inches (10-30cm) of width to your path on each side that has planting. This « buffer zone » will be invisible at first, but it will be the very thing that preserves the integrity of your design as plants fill in. For a family garden, it’s also wise to consider the « scooter corridor »—will a child on a riding toy still be able to pass once the lavender has bushed out? This requires careful planning from the start.
Your Path Width Audit: A 4-Step Plan
- Calculate Base Width: Start with 3-4 feet (90-120cm) for any primary path to ensure comfortable passage for two people or wheelchair/pushchair access.
- Add Mature Plant Overhang: Include an additional 4-12 inches (10-30cm) on each side of the path to accommodate stems and leaves that will spill over the edges.
- Include Equipment Clearance: If the path must be used for a wheelbarrow or lawnmower, ensure the final cleared width is at least 3 feet (90cm) after accounting for plant overhang.
- Test the ‘Scooter Corridor’: Mentally (or physically) check if a child on a small toy can pass when border plants are at their mature size, typically requiring 30-36 inches (75-90cm) of total clearance.
Failing to account for this growth is the difference between a garden that flows and one that fights back. It’s a simple calculation that saves years of frustration.
Vertical Gardening: How to Green Walls Without Losing Floor Space?
In a narrow garden, every square inch of floor space is prime real estate. The boundary walls and fences, often seen as constraints, are actually your greatest untapped assets. Vertical gardening is the art of transforming these flat, two-dimensional surfaces into lush, three-dimensional features without sacrificing a single inch of valuable ground. This isn’t just about hanging a few pots; it’s about creating living walls that add depth, texture, and interest.
This approach can be both beautiful and productive. A case study on GardenDesign.com shows how a narrow backyard was transformed by cladding an existing retaining wall with a lush vertical garden. This not only added a huge amount of greenery but also created a stunning backdrop for a spa area, effectively maximizing the vertical dimension to enhance the limited floor space. Modern systems of wall-mounted planters, felt pockets, and trellises make it easier than ever to create these effects.
Moreover, vertical gardens can be incredibly family-friendly. As the image shows, you can design them to be accessible and interactive. Imagine wall-mounted planters with strawberries, cherry tomatoes, and herbs like mint and basil positioned at a child’s height. This not only greens the space but also turns the garden into a sensory, edible classroom. By layering textures—placing darker, larger-leafed plants at the bottom and lighter, finer-textured ones higher up—you can even create an illusion of vertical depth on a flat wall.
This strategy effectively doubles your planting area, drawing the eye upward and away from the narrow floor plan, making the entire space feel richer and more expansive.
Why Trailing Plants Make Small Concrete Spaces Feel Larger?
Modern builds often feature small, concrete-heavy courtyards or patios that feel harsh, sterile, and confined. In these spaces, trailing plants are not just decoration; they are powerful tools for boundary dissolution. Their cascading habit is uniquely effective at softening the hard, right-angled junctions between vertical walls and horizontal floors. This blurring of lines is an optical trick that makes it difficult for the eye to perceive the true, small dimensions of the space.
As one expert from Garden Design Principles notes, trailing plants « work by blurring the hard, defined lines between horizontal and vertical surfaces. This ambiguity tricks the eye. » When cascades of ivy, creeping jenny, or trailing petunias flow from hanging baskets, window boxes, and the edges of tall planters, they create ‘green waterfalls’. These living curtains dissolve the rigid architecture, replacing sharp corners with soft, organic forms. The eye is no longer certain where the wall ends and the floor begins, and this visual ambiguity creates a sense of greater space.
The effect is one of integration. The plants become a bridge between the different planes of the garden, stitching them together into a more cohesive and naturalistic whole. This is particularly effective against stark materials like concrete or brick, where the contrast between the soft, moving foliage and the static, hard surface is most dramatic. The constant, gentle motion of the leaves in the breeze also adds a dynamic quality that static, upright plants cannot.
By using trailing plants to intentionally obscure the garden’s skeleton, you distract from its restrictive dimensions and create a softer, more immersive environment.
The Scale Error DIYers Make That Shrinks the Garden Visually
When faced with a small space, our intuition often tells us to use small things. We fill our narrow gardens with an assortment of small pots, small ornaments, and undersized furniture. The result is almost always the opposite of what we intend: the space feels cluttered, chaotic, and even smaller. This is because the eye gets bogged down by the « visual friction » of processing dozens of tiny items. The most significant scale error is thinking small. In reality, boldness creates space.
A few bold, large-scale planters or a single large bench create a sense of calm and space, whereas a collection of small items creates visual clutter and chaos that makes the space feel smaller.
– Garden Design Psychology Experts, Small Garden Design Principles
Instead of ten small terracotta pots, opt for three very large, identical planters. Instead of a flimsy bistro set, choose a single, substantial L-shaped bench that tucks into a corner. These large elements act as anchors. They have presence and purpose, which gives the eye a clear, calm place to rest. This reduces visual noise and creates a feeling of simplicity and order, which the brain interprets as spaciousness. Landscape designer Lee Burkhill perfectly illustrated this in a child-friendly garden redesign, where a single, well-designed wooden playhouse felt far more integrated and made the garden feel more spacious than a messy assortment of small plastic toys.
The key is confident editing. Be brave enough to choose fewer, bigger things. A single large, round water bowl will have more impact and create a greater sense of space than a collection of smaller water features. This counter-intuitive approach—going big in a small space—is one of the most effective strategies for overcoming the visual clutter that shrinks your garden.
By giving each element room to breathe, you allow the space itself to feel more generous and composed.
Key takeaways
- The most powerful design tool in a narrow garden is not a spade, but an understanding of optical illusion.
- Create movement and width by forcing the eye to travel side-to-side using diagonal paths and staggered focal points.
- Always plan for mature plant size, especially path widths, to ensure the garden’s flow improves, not degrades, over time.
Softscape Vegetation to Soften Harsh Concrete Lines in Modern Builds
While hardscaping provides the skeleton of a garden, it’s the softscaping—the living, breathing plant life—that gives it soul and grace. In modern builds with their prevalent concrete patios and stark boundary walls, the role of vegetation is to counteract this rigidity. The right planting can soften harsh lines, add texture, and introduce movement, transforming a sterile box into a gentle, inviting space. The key is to choose plants that offer a textural contrast to the hard surfaces.
The goal is to create year-round softness. Ornamental grasses are invaluable here. The gentle swaying of Stipa tenuissima (Mexican feather grass) or the graceful arch of Hakonechloa macra (Japanese forest grass) provides a constant, rustling motion that stands in beautiful opposition to the static nature of concrete. For a family garden, creating a tactile border with soft Lamb’s Ear (Stachys byzantina), fluffy Pennisetum grasses, and the smooth, cool leaves of Bergenia can provide a wonderful sensory experience for children.
It’s also vital to plan for winter, when deciduous plants die back and the garden’s hard skeleton is most exposed. As many landscape designers recommend a year-round softness strategy, incorporating evergreen plants with soft textures is essential. Dwarf conifers, evergreen ferns, and evergreen sedges like Carex provide a persistent softening effect. By layering these textures—placing darker, larger-leafed evergreens at the base and transitioning to lighter, finer-textured grasses and perennials higher up—you ensure the harsh lines of the hardscaping are always buffered by a layer of green.
Ultimately, this thoughtful use of softscape transforms the garden from a collection of hard surfaces into a cohesive, living environment where nature and structure are in a harmonious, balanced dialogue.